Bandwidth Limitation for PPTP Users on RV016, RV042, RV042G and RV082 VPN Routers
Available Languages
Objective
Point-To-Point Tunneling Protocol (PPTP) is a network protocol used in the implementation of a Virtual Private Network (VPN). A computer that supports PPTP can create a VPN tunnel with a PPTP server in your network. A PPTP Server allows you to connect securely from a remote location (such as your home) to a Local Area Network (LAN) located in another location, such as your workplace office.
The objective of this article is to show how to limit the bandwidth (upload or download) for clients connected to the router via a PPTP VPN tunnel. Bandwidth limits allow more users to access the router without a decrease in performance. This article explains how to limit the upload speed of PPTP users on RV016, RV042, RV042G and RV082 Series VPN Routers
Applicable Devices
• RV016
• RV042
• RV042G
• RV082
Software Version
• v4.2.2.08
Limit Bandwidth for PPTP Users
Test the Connection Speed
Step 1. Check for an appropriate speed testing website and perform a speed test for the upload and download speeds.
Step 2. Note the download and upload speeds for further reference. These will be compared to the speeds after bandwidth limitations are applied. Our test had a download speed of 1.92Mb/s and an upload speed 1.95 Mb/s.
PPTP Server Configuration
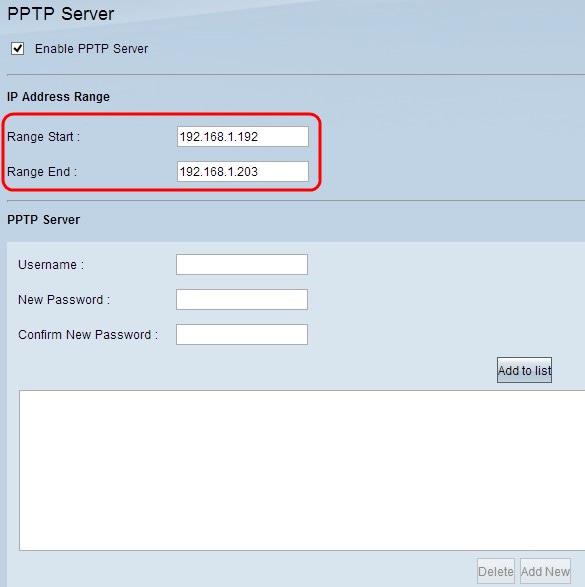
Step 1. Log in to the the Router Configuration Utility and choose VPN > PPTP Server. The PPTP Server page opens:


Step 2. Check the Enable PPTP Server check box to enable the PPTP Server on the device.

Step 3. Enter the starting range of the LAN IP address assigned to the first PPTP VPN client in the Range Start field. The default IP is 192.168.1.200.
Step 4. Enter the last LAN IP address of the range assigned to the last PPTP VPN client in the Range End field. The default is 192.168.1.204.

Step 5. Enter a username for the VPN client in the Username field.
Step 6. Enter a password for the VPN client in the New Password field.
Step 7. Enter the same password again in the Confirm New Password field.
Step 8. Click Add to List. This adds the user to the list.

Step 9. Click Save to save the settings.
Step 10. (Optional) If you want to delete any username, click the respective username and click Delete.
Step 11. (Optional) To refresh the data, click Refresh.

The Connection List is a read-only list that shows information of VPN clients. You need to configure PPTP VPN connection on Windows for the connection list table. To set PPTP connection for Windows, please refer to the article Configuration of PPTP Server on a RV082, RV042, RV042G and RV016 for Windows. The Refresh button updates the data displayed in the Connection List.
Note: Your download speed should not be affected greatly but your upload speed may be low. If the upload speed is low, disable Stateful Packet Inspection (SPI) settings under Firewall > General and click Save Settings. The Router’s firewall uses Stateful Packet Inspection (SPI) to review the information that passes through the firewall. It inspects all packets based on the established connection, prior to passing the packets for processing through a higher protocol layer.
Set rate Limit
This section explains how to configure the rate limit for the addresses in DHCP range.
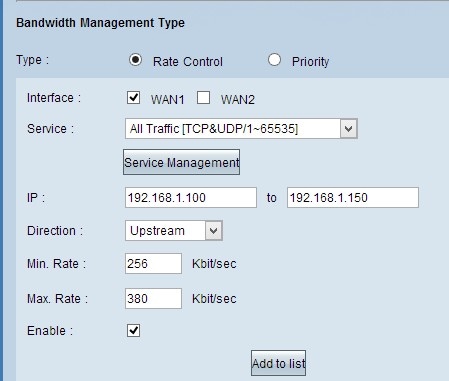
Step 1. In the router configuration utility choose System Management > Bandwidth Management. The Bandwidth Management page opens:

Step 2. In the Bandwidth Management Type section, click Rate Control so that it controls the minimum and maximum rate for both upstream and downstream bandwidth.

Step 3. In the Interface field, check WAN1.
Step 4. In the Service drop-down list, choose [All/~].
Step 5. In the IP field, enter the IP address range.
Note: To limit the bandwidth of your PPTP clients, make sure their LAN IP address is within this range. The LAN IP address was determined in Step 3 of the section PPTP Server Configuration.
Step 6. In the Direction drop-down list, choose Downstream.
Step 7. In the Min. Rate field, enter the minimum rate of guaranteed bandwidth for the user.
Step 8. In the Max. Rate field, enter the maximum rate of guaranteed bandwidth for the user.
Step 9. Check Enable to use this rate control rule.
Step 10. Click Add to list to update this rule.
Step 11. To apply the Upstream limit for the range, repeat Step 3 through Step 10 with the Direction drop down list selection as Upstream.

Step 12. (Optional) To delete an entry, select the respective entry and click Delete.
Step 13. (Optional) To create a new entry, click on Add New and re-enter the fields according to your requirements.
Step 14. Click Save to save the settings.
Speed with Bandwidth Limitation Enabled
Step 1. Perform another speed test and compare to your initial results to verify that the configuration is working.
Note: The second speed test in our example resulted in download speeds of 1.49 Mb/s to 1.62 Mb/s and upload speeds of 0.20 Mb/s to 0.38 Mb/s. The initial speed test had an upload speed of 1.95 Mb/s and you can see that the bandwidth limit was effective.
Revision History
| Revision | Publish Date | Comments |
|---|---|---|
1.0 |
11-Dec-2018 |
Initial Release |
 Feedback