System Log Configuration on RV215W
Available Languages
Objective
Logs are records of network events. They are important tools that are used to understand how a network works. Logs are also useful for network management and debugging. The RV215W can record the logs itself, send the logs to a remote server, or send the logs to an e-mail address.
This article explains how to configure and view on the RV215W.
Applicable Devices
• RV215W
Software Version
• 1.1.0.5
Log Configuration
Log Settings
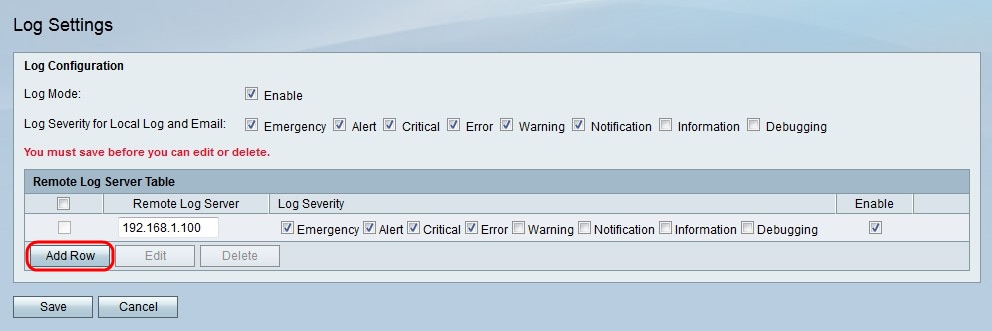
Step 1. Log in to the web configuration utility and choose Administration > Logging > Log Settings. The Log Settings page opens:

Step 2. Check Enable in the Log Mode field to enable Logs.
Step 3. Check the check box that corresponds to the types of logs you want to receive. The logs are ordered based on severity. When a box is checked, all logs that have higher severity are also checked. The following log severity levels are listed from highest to lowest.
• Emergency — The system is unusable.
• Alert — Action is needed.
• Critical — The system is in critical condition.
• Error — The system is in error condition.
• Warning — A system warning occurred.
• Notification — A system notice occurred.
• Information — Device information.
• Debugging — Provides detailed information about an event.

Step 4. Click Add Row to add a remote log server.
Step 5. Enter the IP address of the remote server that is to collect log data in the Remote Log Server field.
Step 6. Check the check box that corresponds to the desired types of logs you want the remote server to receive. The logs are ordered based on severity. When a box is checked, all logs that have higher severity are also checked.
Step 7. Check Enable to enable the remote log server.
Step 8. Click Save.
E-mail Log Settings
Step 1. Log in to the web configuration utility and choose Administration > Logging > E-mail Settings. The E-mail Settings page opens:

Step 2. Check Enable in the E-mail Logs field to configure and enable e-mail logs.
Note: The minimum severity of logs that will be sent to the e-mail is displayed in the Minimum Email Log Severity field. Click Configure Severity to configure the type of logs sent.
Step 3. Enter the address of the Simple Mail Transfer Protocol (SMTP) server that is associated with the e-mail address in the E-mail Server Address field.
Step 4. Enter the port that is used with the SMTP server in the E-mail Server Port field.
Step 5. Enter an e-mail address in the Return E-mail Address field. The return e-mail address is used if the send to e-mail addresses are not available.
Step 6. Enter an e-mail address for the RV215W to send logs to in the Send E-mail Address field (1).
Note: The RV215W can send logs to two additional e-mails. Enter these emails in the Send to E-mail Address (2) and Send to E-mail Address (3) fields.
Step 7. Check Enable in the E-mail Encryption (SSL) field to encrypt the e-mails. Secure Sockets Layer (SSL) is a cryptographic protocol that provides communication security through the encryption of data.
Step 8. From the Authentication with SMTP Server drop-down list choose the type of authentication method that is required by the SMTP server.
Step 9. If the SMTP server requires authentication enter the e-mail username in the E-mail Authentication Username field.
Step 10. If the SMTP server requires authentication enter the e-mail password in the E-mail Authentication Password field.
Step 11. (Optional) Click Test to test the configured e-mail authentication.
Step 12. From the Unit drop-down list choose an option that corresponds to the desired time the logs should be sent.
• Never — The logs are never sent.
• Hourly — The logs are sent hourly.
• Daily — The logs are sent daily. From the Time drop-down lists choose a time for the logs to be sent.
• Weekly — The logs are sent weekly. From the Day and Time drop-down lists choose a day and time for the logs to be sent.
Step 13. Click Save.
View Logs
Step 1. Log in to the web configuration utility and choose Status > View Logs. The View Logs page opens:

The following displays information about the system log table.
• Log Index — The index number of the log.
• Log Time — The time the log was recorded.
• Log Severity — The type of log
• Description — A brief description of the log.
Step 2. Check the box that corresponds to the types of logs you want to filter in the Filter: Log Severity Matches field. The logs are ordered based on severity. When a box is checked, all logs that have higher severity are also checked. The following log severity levels are listed from highest to lowest.
• Emergency — System is unusable.
• Alert — Action is needed.
• Critical — The system is in critical condition.
• Error — The system is in error condition.
• Warning — A system warning occurred.
• Notification — A system notice occurred.
• Information — Device information.
• Debugging — Provides detailed information about an event.
The following options are available for the View Logs page.
• Refresh Rate — From the Refresh Rate drop-down list choose an interval for the log table to refresh.
• Refresh Logs — Click Refresh Logs to refresh the log table.
• Clear Logs — Click Clear Logs to clear the log table.

• Save Logs — Click Save Logs to open or save the logs.
 Feedback