User Settings Configuration on RV215W
Available Languages
Objective
The RV215W allows both an administrator account and a guest account. The administrator can make changes to the router while the guest account has read-only access.
Password complexity allows a network administrator to create a stronger password for network access. It makes the network more secure.
This article explains how to configure the user and password settings on the RV215W.
Applicable Devices
• RV215W
Software Version
• 1.1.0.5
User Settings Configuration
Step 1. Log in to the web configuration utility and choose Administration > Users. The Users page opens:

Account Activation
This procedure explains how to enable a guest account on the device.

Step 1. Check the Active check box to enable a guest account on the Rv215W. Guest account allows multiple users to connect to the device but with read only access.
Note: The Guest account can be enabled only by the administrator.
Step 2. If the user wants to change only the guest enable settings then click Save at the bottom of the page.
Administrator Account Settings
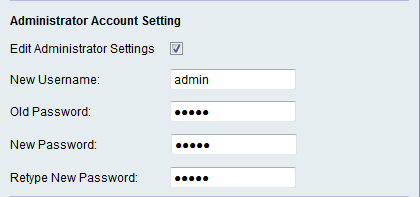
This procedure explains how the administrator can make changes to the administrator account settings. Periodic changes to the administrator account increase the account security.

Step 1. Check the Edit Administrator Settings check box to edit the settings of the administrator.
Note: The default administrator username and password is cisco.
Step 2. Enter the new username of the administrator in the New Username field.
Step 3. Enter the old password of the administrator in the Old Password field.
Step 4. Enter the new password for the administrator in the New Password field. The password can contain Uppercase, Lowercase, numbers and symbols. The password can be up to 64 characters long.
Step 5. Enter the new password again in the Retype New Password field. The password must match the new password in the previous step.
Step 6. If the user only wants to change the guest enable and administrator settings then click Save at the bottom of the page.
Guest Settings
This procedures explains how the administrator can make changes to the guest account settings.

Note: The Guest settings can be edited only if the Guest Account is enabled in the Account Activation area.
Step 1. Check the Edit Guest Settings check box to edit the settings of the administrator.
Step 2. Enter the new username of the guest in the New Username field.
Step 3. Enter the old password of the guest in the Old Password field.
Step 4. Enter the new password for the guest in the New Password field. The password can contain Uppercase, Lowercase, numbers and symbols. The password can be up to 64 characters long.
Step 5. Enter the new password again in the Retype New Password field. The password must match the new password in the previous step.
Step 6. If the user only wants to change the guest enable, administrator settings, and guest settings then click Save at the bottom of the page.
Import User Name & Password
This procedure shows how the administrator can import users from a .csv file.

Step 1. Click Browse to select a file which contains the usernames and passwords from the PC.
Step 2. Click Import.
Step 3. Click Save.
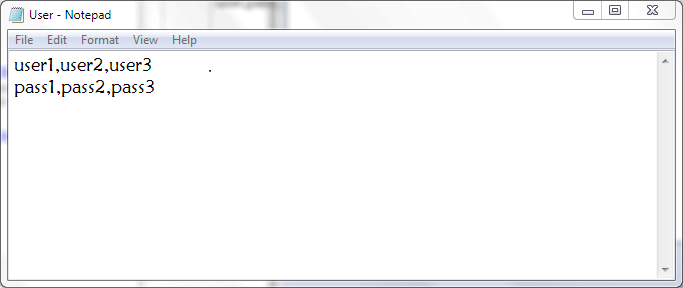
Comma Separated Values (CSV) File Format for Users
This procedure shows the .csv file format.

Step 1. Open a text editor or any application that allows to export or create a csv file.
Step 2. Enter the users to be added in a new line and the password for the users in the next line.
Note: Multiple users and passwords can be added separated by a comma (,).
Step 3. Save the file as .csv file.
Password Complexity Configuration
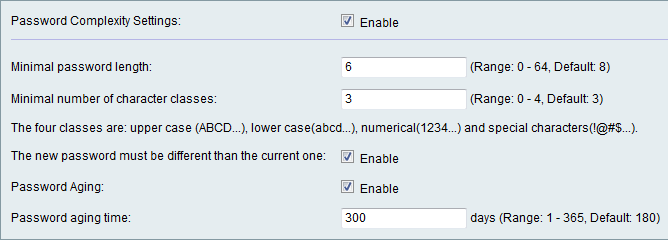
Step 1. Log in to the web configuration utility and choose Administration > Password Complexity. The Password Strength page opens:

Step 2. Check the Enable check box to enable password complexity.
Step 3. Enter the least amount of characters that the password can be in the Minimal Password Strength field.
Step 4. Enter the least amount of classes the password can be in the Minimal Number of Character Classes field. The different classes are:
• Upper Case — These are upper case letters such as "ABCD".
• Lower Case — These are lower case letters such as "abcd".
• Numerical — These are numbers such as "1234".
• Special Characters — These are special characters such as "!@#$".

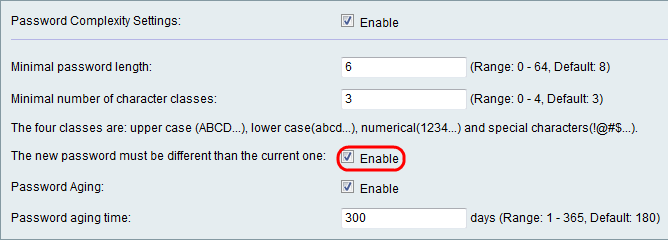
Step 5. Check the Enable check box to prevent a user from making the new password the same as the current password.

Step 6. Check the Enable check box to give the password an expiration date.
Step 7. (Optional) If you choose to enable Password Aging in the previous step, enter the time taken before a password expires in the Password Aging Time field. After the password expires a new password must be created.
Step 8. Click Save.
 Feedback