Failover and Recovery Configuration on RV215W
Available Languages
Objective
Failover and recovery are powerful features that are used to ensure a constant connection to the internet on the RV215W. A failover occurs when the Ethernet WAN connection of the RV215W is lost. At this point the 3G connection takes over and provides internet to the RV215W. A recovery occurs when the RV215W reverts back to using the Ethernet connection. An Ethernet WAN connection and a 3G WAN connection must both be configured for these features to work. To utilize the failover feature, the connect mode for the mobile network must be set to automatic on the Mobile Network page.
This article explains how to configure the failover and the recovery feature on the RV215W.
Applicable Devices
• RV215W
Software Version
• 1.1.0.5
Failover & Recovery
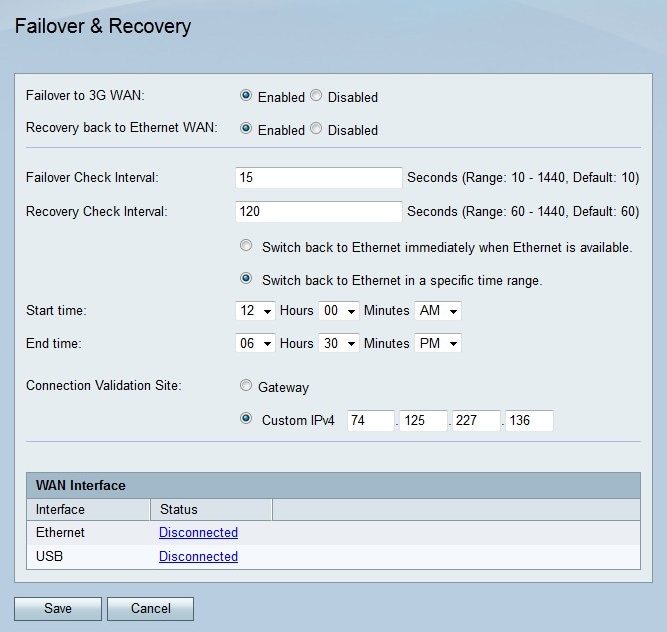
Step 1. Log in to the web configuration utility and choose Networking > WAN > Failover & Recovery. The Failover & Recovery page opens:

Step 2. Click the Enabled radio button in the Failover to 3G WAN field to enable the failover feature. A failover occurs whenever the Ethernet WAN connection fails and the 3G WAN connection takes over.
Step 3. Click the Enabled radio button in the Recovery back to Ethernet WAN field to enable the recovery feature. A recovery occurs whenever the Ethernet WAN connection resumes connectivity following a failover.
Step 4. Enter the time interval in which the RV215W checks for failovers in the Failover Check Interval field.
Step 5. Enter the time interval in which the RV215W checks for recoveries in the Recovery Check Interval field.
Step 6. Click the radio button that corresponds to the desired recovery time.
Step 7. If the second radio button is clicked in the previous step, enter the start and end time in which the RV215W will be allowed to revert back to the Ethernet connection.
Step 8. Click the radio button that corresponds to the desired validation site in the Connection Validation Site field. This site validates if an internet connection has been re-established after a failover or recovery.
• Gateway — The default gateway is used as the validation site.
• Custom IPv4 — Enter an IP address to use as the validation site.
Step 9. Click Save.
 Feedback