View Port Setup/Port Status on RV320 and RV325 VPN Router Series
Available Languages
Objective
The RV320 contains four LAN ports and two WAN ports, while the RV325 contains fourteen LAN ports and two WAN ports. The Port Setup page is used to configure port mirroring and parameters on a per port basis. The Port Status page is used to view the specifications and statistics of a port.
This article explains how to configure the interfaces, view statistics of the interfaces, and how to configure port mirroring on the RV32x VPN Router Series.
Applicable Devices
• RV320 Dual WAN VPN Router
• RV325 Gigabit Dual WAN VPN Router
Software Version
• v1.1.0.09
Port Setup
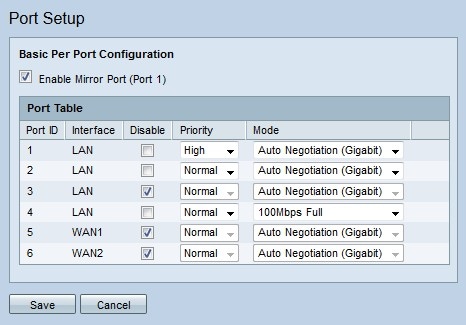
Step 1. Log in to the web configuration utility and choose Port Management > Port Setup. The Port Setup page opens:

Step 2. (Optional) To configure port 1 as the mirror port, check Enable Mirror Port (Port 1). Port Mirroring is a diagnostic tool that is used to troubleshoot problems on an interface. Port mirroring forwards a copy of each ingress and egress packet from enabled ports to the mirror port where the packets can be studied. For example, in the configured picture above, all received and sent packets on ports 2 and 4 are forwarded to port 1.
Note: Port Mirroring does not work when MAC address cloning is enabled.
Note: To mirror a single port, disable all unwanted ports.
Note: WAN ports can not be mirrored.
Step 3. Configure the following parameters in the Port Table.
• Port ID — This field displays the number that identifies the port on the device.
• Interface — This field displays the type of interface.
• Disable — Check the check box to disable the interface.
• Priority — From the drop-down list choose the priority level for the interface. Traffic from an interface with high priority is sent before traffic from an interface with normal priority.
• Mode — From the drop-down list choose the speed and duplex mode of the interface. Half duplex mode restricts communication between two connected devices to one way communication. This means that only one of the devices can transmit at a time, while the other device listens. Full duplex mode allows two connected devices to transmit data simultaneously. This option should be selected based on the capabilities of the device that is connected to the interface.
– Auto Negotiation (Gigabit) — Enable auto negotiation on the interface. Auto negotiation is a technology in which two connected devices share transmission capabilities. This allows the devices to choose the speed and duplex mode that both devices share, which ultimately leads to the highest performance possible.
– 10Mbps Half — The interface has a speed of 10 megabits per second and is in half duplex mode.
– 10Mbps Full — The interface has a speed of 10 megabits per second and is in full duplex mode.
– 100Mbps Half — The interface has a speed of 100 megabits per second and is in half duplex mode.
– 100Mbps Full — The interface has a speed of 100 megabits per second and is in full duplex mode.
Step 4. Click Save. The port setup configuration is saved.
Port Status
Step 1. Log in to the web configuration utility and choose Port Management > Port Status. The Port Status page opens:

The following displays a summary of the interfaces:
• Port ID — The ID name of the interface.
• Type — The type of ethernet connection.
• Link Status — The current connection status of the port.
• Port Activity — The current state of the port
• Priority — The priority level of the interface.
• Speed Status — The current speed of the interface.
• Duplex Status — The current duplex mode.
• Auto Negotiation — The current state of the auto negotiation feature.
Step 2. (Optional) To refresh the Port Status page, click Refresh.
 Feedback