Configure Port Address Translation (PAT) on RV320 and RV325 VPN Router Series
Available Languages
Objective
The objective of this document is to show you how to configure port address translation (PAT) on the RV32x Series VPN Routers.
Introduction
PAT is an extension of Network Address Translation (NAT). NAT is the process used to convert private IP addresses to public IP addresses. It helps to protect the private IP addresses from any malicious attacks or discovery as the private IP addresses are kept hidden. It allows multiple Local Area Network (LAN) devices to share the same public IP but different port numbers. This protects the private IPs as well as distinguishing each device from the others.
Applicable Devices
- RV320 Dual WAN VPN Router
- RV325 Gigabit Dual WAN VPN Router
Software Version
- v1.1.0.09
PAT Configuration
Step 1.Log in to the Web Configuration Utility to choose Setup > Port Address Translation.

The Port Address Translation page opens:

Adding PAT
Step 1. Click Add to add a service. This service is the protocol which is used to map the private IP address with the public IP address.

A new row is added in the Port Address Translation Table:

Step 2. Choose the desired service from Service drop-down list. This is the service on which PAT is performed to convert the private IP addresses into public IP addresses.

Step 3. Enter the IP address of the device or a domain name which has the particular service into the Name or IP Address field. This is the source IP address on which the PAT is performed.
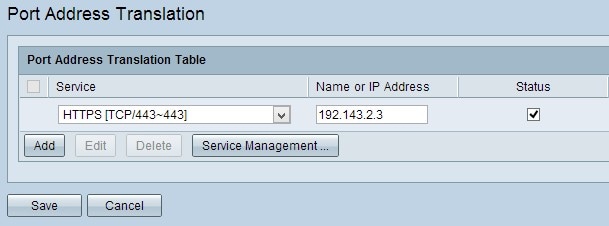
Note: If you want to add a new service, refer to the Service Management section.
Step 4. Check the Status check box to enable the service. If you do not check Status, the service appears inactive.
Step 5. Click Save to save the settings.
Edit PAT
Step 1. If you want to change any port address translation settings, check the check box beside the appropriate service to select it.

Step 2. Click Edit and change the necessary setting.
Step 3. Click Save to save the settings.
Delete PAT
Step 1. If you want to delete any specific port address translation, check the check box beside the appropriate service to select it.
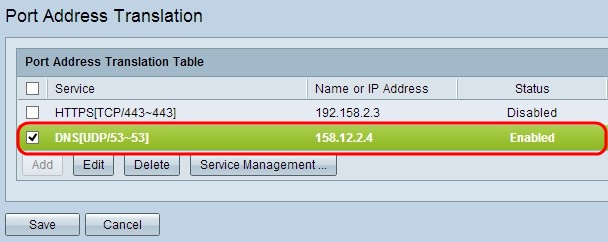
Step 2. Click Delete.
Step 3. Click Save to save the settings.
Service Management
If you do not get any specific service under the Service drop-down list, you have to add the desired service. You can even change the service list or delete any specific service from the list based on your need.
Step 1. Click Service Management. The Service Management Table window opens:

Add a Service
Step 1. Click Add to add a service. You can add up to 30 services.

A new row is added:
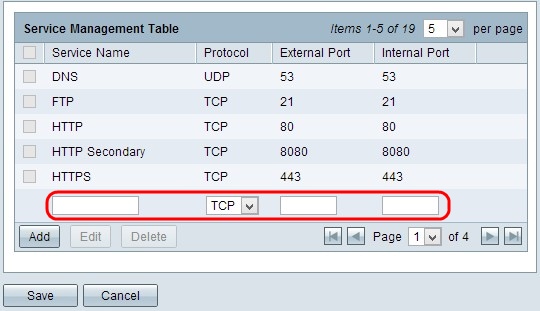
Step 2. Enter the desired name for the service in Service Name field.
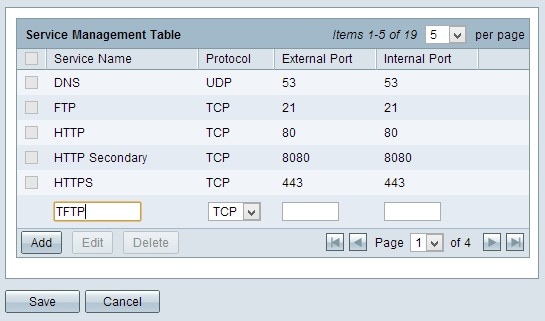
Step 3. Choose the desired protocol from the Protocol drop-down list. This protocol is the transport layer protocol which helps to convert the private IP addresses to public IP addresses.

- TCP - Transmission Control Protocol (TCP) is a connection oriented Internet protocol which is used to provide reliable, ordered data transfer.
- UDP - User Datagram Protocol (UDP) is a connectionless Internet protocol which is used to provide quick data transfer, but non-reliable and disordered.
- IPv6 - Internet Protocol version 6 (IPv6) is the newest version of Internet protocol which can be used to accommodate a lot of users with IP.
Step 4. Enter a port number which you want to use as an external port in the External Port field. The external port number is used to establish the connection between the end user device of the external public network and the PAT device.
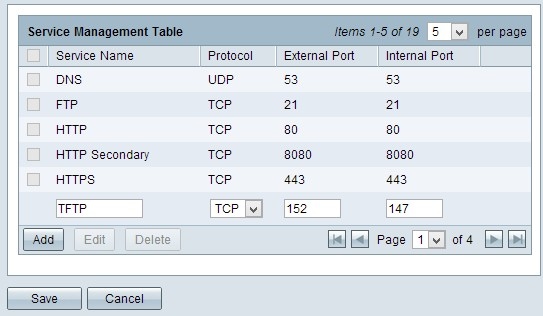
Step 5. Enter a port number which you want to use as an internal port in the Internal Port field. The internal port is used to establish a connection between the PAT device and the private network device.
Step 6. Click Save to save the settings.
Edit Service Management
Step 1. If you want to change any setting for a specific service, check the check box beside the appropriate service to select the appropriate service.

Note: You can edit only the newly created Service. You cannot edit an existing service.
Step 2. Click Edit and change the setting.
Step 3. Click Save to save the settings.
Delete Service Management
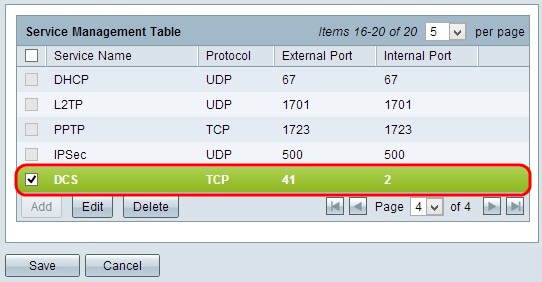
Step 1. If you want to delete any specific service, check the check box beside the appropriate service to select the appropriate service.
Note: You can delete the only newly created service. You cannot delete an existing service.
Step 2. Click Delete.
Step 3. Click Save to save the settings.
Conclusion
You have now successfully configured PAT on the RV32x series VPN routers.
 Feedback