System Log Configuration on RV320 and RV325 VPN Router Series
Available Languages
Objective
System logs are records of network events. Logs are an important tool that is used to understand how a network operates. They are useful for network management and network troubleshooting.
This article explains how to configure the types of logs to be recorded, how to view the logs on the RV32x VPN Router Series, and how to send the logs to a recipient through SMS, to a system log server, or to a recipient through email.
Applicable Devices
• RV320 Dual WAN VPN Router
• RV325 Gigabit Dual WAN VPN Router
Software Version
• v1.1.0.09
System Log Configuration
Step 1. Log in to the Web Configuration Utility and choose Log > System Log. The System Log page opens:

Refer to the following sections for information about the System Log page.
• System Logs by SMS — How to send the system logs to a phone through SMS.
• System Logs on System Log Servers — How to send the system logs to a system log server.
• Email System Logs — How to send the system logs to an email address.
• Log Settings — How to configure the type of messages that are saved to the log.
• View System Log — How to view the system logs on the device.
• View Outgoing Log Table — How to view the system logs that only relate to outgoing packets.
• View Incoming Log Table — How to view the system logs that only relate to incoming packets.
System Logs by SMS

Step 1. Check Enable in the SMS field to send system logs to a client through Short Message Service (SMS) messages.
Step 2. Check the check boxes of the USB ports to which the 3G USB modem is connected.
Step 3. Check the check box in the Dial Number1 field and enter the phone number to which messages are sent.
Note: Click Test to test the connection to dial number 1. If the configured number does not receive the test message, make sure the phone number is entered correctly in the Dial Number1 field.
Step 4. (Optional) Check the check box in the Dial Number2 field and enter the phone number to which messages are sent.
Note: Click Test to test the connection to dial number 2. If the configured number does not receive the test message, make sure the phone number is entered correctly in the Dial Number2 field.
Step 5. Check the check boxes of the events that will trigger a log to be sent.
• Link Up — A connection to the RV320 has been brought up.
• Link Down — A connection to the RV320 has been brought down.
• Authentication Failed — An authentication has failed.
• System Startup — The router is booted up.
Step 6. Click Save. System logs through SMS is configured.
System Logs on System Log Servers

Step 1. Check Enable in the Syslog1 field to send system logs to a system log server.
Step 2. Enter the hostname or IP address of the system log server in the Syslog Server 1 field.
Step 3. (Optional) To send logs to another system log server, check Enable in the Syslog2 field.
Step 4. If the check box is checked in the Syslog2 field, enter the hostname or IP address of the system log server in the Syslog Server 2 field.
Step 5. Click Save. System logs through system log servers is configured.
Email System Logs

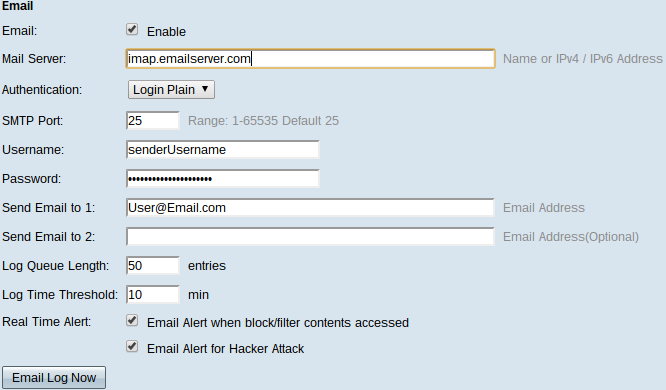
Step 1. Check Enable in the Email field to send system logs to a recipient through email.
Step 2. Enter the domain name or IP address of the mail server in the Mail Server field.
Step 3. Choose the type of Authentication that the mail server uses in the Authentication field.
• None — The mail server uses no authentication.
• Login Plain — The mail server uses authentication that is in a plain text format.
• TLS — The mail server uses Transport Layer Security (TLS) to allow the client and server to exchange authentication information securely.
• SSL — The mail server uses Secure Sockets Layer (SSL) to allow the client and server to exchange authentication information securely.
Step 4. Enter the Simple Mail Transfer Protocol (SMTP) port that the mail server uses in the SMTP Port field. SMTP is a protocol that allows for emails to be transmitted over IP networks.

Step 5. Enter the username of the email sender in the Username field.
Step 6. Enter the password of the email sender in the Password field.
Step 7. Enter the email address of the email recipient in the Send Email to 1 field.
Step 8. (Optional) Enter an additional email address in which to send log emails to in the Send Email to 2 field.
Step 9. Enter the number of log entries that must be made before the log is sent to the email recipient in the Log Queue Length field.
Step 10. Enter the interval at which the device sends the log to the email in the Log Time Threshold field.
Step 11. Check the first check box of the Real Time Alert field to immediately send an email when someone, who has been blocked or filtered, attempts to access the router.
Step 12. Check the second check box of the Real Time Alert field to send an immediately email when a hacker attempts to access the router through a Denial of Service (DOS) attack.
Note: Click Email Log Now to immediately send the log.
Step 13. Click Save. System logs through email is configured.
Log Settings

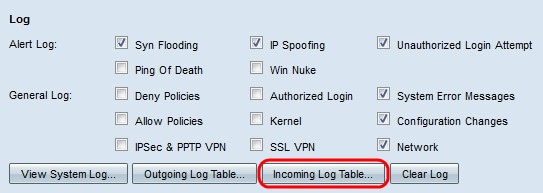
Step 1. Check the check boxes of the events that will trigger a log entry.
• Alert Log — These logs are created when an attack or attempted attack has occurred.
– Syn Flooding — SYN request are received faster than the router can process them.
– IP Spoofing — The RV320 has received IP packets with forged source IP addresses.
– Unauthorized Login Attempt — A rejected attempt to log on to the network has failed.
– Ping of Death — A ping of a abnormal size has been sent to an interface in an attempt to crash the target device.
– Win Nuke — The remote Distributed Denial of Service Attack (DDOS) known as WinNuke, has been sent to an interface in an attempt to crash the target device.
• General Log — These logs are created when general network actions occur.
– Deny Policies — Access has been denied to a user based on the configured policies of the router.
– Authorized Login — A user has been authorized to access the network.
– System Error Messages — A system error has occurred.
– Allow Policies — Access has been granted to a user based on the configured policies of the router.
– Kernel — Include all kernel messages in the log. The kernel is the first part of the operating system that loads into memory at boot up. Kernel messages are logs that are associated with the kernel.
– Configuration Changes — The router configuration has been modified.
– IPSEC & PPTP VPN — AN IPSEC & PPTP VPN negotiation, connection, or disconnection has occurred.
– SSL VPN — An SSL VPN negotiation, connection, or disconnection has occurred.
– Network — A physical connection has been made or lost on the WAN or DMZ interfaces.
Step 2. Click Save. The Log Settings are configured.
Note: Click Clear Log to clear the current log.
View System Log

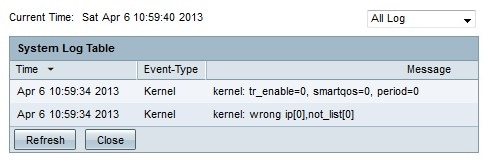
Step 1. Click View System Log to view the system log table. The System Log Table window appears.

Step 2. (Optional) From the drop-down list choose the type of logs to view.
• All Log — Includes all log messages.
• System Log — Only includes the system error messages.
• Firewall/DoS Log — Only includes the alert logs.
• VPN Log — Only includes the IPSec & PPTP VPN and SSL VPN logs.
• Network Log — Only includes the network logs.
• Kernel Log — Only includes kernel messages.
• User Log — Only includes deny policies, allow policies, authorized login and configuration change logs
• SSL Log — Only includes SSL VPN logs.
The System Log Table displays the following information.
• Time — The time the log was created.
• Event-Type — The type of log.
• Message — Information that corresponds to the log. This includes the type of policy, the source IP address and the source MAC address.
Note: Click Refresh to refresh the log table.
View Outgoing Log Table

Step 1. Click Outgoing Log Table to view the log table that relates only to outgoing packets. The Outgoing Log Table window appears.

The Outgoing Log Table displays the following information.
• Time — The time the log was created.
• Event-Type — The type of log.
• Message — Information that corresponds to the log. This includes the type of policy, the source IP address and the source MAC address.
Note: Click Refresh to refresh the log table.
View Incoming Log Table

Step 1. Click Incoming Log Table to view the log table that relates only to incoming packets. The Incoming Log Table window appears.

The Incoming Log Table displays the following information.
• Time — The time the log was created.
• Event-Type — The type of log.
• Message — Information that corresponds to the log. This includes the type of policy, the source IP address and the source MAC address.
Note: Click Refresh to refresh the log table.
 Feedback