Manage DNS (Domain Name System) Local Database on RV320 and RV325 VPN Router Series
Available Languages
Objective
Domain Name System (DNS) is used to translate a domain name into an IP address. A DNS local database enables the router to act as a local DNS server for commonly used domain names. The local database helps to find the IP addresses faster than an external DNS server. If a requested domain name is not found in the local database, then the request is forwarded to the DNS server that is configured on the WAN Setting page.
Note: If you want to use your router as the local DNS server to translate domain names into IP addresses faster, you need to configure your client device (PC) to use the router as a DNS server.
This article explains how to manage the DNS local database on RV32x VPN Router Series.
Applicable Devices
• RV320 Dual WAN VPN Router
• RV325 Gigabit Dual WAN VPN Router
Software Version
• v1.1.0.09
Manage DNS Local Database
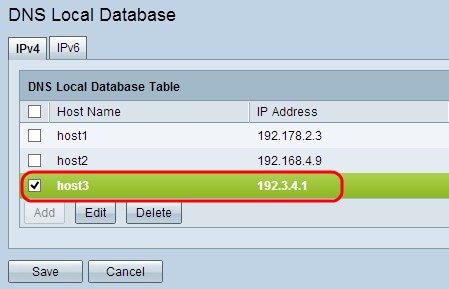
Step 1. Log in to the web configuration utility and choose DHCP > DNS Local Database. The DNS Local Database page opens:


Step 2. Choose the appropriate service between IPv4 and IPv6 and click the respective tab.
• IPv4 — Internet Protocol Version 4 (IPv4) is a 32 bit Internet protocol which can support a maximum of 4,294,967,296 addresses.
• IPv6 — Internet Protocol Version 6 (IPv6) is a 128 bit Internet protocol which can support many more addresses than IPv4.
Add an Entry to the DNS Local Database

Step 1. Click Add to add a new domain name and it's IP address to the database. A new row is added:


Step 2. Enter the domain name in Host Name field.
Step 3. Enter the IP address of the domain name in the IP Address field.
Step 4. Click Save to save the settings.
Edit an Entry of the DNS Local Database

Step 1. Check the check box beside the host name that you want to edit.

Step 2. Click Edit to and change the appropriate field(s).
Step 3. Click Save to save the settings.
Delete an Entry from the DNS Local Database

Step 1. Check the check box beside the host name that you want to delete.
Step 2. Click Delete to remove the entry.
Step 3. Click Save to save the settings.
 Feedback