Configure Group Client to Gateway Virtual Private Network (VPN) on RV320 and RV325 VPN Router Series
Available Languages
Objective
A Virtual Private Network (VPN) is a private network that is used to virtually connect the devices of the remote user through the public network to provide security. One of the types of VPNs is a client-to-gateway VPN. With client-to-gateway, you can remotely connect different branches of your company located at different geographical areas to transmit and receive the data among the areas more securely. Group VPN provides easy configuration of the VPN as it eliminates the configuration of VPN for each user. The RV32x VPN Router Series can support a maximum of two VPN groups.
The objective of this document is to explain how to configure a group client to gateway VPN on RV32x Series VPN Routers .
Applicable Devices
• RV320 Dual WAN VPN Router
• RV325 Gigabit Dual WAN VPN Router
Software Version
• v1.1.0.09
Configure Group Client to Gateway VPN
Step 1. Log in to the router configuration utility and choose VPN > Client to Gateway. The Client to Gateway page opens:
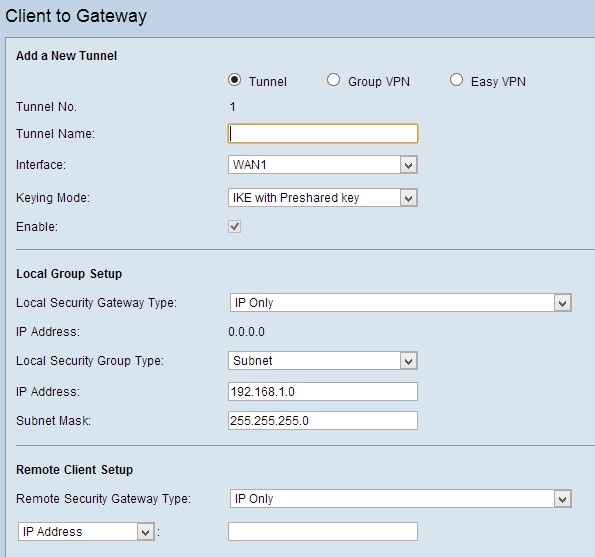
Step 2. Click the Group VPN radio button to add a group client-to-gateway VPN.

Add a New Tunnel
Step 1. Enter the name of the tunnel in the Tunnel Name field.

Note: Group No - Represents the number of the group. It is an auto generated field.
Step 2. Choose the appropriate interface through which the VPN group connects with the gateway from the Interface drop-down list.

Step 3. Check the Enable check box to enable the gateway-to-gateway VPN. By default it is enabled.
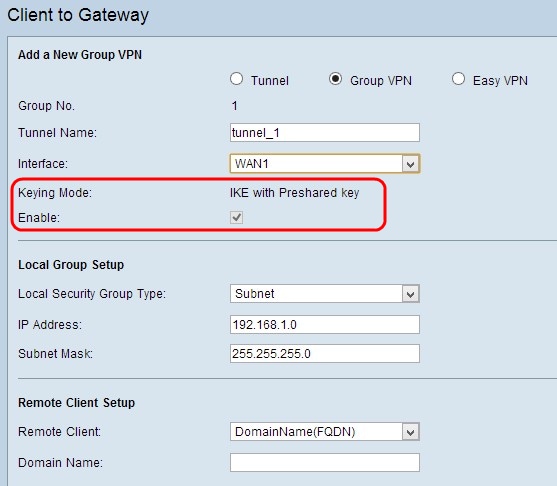
Note: Keying Mode - Displays the mode of authentication used. IKE with Preshared key is the only option, which means the Internet Key Exchange (IKE) protocol is used to automatically generate and exchange a preshared key to establish authenticated communication for the tunnel.
Step 4. To save the settings you have so far and leave the rest as default, scroll down and click Save to save the settings.
Local Group Setup
Step 1. Choose the appropriate local LAN user or group of users who can access the VPN tunnel from the Local Security Group Type drop-down list. The default is Subnet.
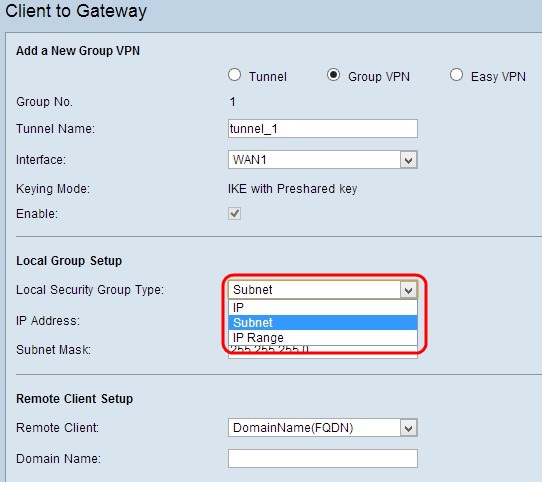
The available options are defined as follows:
• IP — Only one specific LAN device can access the tunnel. If you choose this option, enter the IP address of the LAN device in the IP Address field. The default IP is 192.168.1.0.
• Subnet — All LAN devices on a specific subnet can access the tunnel. If you choose this option, enter the IP address and subnet mask of the LAN devices in the IP Address and Subnet Mask field respectively. The default mask is 255.255.255.0.
• IP Range — A range of LAN devices can access the tunnel. If you choose this option, enter the first and last IP addresses for the range in the Start IP and End IP fields respectively. The default range is from 192.168.1.0 to 192.168.1.254.
Step 2. To save the settings you have so far and leave the rest as default, scroll down and click Save to save the settings.
Remote Client Setup
Step 1. Choose the appropriate remote LAN user or group of users who can access the VPN tunnel from the Remote Security Group Type drop-down list.
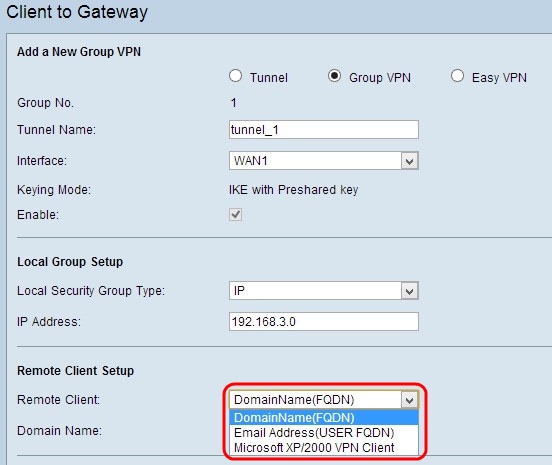
The available options are defined as follows:
• Domain Name (FQDN) Authentication — Access to the tunnel is possible through a registered domain. If you choose this option, enter the name of the registered domain in the Domain Name field.
• E-mail Addr.(USER FQDN) Authentication — Access to the tunnel is possible through an email address. If you choose this option, enter the email address in the Email Address field.
• Microsoft XP/2000 VPN Client — Access to the tunnel is possible through client software which is a built-in Microsoft XP or 2000 VPN Client software.
Step 2. To save the settings you have so far and leave the rest as default, scroll down and click Save to save the settings.
IPSec Setup
Step 1. Choose the appropriate Diffie-Hellman (DH) group from the Phase 1 DH Group drop-down list. Phase 1 is used to establish the simplex, logical security association (SA) between the two ends of the tunnel to support secure authenticate communication. Diffie-Hellman is a cryptographic key exchange protocol which is used in Phase 1 connection to share a secret key in order to authenticate communication.

The available options are defined as follows:
• Group1 (768-bit) — Computes the key the fastest, but is the least secure.
• Group2 (1024-bit) — Computes the key slower, but is more secure than Group1.
• Group5 (1536-bit) — Computes the key the slowest, but is the most secure.
Step 2. Choose the appropriate encryption method to encrypt the key from the Phase 1 Encryption drop-down list. AES-128 is recommended for its high security and fast performance. The VPN tunnel needs to use the same encryption method for both of its ends.

The available options are defined as follows:
• DES — Data Encryption Standard (DES) is a 56-bit, old encryption method which is not a very secure encryption method, but may be required for backwards compatibility.
• 3DES — Triple Data Encryption Standard (3DES) is a 168-bit, simple encryption method used to increase the key size because it encrypts the data three times. This provides more security than DES but less security than AES.
• AES-128 — Advanced Encryption Standard with 128-bit key (AES-128) uses a 128-bit key for AES encryption. AES is faster and more secure than DES. In general, AES is also faster and more secure than 3DES. AES-128 is faster but less secure than AES-192 and AES-256.
• AES-192 — AES-192 uses a 192-bit key for AES encryption. AES-192 is slower but more secure than AES-128, and faster but less secure than AES-256.
• AES-256 — AES-256 uses a 256-bit key for AES encryption. AES-256 is slower but more secure than AES-128 and AES-192.
Step 3. Choose the appropriate authentication method from the Phase 1 Authentication drop-down list. The VPN tunnel needs to use the same authentication method for both of its ends.

The available options are defined as follows:
• MD5 — Message Digest Algorithm-5 (MD5) represents a 128-bit hash function that provides protection to the data from malicious attacks by the checksum calculation.
• SHA1 — Secure Hash Algorithm version 1 (SHA1) is a 160-bit hash function, which is more secure than MD5.
Step 4. In the Phase 1 SA Life Time field, enter the amount of time in seconds that the VPN tunnel remains active in Phase 1. The default time is 28,800 seconds.

Step 5. (Optional) To provide more protection to the keys, check the Perfect Forward Secrecy check box. This option allows you to generate a new key if any key is compromised. This is a recommended action as it provides more security.
Note: If you uncheck Perfect Forward Secrecy in Step 5, you do not need to configure Phase 2 DH Group.
Step 6. Choose the appropriate DH group from the Phase 2 DH Group drop-down list.

The available options are defined as follows:
• Group1 (768-bit) — Computes the key the fastest, but is the least secure.
• Group2 (1024-bit) — Computes the key slower, but is more secure than Group1.
• Group5 (1536-bit) — Computes the key the slowest, but is the most secure.
Step 2. Choose the appropriate encryption method to encrypt the key from the Phase 1 Encryption drop-down list. AES-128 is recommended for its high security and fast performance. The VPN tunnel needs to use the same encryption method for both of its ends.
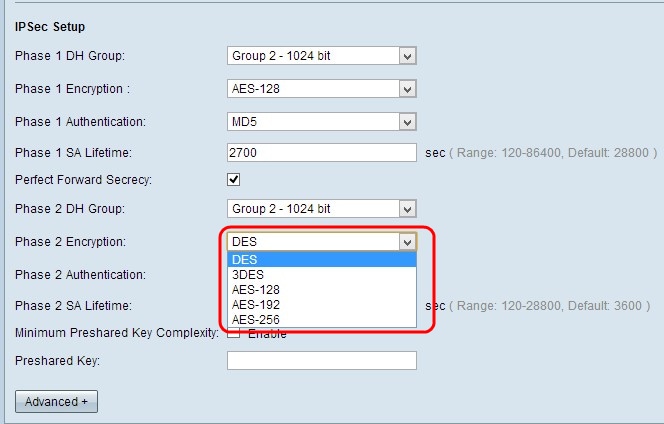
The available options are defined as follows:
• DES — Data Encryption Standard (DES) is a 56-bit, old encryption method which is not a very secure encryption method, but may be required for backwards compatibility.
• 3DES — Triple Data Encryption Standard (3DES) is a 168-bit, simple encryption method used to increase the key size because it encrypts the data three times. This provides more security than DES but less security than AES.
• AES-128 — Advanced Encryption Standard with 128-bit key (AES-128) uses a 128-bit key for AES encryption. AES is faster and more secure than DES. In general, AES is also faster and more secure than 3DES. AES-128 is faster but less secure than AES-192 and AES-256.
• AES-192 — AES-192 uses a 192-bit key for AES encryption. AES-192 is slower but more secure than AES-128, and faster but less secure than AES-256.
• AES-256 — AES-256 uses a 256-bit key for AES encryption. AES-256 is slower but more secure than AES-128 and AES-192.
Step 8. Choose the appropriate authentication method from the Phase 2 Authentication drop-down list. The VPN tunnel needs to use the same authentication method for both of its ends.

The available options are defined as follows:
• MD5 — Message Digest Algorithm-5 (MD5) represents 128-bit hash function which provides protection to the data from malicious attack by the checksum calculation.
• SHA1 — Secure Hash Algorithm version 1 (SHA1) is a 160-bit hash function which is more secure than MD5.
Step 9. In the Phase 2 SA Lifetime field, enter the amount of time in seconds that the VPN tunnel remains active in Phase 2. The default time is 3600 seconds.

Step 10. (Optional) If you want to enable the strength meter for the preshared key, check the Minimum Preshared Key Complexity check box.
Note: If you check the Minimum Preshared Key Complexity check box, the Preshared Key Strength Meter shows the strength of the preshared key through colored bars. Red indicates weak strength, yellow indicates acceptable strength, and green indicates strong strength.
Step 11. Enter the desired key in the Preshared Key field. Up to 30 hexadecimals can be used as the preshared key. The VPN tunnel needs to use the same preshared key for both of its ends.
Note: It is strongly recommended to frequently change the preshared key between the IKE peers so that the VPN remain secured.
Step 12. To save the settings you have so far and leave the rest as default, scroll down and click Save to save the settings.
Advanced Setup
Step 1. Click Advanced to configure the advanced settings.
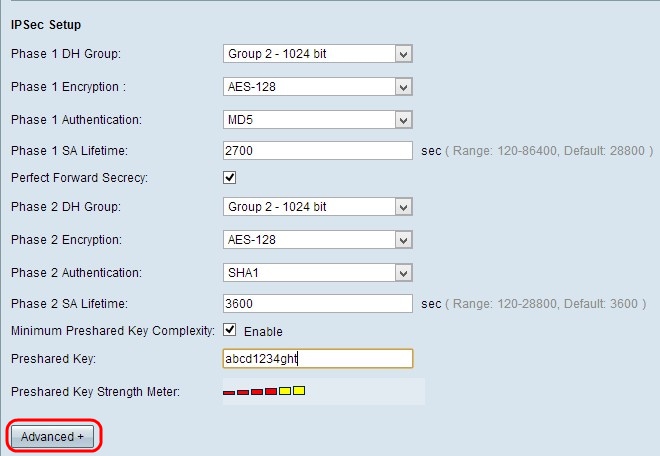
The Advanced area appears with new fields available.

Step 2. (Optional) Check the Aggressive Mode check box if your network speed is low. Aggressive Mode exchanges the IDs of the end points of the tunnel in clear text during SA connection, which requires less time to exchange but is less secure.
Step 3. (Optional) Check the Compress (Support IP Payload Compression Protocol(IPComp)) check box if you want to compress the size of IP datagrams. IPComp is an IP compression protocol which is used to compress the size of IP datagrams if the network speed is low, and if the user wants to quickly transmit the data without any loss.
Step 4. (Optional) Check the Keep-Alive check box if you always want the connection of the VPN tunnel to remain active. Keep-Alive helps to immediately re-establish the connections if any connection becomes inactive.
Step 5. (Optional) Check the AH Hash Algorithm check box if you want authentication to the data origin, data integrity through checksum, and protection extended into the IP header. Then choose the appropriate authentication method from the drop-down list. The tunnel should have same algorithm for both of its sides.
The available options are defined as follows:
• MD5 — Message Digest Algorithm-5 (MD5) represents 128-bit hash function which provides protection to the data from malicious attack by the checksum calculation.
• SHA1 — Secure Hash Algorithm version 1 (SHA1) is a 160-bit hash function which is more secure than MD5.
Step 6. Check the NetBIOS Broadcast check box if you want to allow non-routable traffic through the VPN tunnel. The default is unchecked. NetBIOS is used to detect network resources like printers, computers, etc. in the network through software applications and Windows features like Network Neighborhood.
Step 7. (Optional) Check NAT Traversal check box if you want to access the internet from your private LAN via public IP address. NAT traversal is used to make the private IP addresses of internal systems appear as public IP addresses to protect the private IP addresses from any malicious attack or discovery.
Step 8. Click Save to save the settings.
 Feedback