Configure Advanced Secure Sockets Layer Virtual Private Network (SSL VPN) on RV320 and RV325 VPN Routers
Available Languages
Objective
A Secure Sockets Layer Virtual Private Network (SSL VPN) allows you to configure a VPN, but does not require you to install a VPN client on the device of the client. Advanced SSL VPN allows you to configure the range of IP addresses that can access the SSL VPN service. You can also configure the port number for SSL VPN and the banners that are displayed.
Note: To configure advanced settings of SSL VPN, you need to enable SSL VPN first. To find out more about how to enable SSL VPN, refer to the article, Basic Firewall Configuration on RV320 and RV325 VPN Router Series.
The objective of this document is to explain how to configure advanced SSL VPN on RV32x VPN Router Series.
Applicable Devices
• RV320 Dual WAN VPN Router
• RV325 Gigabit Dual WAN VPN Router
Software Version
• v1.1.0.09
Configure Advanced SSL VPN
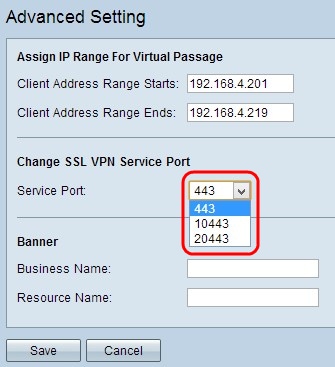
Step 1. Log in to the web configuration utility and choose SSL VPN > Advanced Settings. The Advanced Setting page opens:

Step 2. Enter the starting IP address for the range of clients who can access the SSL VPN in the Client Address Range Starts field.
Step 3. Enter the ending IP address for the range of clients who can access the SSL VPN in the Client Address Range Ends field.
Note: This range must be on the same subnet as the device.

Step 4. Choose the appropriate port number from the Service Port drop-down list through which the SSL VPN works.

Step 5. Enter the name of the business in the Business Name field that you wish to be displayed as a banner.
Step 6. Enter the name that you wish to display as a banner for the resources in the Resource Name field. Resources are the standard Microsoft terminal services such as Word, Excel, PowerPoint, Access, Outlook, Explorer, FrontPage, or ERP, which the client can use even if they are not connected to the client device.
Note: If you would like to find out more about how to configure resources, refer to Resource Management on RV320 and RV325 VPN Router Series.

Revision History
| Revision | Publish Date | Comments |
|---|---|---|
1.0 |
13-Dec-2018 |
Initial Release |
 Feedback