View Virtual Private Network (VPN) Summary on RV320 and RV325 VPN Routers
Available Languages
Objective
A Virtual Private Network (VPN) is a private network that is used to virtually connect devices of the remote user through the public network to provide security. VPN summary is used to display general information of the VPN tunnels like how many VPN tunnels are available, how many are enabled, how many are used. Also it displays the Gateway to Gateway, Client to Gateway and Group VPN status.
This article explains VPN summary on the RV32x VPN Router Series.
Applicable Devices
• RV320 Dual WAN VPN Router
• RV325 Gigabit Dual WAN VPN Router
Software Version
• v1.1.0.09
VPN Summary
Step 1. Log in to the web configuration utility and choose VPN > Summary. The Summary page opens:
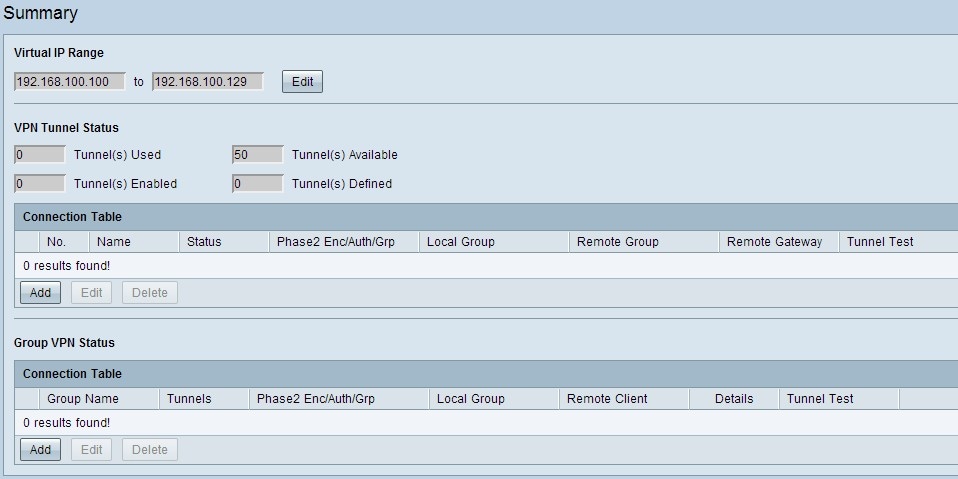
Virtual IP Range
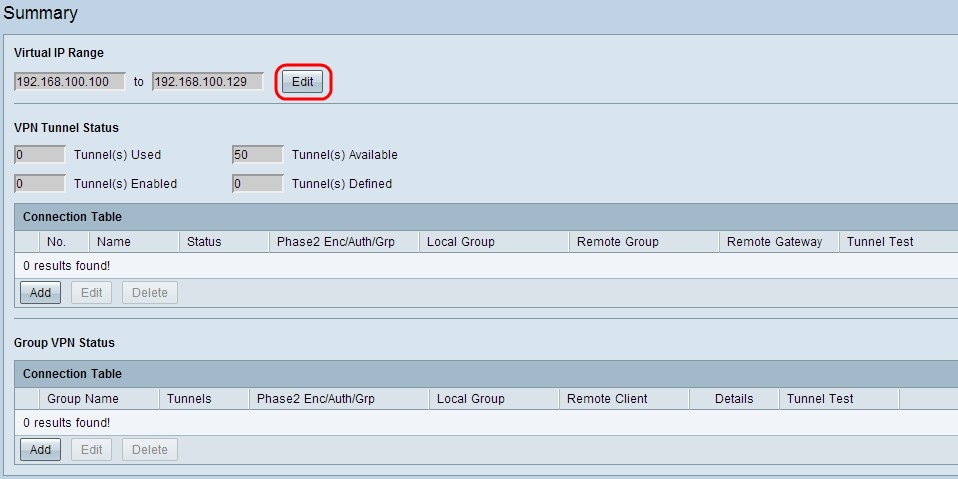
Step 1. Virtual IP Range is the range of IP addresses which are used for VPN tunnels. Click Edit to edit the Virtual IP Range. The Virtual IP Range window opens:
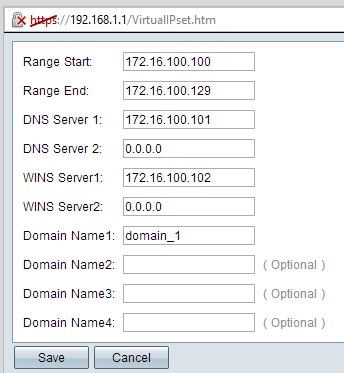
Step 2. Enter the starting IP address for the VPN tunnel in the Range Start field.
Step 3. Enter the ending IP address for the VPN tunnel in the Range End field.
Step 4. (Optional) If you want to use a DNS server, enter the IP address of the DNS server in the DNS Server 1 field. The default is 0.0.0.0 which represents dynamically assigned DNS server.
Note: It is recommended to provide specific IP address of the DNS server if you know rather than dynamic DNS as it provides faster access than dynamic DNS.
Step 5. (Optional) If you want to use a secondary DNS server, enter the IP address of the second DNS server in the DNS Server 2 field. The default is 0.0.0.0 which is dynamically assigned DNS server.
Step 6. (Optional) If you want to use a WINS server, enter IP address of the Windows Internet Naming Service (WINS) Server in the WINS Server 1 field. WINS server reduces the traffic to broadcast NETBIOS name query as the client can directly resolves the NETBIOS name to IP from the WINS server. The default is 0.0.0.0 which represents dynamically assigned WINS server.
Step 7. (Optional) If you want to use a secondary WINS server, enter IP address of the second Windows Internet Naming Service (WINS) Server in the WINS Server 2 field. The default is 0.0.0.0 which represents dynamically assigned WINS server.
Step 8. Enter the domain name in the Domain Name 1 field if the router has a static IP address and a registered domain name.
Step 9. (Optional) If you want a second domain name, enter the second domain name in the Domain Name 2 field if the router has a static IP address and a registered domain name.
Step 10. (Optional) If you want a third domain name, enter the third domain name in the Domain Name 3 field if the router has a static IP address and a registered domain name.
Step 11. (Optional) If you want a fourth domain name, enter the fourth domain name in the Domain Name 4 field if the router has a static IP address and a registered domain name.
Step 12. Click Save to save the settings.
VPN Tunnel Status
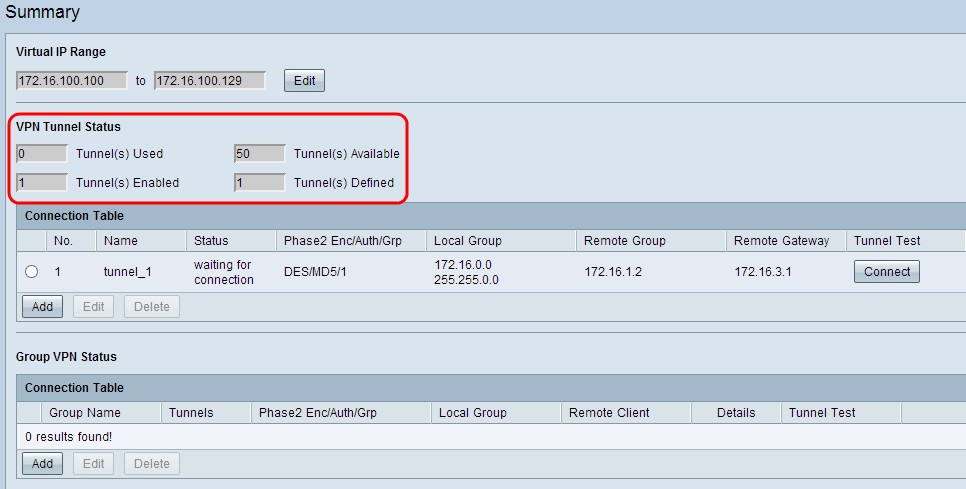
• Tunnel(s) Used — Displays the number of tunnel which is in use.
• Tunnel(s) Available — Displays the total number of tunnel available for VPN connection.
• Tunnel(s) Enabled — Displays the number of tunnel which is enabled for VPN connection.
• Tunnel(s) Defined — Displays the number of tunnel which is defined for VPN connection.
Connection Table
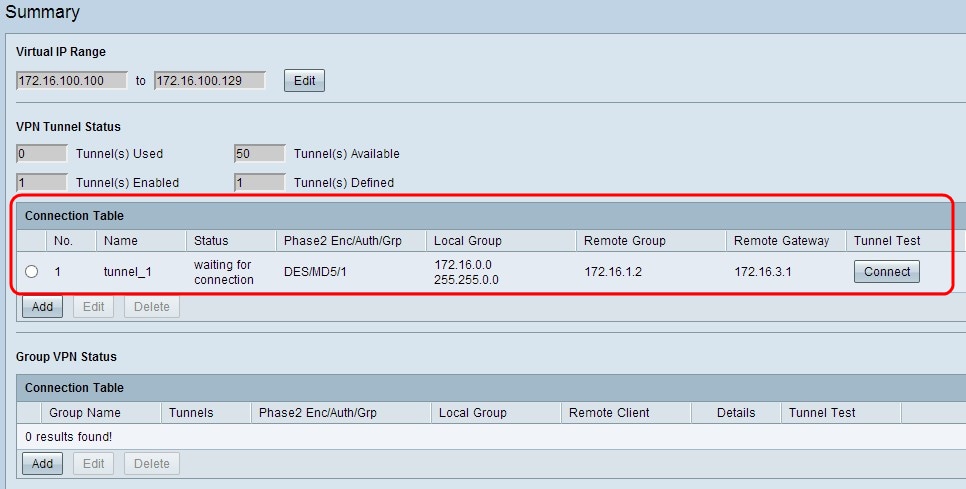
Displays Gateway to Gateway and Client to Gateway (Single) VPN connection.
• No. — Represents the tunnel number which is used for VPN connection.
• Name — Represents the tunnel name which is used for VPN connection.
• Status — Represents the current status of the VPN connection.
• Phase 2 Enc/Auth/Grp — Represents the authentication which is used for the VPN connection.
• Local Group — Represents the IP address and subnet mask of the local group.
• Remote Group — Represents the IP address and subnet mask of the remote group.
• Remote Gateway — Represents the IP address of the remote gateway.
• Tunnel Test — Represents the tunnel status.
Step 1. (Optional) To add a new Gateway to Gateway or Client to Gateway VPN, click Add.
Step 2. (Optional) To edit any information of the installed VPN, click the radio button beside the VPN connection and click Edit.
Note: To know more on how to configure or edit Gateway to Gateway VPN connection refer to Gateway to Gateway Virtual Private Network (VPN) Configuration on RV320 and RV325 VPN Routers or for Client to Gateway VPN connection refer to Configure Single Client to Gateway Virtual Private Network (VPN) on RV320 and RV325 VPN Routers.
Step 3. (Optional) To delete the VPN, click the radio button beside the VPN connection and click Delete.
Group VPN Connection Table

Group VPN connection table displays general information of the Client to Gateway Group VPN.
• Group Name — Represents the group name which is used for VPN connection.
• Tunnels — Represents the number of users who are logged in to the VPN tunnel.
• Phase 2 Enc/Auth/Grp — Represents the authentication which is used for the VPN connection.
• Local Group — Represents the IP address and subnet mask of the local group.
• Remote Client — Represents domain/ e-mail address of the remote client.
• Details — Represents the detail information of the VPN connection.
• Tunnel Test — Represents the tunnel status.
Step 1. (Optional) To add a new Group VPN, click Add. The Client to Gateway page opens:
Step 2. (Optional) To edit any information of the installed VPN, click the radio button beside the VPN connection and click Edit.
Note: To know more on how to configure or edit Client to Gateway Group VPN connection refer to Configure Group Client to Gateway Virtual Private Network (VPN) on RV320 and RV325 VPN Routers.
Step 3. (Optional) To delete the VPN, click the radio button beside the VPN connection and click Delete.
 Feedback