Routing Configuration on the CVR100W VPN Router
Available Languages
Objective
Routing facilitates efficient movement of data throughout a network. Routing includes static, dynamic, and Inter-VLAN routing. Static routes are manually configured pathways created to enable a packet to reach a specific host or network. Dynamic routing allows a router to automatically adjust to physical changes in the network which enables the router to calculate the most efficient route for the network data packets to travel. Inter-VLAN routing enables the router to move tagged VLAN traffic through different subnets.
This article explains how to configure routing on the CVR100W VPN Router.
Applicable Device
• CVR100W VPN Router
Software Version
• 1.0.1.19
Routing Configuration
Step 1. Log in to the web configuration utility and choose Networking > Routing. The Routing page opens:

Operating Mode

Step 1. In the Operating Mode field, click the desired radio button for the operating mode of the router.
• Gateway — Choose this radio button if the router is to host the network connection to the internet. This is the default setting.
• Router — Choose this radio button if the router is part of a network with other routers, and another router in the network is the gateway to the Internet. Another router in the network must function as the gateway if internet connectivity is to be available in Router mode. Disable the firewall of this router since firewall protection is provided by the gateway router.
Note: If Gateway mode is selected, the Dynamic Routing fields are dimmed. Skip to Static Routing.
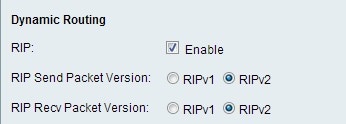
Dynamic Routing

Step 1. In the Routing Information Protocol (RIP) field, check the Enable check box to allow the CVR100W to exchange routing information automatically with other routers, and to dynamically adjust the CVR100W routing tables as changes occur on the network.
Step 2. In the RIP Send Packet Version field click the radio button for the desired RIP protocol used to transmit network data. This option is based on what the other routers on the network support.
• RIPv1 — RIPv1 is a class-based routing version. It does not include subnet information and does not support variable length subnet masks (VLSM). RIPv1 lacks support for router authentication which makes it vulnerable to attacks.
•RIPv2 — RIPv2 carries subnet information; networks that have variable length subnets work with this version of RIP. This form of RIP supports multicast and password authentication security.
Step 3. In the RIP Recv Packet Version field click the radio button for the desired RIP protocol used to receive network data. Refer to step 2 for the differences between RIPv1 and RIPv2. This option is based on what the other routers on the network support.
Note: The RIP version chosen in Step 2 and Step 3 depends on the RIP version supported by other routers on the network.
Static Routing

Step 1. From the Route Entries drop-down list, choose the routing table entry number. Static routes in the drop-down list that are not yet configured have nothing between the parentheses.
Step 2. In the Enter Route Name field, enter the name of the static route.
Step 3. In the Destination LAN IP field, enter the destination address of the static route.
Step 4. In the Subnet Mask field, enter the subnet mask of the destination address.
Step 5. In the Gateway field, enter the gateway of the static route. A gateway is a node on a network that connects two networks together.
Step 6. In the Interface field, click the desired radio button.
• LAN — Click this radio button if the static route applies to the LAN interface.
• WAN — Click this radio button if the static route applies to the WAN interface.
Step 7. (Optional) To edit a static route entry, choose the routing table number from the Route Entries drop-down list and edit the desired fields.
Step 8. (Optional) To delete a static route entry, choose the routing table number from the Route Entries drop-down list and click Delete This Entry.
Inter-VLAN Routing

Step 1. In the Inter-VLAN Routing field, check the Enable check box to allow the device to route tagged VLAN traffic to different subnets.
Note: To configure VLANs, refer to the article, VLAN Membership on the CVR100W VPN Router.
Routing Table


Step 1. To view the Routing table, click Show IPv4 Routing Table. This displays the static and dynamic routes created.
Step 2. Click Save to save the routing configuration.
 Feedback