Firewall Schedule Management on the CVR100W VPN Router
Available Languages
Objective
A firewall protects a network from unauthorized access from outside the network. It also helps limit access to the outside network from users within the network. Firewall schedules are created to apply the firewall during specific days and times.
This article explains how to add/edit a firewall schedule on the CVR100W VPN Router.
Applicable Device
• CVR100W VPN Router
Software Version
• 1.0.1.19
Manage Schedules
Step 1. Log in to the web configuration utility and choose Firewall > Schedule Management. The Schedule Management page opens:

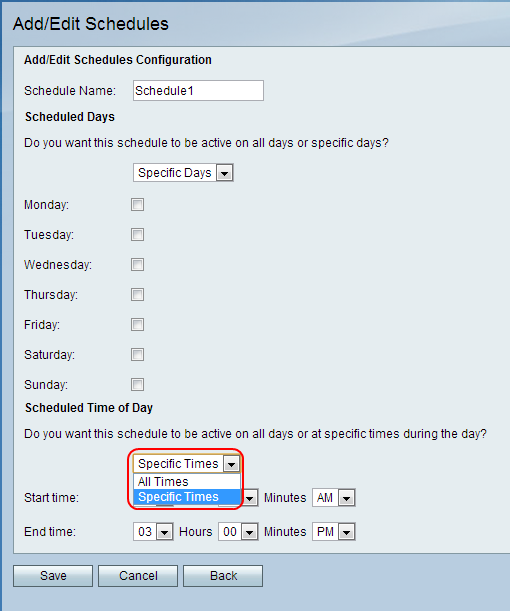
Step 2. In the Schedules Table, click Add Row. The Add/Edit Schedules page opens:

Step 3. In the Schedule Name field, enter a name for the schedule.

Step 4. From the Schedule Days drop-down list, choose an option.
• All Days — The schedule is applied every day of the week. If this option is selected, specific days check boxes are dimmed.
• Specific Days — The schedule is applied on specified days of the week. Check the check boxes for the days on which you want to apply the function.

Step 5. From the Schedule Time drop-down list, choose an option.
• All Day — The schedule is applied all day. If this option is selected, the Start time and End time fields are dimmed
• Specific Times — The schedule is applied only on specified times of the day. Choose a time to begin the schedule from the Start Time drop-down lists, and choose a time to end the function from the End Time drop-down lists.
Step 6. Click Save. The Schedule Management page opens and the Schedules Table is updated.


Step 7. (Optional) To edit a schedule entry in the Schedules Table, check the check box of the entry, click Edit, edit the required fields, and click Save.
Step 8. (Optional) To delete a schedule entry in the Schedules Table, check the check box of the, click Delete, and click Save.
 Feedback