Basic VPN Setup on the CVR100W VPN Router
Available Languages
Objective
A Virtual Private Network (VPN) is used to connect endpoints on different networks together over a public network, such as the Internet. This feature is useful to enable remote users who are away from a local network to securely connect to the network over the Internet.
This article explains how to configure Basic VPN on the CVR100W VPN Router. For advanced VPN setup, refer to the article Advanced VPN Setup on the CVR100W VPN Router .
Note: Ensure the following settings are configured on both sides of the VPN tunnel.
Applicable Device
• CVR100W VPN Router
Software Version
• 1.0.1.19
Basic VPN Setup Configuration
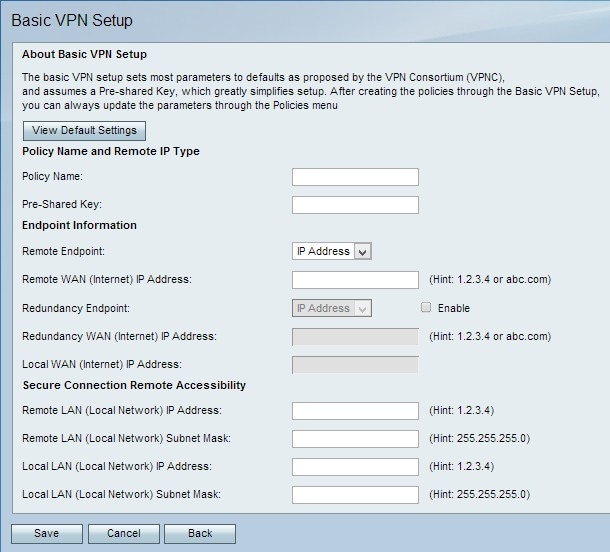
Step 1. Log in to the web configuration utility and choose VPN > Basic VPN Setup. The Basic VPN Setup page opens:


Step 2. (Optional) To view the default basic settings of the VPN tunnel, click View Default Settings.

Step 3. In the policy name field, enter a name for the policy. This name is used for management purposes.
Step 4. In the Pre-Shared Key field, enter a password. The pre-shared key is used by the VPN client or remote gateway to establish a VPN connection. The key must have a length of at least 8 characters.

Step 5. From the Remote Endpoint drop-down list, choose the appropriate type of address for the remote endpoint.
• IP Address — This option uses an IP address to identify the remote endpoint.
• FQDN (Fully Qualified Domain Name) — This option uses a domain name to identify the remote endpoint.
Step 6. In the Remote WAN (Internet) IP Address field, enter the IP Address or the domain name of the remote endpoint.
Step 7. (Optional) To enable redundancy endpoint, check the Enable check box in the Redundancy Endpoint field. The redundancy endpoint option enables the CVR100W VPN Router to connect to a backup VPN endpoint when the primary VPN connection fails.
Step 8. (Optional) To choose the type of address for the redundancy endpoint, from the Redundancy Endpoint drop-down list, choose the appropriate type of address.
• IP Address — This option uses an IP address to identify the redundancy endpoint.
• FQDN (Fully Qualified Domain Name) — This option uses a domain name to identify the redundancy endpoint.
Step 9. Enter the IP Address or domain name of the redundancy endpoint in the Redundancy WAN (Internet) IP Address field.
Note: The Local WAN (Internet) IP Address field is dimmed. To edit the Local WAN IP Address, refer to the article Internet Setup on the CVR100W VPN Router.

Step 10. In the Remote LAN (Local Network) IP Address field, enter the remote IP address of the remote LAN.
Step 11. In the Remote LAN (Local Network) Subnet Mask field, enter the remote subnet mask of the remote LAN.
Step 12. In the Local LAN (Local Network) IP Address field, enter the local IP address of the local LAN.
Step 13. In the Local LAN (Local Network) Subnet Mask field, enter the local subnet mask of the local LAN.
Note: The Local LAN and the Remote LAN should be in different subnets to avoid conflicts.
Step 14. Click Save to apply settings.
 Feedback