Edit WAN Connection on RV016, RV042, RV042G and RV082 VPN Routers
Available Languages
Objective
A Wide Area Network (WAN) is a network that is made up of multiple LANs, such as the Internet. The WAN port on the RV0XX series VPN routers is generally used to connect to the Internet. RV0XX series routers support multiple connection types for the WAN port. The connection type you need will depend on your ISP.
This article guides on how to edit the WAN connection type on RV016, RV042, RV042G and RV082 Series VPN Routers.
Applicable Devices
• RV016
• RV042
• RV042G
• RV082
Software Version
• v4.2.2.08
Edit WAN Connection for IPv4
Note: To edit the WAN connection for IPv6 addresses, go to the IPv6 section.
Step 1. Log in to the Router Configuration Utility and choose Setup > Network. The Network page opens:
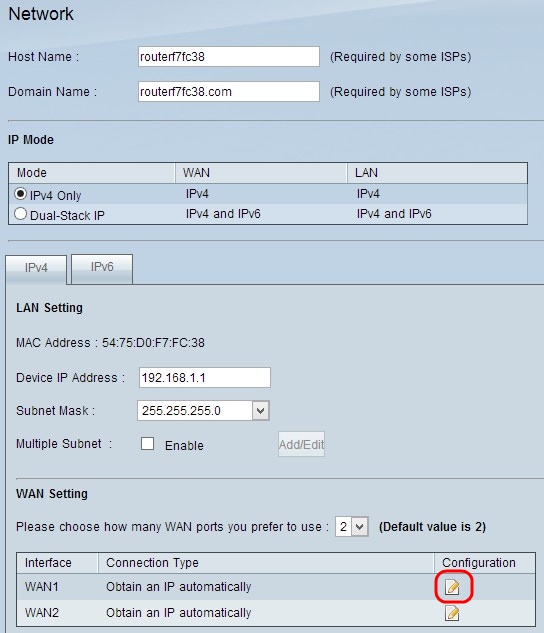
Step 2. Scroll down to WAN Setting section and click the Configuration icon for the specific WAN interface which you want to edit. The Network page displays additional information:
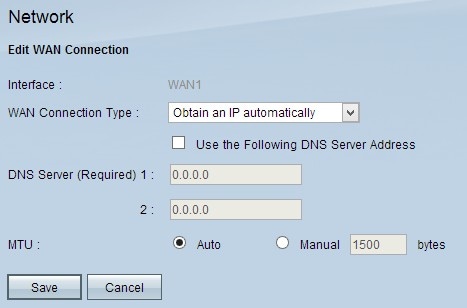
Note: The Interface is a read only field which indicates the WAN interface which you want to edit.
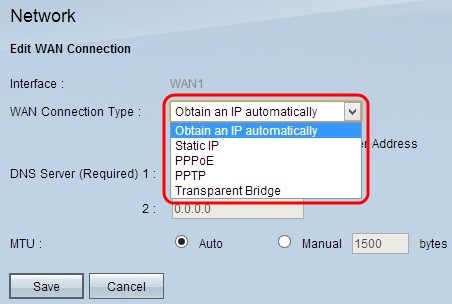
Step 3. In the WAN Connection Type field, choose your Internet connection type:
• Obtain an IP Automatically — Choose this option if your ISP dynamically assigns an IP address.
• Static IP — Choose this option if your ISP assigned a permanent IP address to your account.
• PPPoE (Point-to-Point Protocol over Ethernet) — Choose this option if your ISP uses PPPoE to establish Internet connections (typical for DSL lines).
• PPTP (Point-to-Point Tunneling Protocol) — Choose this option if your ISP uses PPTP.
• Transparent Bridge — Choose this option if you are using this router to connect two network segments.
Obtain an IP automatically
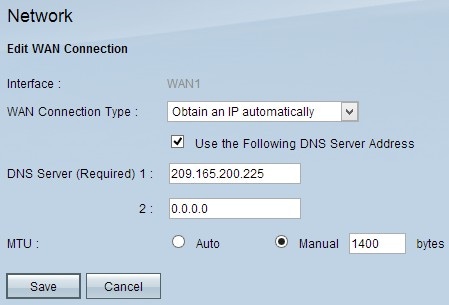
Note: With this connection type, your ISP automatically assigns you an IP address and DNS server IP addresses. The following steps are optional.
Step 1. If you know the IP address of your DNS server and you want to specify the DNS server, check Use the Following DNS Server Address check box.
Step 2. Enter the IP address of the DNS server in the DNS Server (Required) 1 field.
Step 3. Enter the IP address of the second DNS server in the DNS Server 2 field.
Step 4. Click the appropriate radio button to choose the size of the transmission unit for the WAN connection. MTU (Maximum Transmission Unit) indicates the maximum size of packet that can go over the network.
• Auto — Automatically specifies the transmission packet size according to the network.
• Manual — Manually specify the transmission packet size. If you choose this option enter the maximum size of the packet in bytes in the field beside Manual. The default value is 1500 bytes.
Step 5. Click Save to save the settings.
Static IP
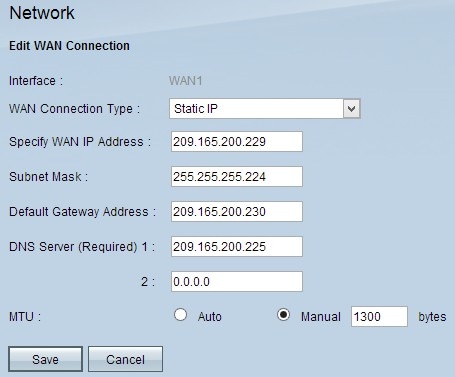
Step 1. Enter the external IP address for the WAN interface in the Specify WAN IP Address field. Your ISP provides you the WAN IP address.
Step 2. Enter the subnet mask for the WAN IP address in the Subnet Mask field.
Step 3. Enter the IP address of the default gateway in the Default Gateway Address field.
Step 4. Enter the IP address of the domain name server in the DNS Server (Required) 1 field.
Step 5. (Optional) If you know the IP address of the secondary domain name server, enter the IP address in the DNS Server 2 field.
Step 6. Click the appropriate radio button to choose the size of the transmission unit for the WAN connection. MTU (Maximum Transmission Unit) indicates the maximum size of packet that can go over the network.
• Auto — Automatically specifies the transmission packet size according to the network.
• Manual — Manually specify the transmission packet size. If you choose this option, enter the maximum size of the packet in bytes in the field beside the Manual field. The default value is 1500 bytes.
Step 7. Click Save to save the settings.
PPPoE
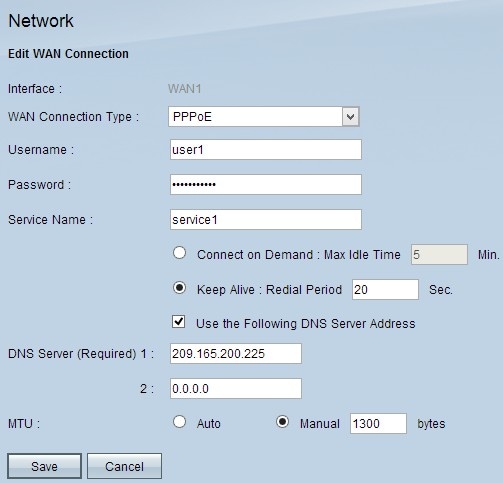
Step 1. Enter the username of your ISP account in the Username field.
Step 2. Enter the password of your ISP account in the Password field.
Step 3. Enter the service name in the Service Name field.
Step 4. Click the appropriate radio button to choose the service type.
• Connect on Demand — Connection to the Internet becomes disconnected after a specific amount of inactivity. Enter a period of time in minutes in the Max Idle Time after which the connection to the Internet becomes disconnected. The default value is 5 minutes.
• Keep Alive — The Internet connection is always on. The router will periodically sent out data packets to ensure the connection is always maintained. Enter a time period in seconds in the Redial Period field that the router will wait before it sends another data packet.
Step 5. (Optional) If you want to specify the IP address of your DNS server, check the Use the Following DNS Server Address check box. If you do not want to specify the IP address of your DNS server, skip to Step 8.
Step 6. Enter the IP address of the domain name server in the DNS Server (Required) 1 field.
Step 7. (Optional) If you know the IP address of the secondary domain name server, enter the IP address of the secondary domain name server in the DNS Server 2 field.
Step 8. Click the appropriate radio button to choose the size of the transmission unit for the WAN connection. MTU (Maximum Transmission Unit) indicates the maximum size of packet that can go over the network.
• Auto — Automatically specifies the transmission packet size according to the network.
• Manual — Manually specify the transmission packet size. If you choose this option enter the maximum size of the packet in bytes in the field beside Manual. The default value is 1500 bytes.
Step 9. Click Save to save the settings.
PPTP
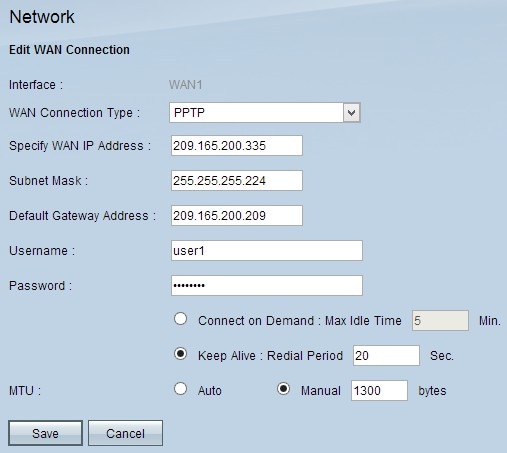
Step 1. Enter the external IP address for the WAN interface in the Specify WAN IP Address field. Your ISP provides you with the WAN IP address.
Step 2. Enter the subnet mask for the WAN IP address in the Subnet Mask field.
Step 3. Enter the IP address of the default gateway in the Default Gateway Address field.
Step 4. Enter the username of your ISP account in the Username field.
Step 5. Enter the password of your ISP account in the Password field.
Step 6. Click the appropriate radio button to choose the service type.
• Connect on Demand — Connection to the Internet becomes disconnected after a specific amount of inactivity. Enter a period of time in minutes in the Max Idle Time after which the connection to the Internet becomes disconnected. The default value is 5 minutes.
• Keep Alive — The Internet connection is always on. The router will periodically sent out data packets to ensure the connection is always maintained. Enter a time period in seconds in the Redial Period field that the router will wait before it sends another data packet.
Step 7. Click the appropriate radio button to choose the size of the transmission unit for the WAN connection. MTU (Maximum Transmission Unit) indicates the maximum size of packet that can go over the network.
• Auto — Automatically specifies the transmission packet size according to the network.
• Manual — Manually specify the transmission packet size. If you choose this option enter the maximum size of the packet in bytes in the field beside Manual. The default value is 1500 bytes.
Step 8. Click Save to save the settings.
Transparent Bridge
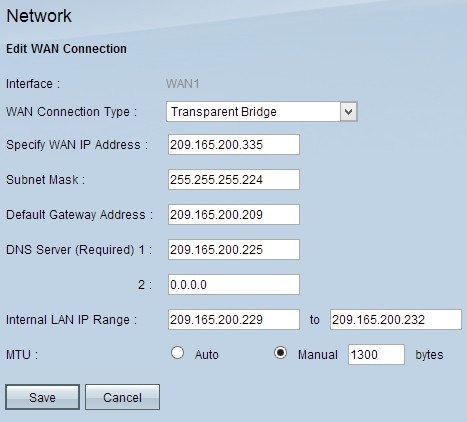
Step 1. Enter the external IP address for the WAN interface in the Specify WAN IP Address field. Your ISP provides you with the WAN IP address.
Step 2. Enter the subnet mask for the WAN IP address in the Subnet Mask field.
Step 3. Enter the IP address of the default gateway in the Default Gateway Address field.
Step 4. Enter the IP address of the domain name server in the DNS Server (Required) 1 field.
Step 5. (Optional) If you know the IP address of the secondary domain name server, enter the IP address in the DNS Server 2 field.
Step 6. Enter the IP address range of the internal LAN address in the Internal LAN IP Range field.
Step 7. Click the appropriate radio button to choose the size of the transmission unit for the WAN connection. MTU (Maximum Transmission Unit) indicates the maximum size of packet that can go over the network.
• Auto — Automatically specifies the transmission packet size according to the network.
• Manual — Manually specify the transmission packet size. If you choose this option enter the maximum size of the packet in bytes in the field beside Manual. The default value is 1500 bytes.
Step 8. Click Save to save the settings.
Edit WAN Connection for IPv6
Note: Dual-Stack IP must be enabled in the IP Mode area in order to configure IPv6
Step 1. Log in to the Router Configuration Utility and choose Setup > Network. The Network page opens:
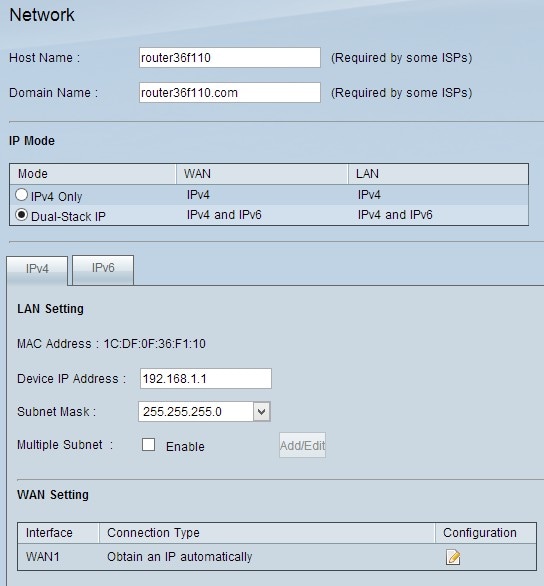
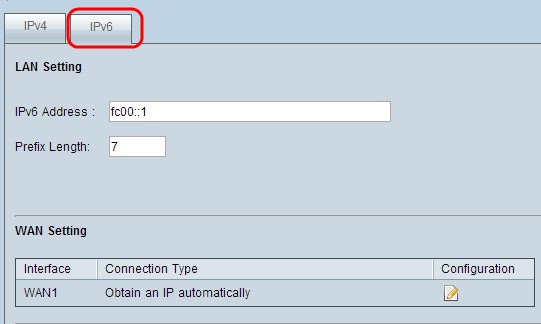
Step 2. Scroll down to WAN Setting section and click the IPv6 tab.
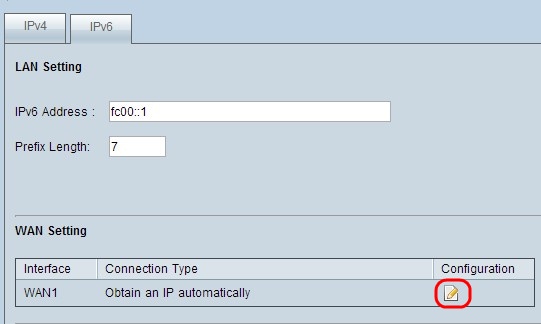
Step 3. Click the Configuration icon for the specific WAN interface which you want to edit. The Network page displays additional information:
Note: The Interface is a read only field which indicates the WAN interface which you want to edit.
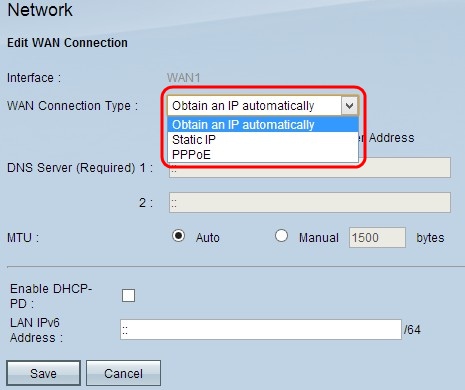
Step 4. In the WAN Connection Type field, choose your Internet connection type:
• Obtain an IP Automatically — Choose this option if your ISP dynamically assigns an IP address.
• Static IP — Choose this option if your ISP assigned a permanent IP address to your account.
• PPPoE (Point-to-Point Protocol over Ethernet) — Choose this option if your ISP uses PPPoE to establish Internet connections (typical for DSL lines).
Obtain an IP automatically
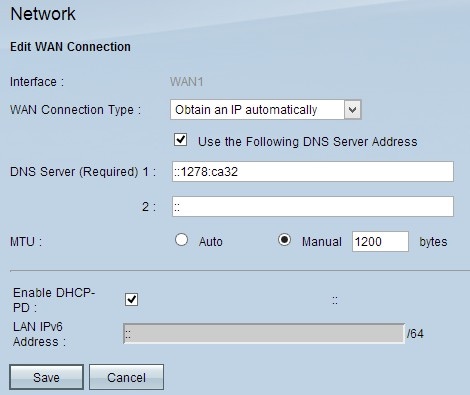
Note: With this connection type, your ISP automatically assigns you an IP address and DNS server IP addresses. The following steps are optional.
Step 1. If you know the IP address of your DNS server and you want to specify the DNS server, check Use the Following DNS Server Address check box.
Step 2. Enter the IP address of the DNS server in the DNS Server (Required) 1 field.
Step 3. Enter the IP address of the second DNS server in the DNS Server 2 field.
Step 4. Click the appropriate radio button to choose the size of the transmission unit for the WAN connection. MTU (Maximum Transmission Unit) indicates the maximum size of packet that can go over the network.
• Auto — Automatically specifies the transmission packet size according to the network.
• Manual — Manually specify the transmission packet size. If you choose this option enter the maximum size of the packet in bytes in the field beside Manual. The default value is 1500 bytes.
Step 5. (Optional) If you want to enable IPv6 of DHCP client process check Enable DHCP-PD check box. It is used if the ISP is able to send LAN prefix via DHCPv6.
Step 6. (Optional) If you know the LAN IP address, enter the LAN IPv6 prefix in the LAN IPv6 Address field.
Step 7. Click Saveto save the settings.
Static IP
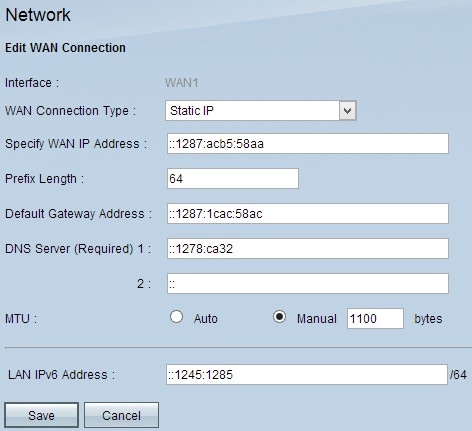
Step 1. Enter the external IP address for the WAN interface in the Specify WAN IP Address field. Your ISP provides you with the WAN IP address.
Step 2. Enter the prefix for the WAN IP address in the Prefix Length field.
Step 3. Enter the IP address of the default gateway in the Default Gateway Address field.
Step 4. Enter the IP address of the domain server in the Domain Server (Required) 1 field.
Step 5. (Optional) If you know the IP address of the secondary domain name server, enter the IP address in the DNS Server 2 field.
Step 6. Click the appropriate radio button to choose the size of the transmission unit for the WAN connection. MTU (Maximum Transmission Unit) indicates the maximum size of packet that can go over the network.
• Auto — Automatically specifies the transmission packet size according to the network.
• Manual — Manually specify the transmission packet size. If you choose this option enter the maximum size of the packet in bytes in the field beside Manual. The default value is 1500 bytes.
Step 7. (Optional) If you know the LAN IP address, enter the LAN IPv6 prefix in the LAN IPv6 Address field.
Step 8. Click Save to save the settings.
PPPoE
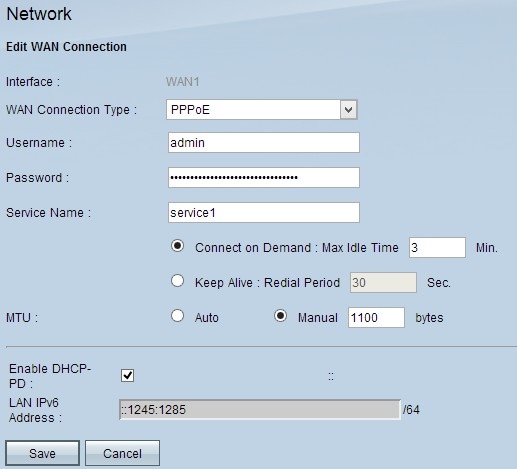
Step 1. Enter the username of your ISP account in the Username field.
Step 2. Enter the password of your ISP account in the Password field.
Step 3. Enter the service name in the Service Name field.
Step 4. Click the appropriate radio button to choose the service type.
• Connect on Demand — Connection to the Internet becomes disconnected after a specific amount of inactivity. Enter a period of time in minutes in the Max Idle Time after which the connection to the Internet becomes disconnected. The default value is 5 minutes.
• Keep Alive — The Internet connection is always on. The router will periodically sent out data packets to ensure the connection is always maintained. Enter a time period in seconds in the Redial Period field that the router will wait before it sends another data packet.
Step 5. Click the appropriate radio button to choose the size of the transmission unit for the WAN connection. MTU (Maximum Transmission Unit) indicates the maximum size of packet that can go over the network.
• Auto — Automatically specifies the transmission packet size according to the network.
• Manual — Manually specify the transmission packet size. If you choose this option enter the maximum size of the packet in bytes in the field beside Manual. The default value is 1500 bytes.
Step 6. (Optional) If you want to enable IPv6 of DHCP client process check the Enable DHCP-PD check box. Your ISP may use DHCP-PD to send LAN prefixes via DHCPv6.
Step 7. (Optional) If you know the LAN IP address, enter the LAN IPv6 prefix in the LAN IPv6 Address field.
Step 8. Click Save to save the settings.
Revision History
| Revision | Publish Date | Comments |
|---|---|---|
1.0 |
11-Dec-2018 |
Initial Release |
 Feedback