ARP Attack Protection on RV315W VPN Router
Available Languages
Objective
ARP (Address Resolution Protocol) is used to keep track of all devices that are directly connected to the RV315W. ARP protection is used to protect a network from ARP attacks. When a packet arrives on an interface (port/LAG) that is defined as untrusted, ARP protection attack compares the IP address and MAC address of the packet with the IP addresses and MAC addresses previously defined in the ARP access control rules. If the addresses match, the packet is considered valid and is forwarded otherwise the packet is discarded. This article explains how to configure ARP Attack Protection on the RV315W VPN Router.
Applicable Device
• RV315W
Software Version
• 1.01.03
ARP Attack Protection
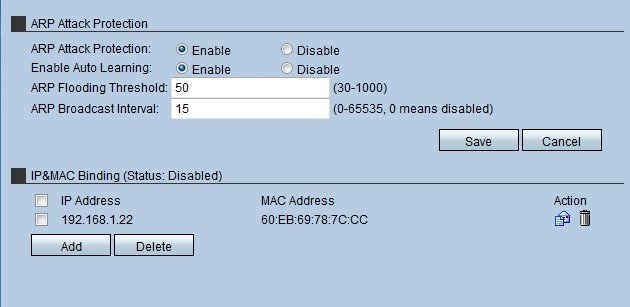
Step 1. Log in to the web configuration utility and choose Security > ARP Attack Protection . The ARP Attack Protection page opens:

Step 2. In the Attack Protection field, click the Enable radio button to enable ARP Attack Protection on the RV315W.
Step 3. (Optional) To enable the RV315W to auto learn, click Enable in the Enable Auto Learning field. This feature allows the RV315W to recognize which IP addresses and MAC addresses are valid on the network.
Step 4. Enter the maximum amount of ARP packets that the RV315W can receive per second. If the device receives more than the value that is set, the ARP protection is applied to the RV315W.
Step 5. Enter the interval for the ARP broadcast in the ARP Broadcast Interval field. This interval determines the amount of ARP broadcast sent out.
IP&MAC Binding
This area allows the administrator to map an IP address and a MAC address to enhance the security. A host may only access the network if the IP address and MAC address of the host match what is configured in the IP&MAC Binding area.
Add a IP&MAC Binding

Step 1. Click Add to add a new IP&MAC Binding rule. This Add IP&MAC Binding Rule page opens:
Step 2. Enter the IP address which is mapped with the MAC Address in the IP Address field.
Step 3. Enter the MAC address which is mapped with the IP Address in the MAC Address field.
Step 4. Click Save. This rule is displayed in the IP&MAC Binding List.
Edit a IP&MAC Binding Rule

Step 1. Check the check box of the IP&MAC binding rule that is to be edited.
Step 2. Click the Envelop icon to edit the IP&MAC binding rule.
Delete IP&MAC Binding Rule

Step 1. Check the check box of the IP&MAC binding rule that is to be deleted.
Step 2. Click the Trashcan icon to delete the IP&MAC binding rule.
 Feedback