Internet Key Exchange (IKE) Policy Settings on RV130 and RV130W VPN Routers
Available Languages
Objective
Internet Key Exchange (IKE) is a protocol that establishes secure communication between two networks. With IKE, packets are encrypted and locked and unlocked with keys used by two parties.
You need to create an Internet Key Exchange policy before configuring a VPN Policy. Refer to VPN Policy Configuration on RV130 and RV130W for more information.
The objective of this document is to show you how to add an IKE profile to RV130 and RV130W VPN Routers.
Applicable Devices
• RV130
• RV130W
Steps of Procedure
Step 1. Use Router Configuration Utility to choose VPN > Site-to-Site IPSec VPN > Advanced VPN Setup from the menu on the left. The Advanced VPN Setup page appears:

Step 2. Under the IKE Policy Table, click Add Row. A new window appears:

Step 3. Enter a name for the IKE policy in the IKE Name field.

Step 4. From the Exchange Mode drop-down menu, choose the mode in which a key exchange is used to establish secure communication.

The available options are defined as follows:
• Main — Protects the identity of peers for increased security.
• Aggressive — No protection of peer identity but provides a quicker connection.
Step 5. From Local Identifier Type drop-down menu, choose the type of identity the profile has.

The available options are defined as follows:
• Local WAN (Internet) IP — Connects through the Internet.
• IP Address — Unique string of numbers separated by periods that identifies each machine using the Internet Protocol to communicate over a network.
Step 6. (Optional) If IP Address is selected from the drop-down list in step 5, enter the local IP address in the Local Identifier field.

Step 7. From the Remote Identifier Type drop-down menu, choose the type of identity the profile has.

The available options are defined as follows:
• Local WAN (Internet) IP — Connects through the Internet.
• IP Address — Unique string of numbers separated by periods that identifies each machine using the Internet Protocol to communicate over a network.
Step 8. (Optional) If IP Address is selected from the drop-down list in Step 7, enter the remote IP address in the Remote Identifier field.

Step 9. From the Encryption Algorithm drop-down menu, choose an algorithm to encrypt your communications. AES-128 is chosen as default.

The available options are listed as follows from least to greatest security:
• DES — Data Encryption Standard.
• 3DES — Triple Data Encryption Standard.
• AES-128 — Advanced Encryption Standard uses a 128 bit key.
• AES-192 — Advanced Encryption Standard uses a 192 bit key.
• AES-256 — Advanced Encryption Standard uses a 256 bit key.
Note: AES is the standard method of encryption over DES and 3DES for its greater performance and security. Lengthening the AES key will increase security with a drop in performance. AES-128 is recommended as it provides the best compromise between speed and security.
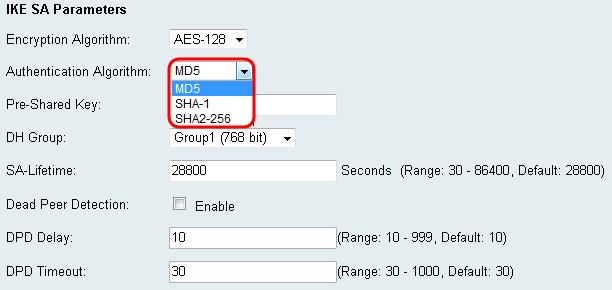
Step 10. From the Authentication Algorithm drop-down menu, choose an algorithm to authenticate your communications. SHA-1 is chosen as default.

The available options are defined as follows:
• MD5 — Message Digest Algorithm has a 128 bit hash value.
• SHA-1 — Secure Hash Algorithm has a 160 bit hash value.
• SHA2-256 — Secure Hash Algorithm with a 256 bit hash value.
Note: MD5 and SHA are both cryptographic hash functions. They take a piece of data, compact it, and create a unique hexadecimal output that is typically not reproducible. MD5 provides essentially no security against hashing collisions and should only be used in a small business environment setting where collision-resistance is not needed. SHA1 is a better choice than the MD5 because it offers better security at negligibly slower speeds. For best results, SHA2-256 has no known attacks of practical relevance and will offer the best security. As mentioned before, higher security means slower speeds.
Step 11. In the Pre-Shared Key field, enter a password that is between 8 and 49 characters in length.

Step 12. From the DH Group drop-down menu, choose a DH group. The number of bits indicates the level of security. Both ends of the connection must be in the same group.

Step 13. In the SA-Lifetime field, enter how long the Security Association will be valid in seconds. The default is 28800 seconds.

Step 14. (Optional) Check the Enable check box in the Dead Peer Detection field if you want to disable a connection with inactive peer. Skip to step 17 if you did not enable Dead peer Detection.

Step 15. (Optional) If you enabled Dead Peer Detection, enter a value in the DPD Delay field. This value will specify how long the router will wait to check for client connectivity.

Step 16. (Optional) If you enabled Dead Peer Detection, enter a value in the DPD Timeout field. This value will specify how long the client will stay connected until it is timed out.

Step 17. Click Save to save changes.

Revision History
| Revision | Publish Date | Comments |
|---|---|---|
1.0 |
12-Dec-2018 |
Initial Release |
 Feedback