Bandwidth Management on the RV130 and RV130W
Available Languages
Objective
Bandwidth is the amount of data that can be transferred across a network over a given unit of time. Bandwidth Management is a Quality of Service (QoS) feature that prioritizes network services and modifies rate controls. The Bandwidth Management settings allow you to control traffic, communications, and the rate of data transfers on a network link to enhance network performance.
The objective of this document is to show you how to configure Bandwidth Management settings on the RV130 and RV130W.
Applicable Devices
• RV130
• RV130W
Bandwidth Management
Step 1. Log in to the web configuration utility and choose QoS > Bandwidth Management. The Bandwidth Management page opens:

Step 2. In the Bandwidth Management field under the Setup section, check the Enable check box to allow the device to manage the bandwidth of traffic flowing from the LAN to the WAN.

Note: The Bandwidth Table shows available WAN interfaces for which you can modify the rate that the device sends and receives data.
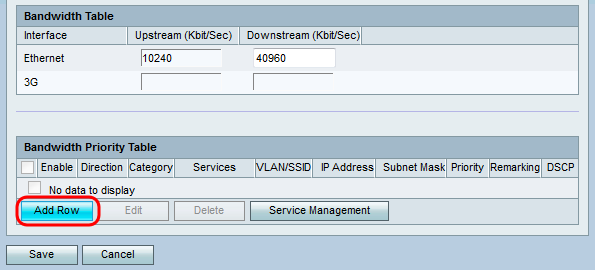
Step 3. In the Upstream (Kbit/Sec) column, enter the rate at which the router sends data for each of the available interfaces listed.

Step 4. In the Downstream (Kbit/Sec) column, enter the rate at which the router receives data for each of the available interfaces listed.

Step 5. Click Save to save changes.
Add a Service Priority
The Bandwidth Priority Table is used to assign specific priorities to services to manage their bandwidth usage.
Step 1. Click Add Row to add a new service priority in the Bandwidth Priority Table.

Step 2. Check the Enable check box to enable bandwidth management for the service.

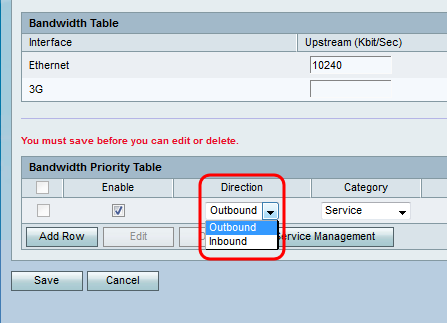
Step 3. From the Direction drop-down list, choose whether the service sends data outbound or receives data inbound.

Step 4. From the Category drop-down list, choose what you would like to set the bandwidth priority for.

The available options are defined as follows:
• Service — Used to set bandwidth priority for a specific type of traffic (i.e. HTTP, DNS, FTP).
• VLAN/SSID — Used to set bandwidth priority for all traffic on a specific VLAN/SSID. This option is only available if you select Outbound for Direction in Step 3. Skip to Step 6 if you choose this option.
• Source IP — Used to set bandwidth priority for all traffic on a specific Source IP address. This option is only available if you select Inbound for Direction in Step 3. Skip to Step 7 if you choose this option.
• Destination IP — Used to set bandwidth priority for all traffic on a specific Destination IP address. This option is only available if you select Outbound for Direction in Step 3. Skip to Step 7 if you choose this option.
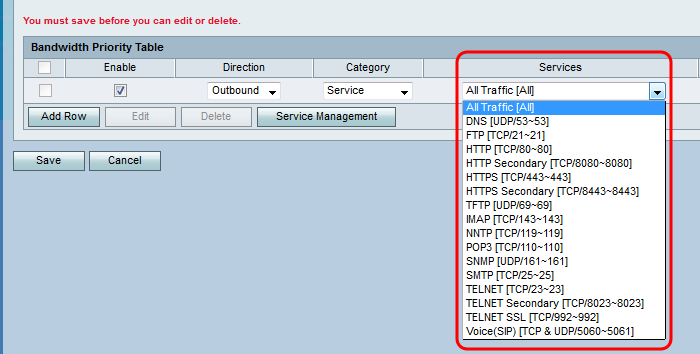
Step 5. If you selected Service in Step 4, choose a service to prioritize from the Services drop-down list. When you are finished, skip to Step 8.

Step 6. If you choose VLAN/SSID in Step 4, choose the VLAN or SSID you would like to set the priority of from the VLAN/SSID drop-down list and skip to Step 8. Otherwise, skip this step.

Step 7. If you choose Source IP or Destination IP in Step 4, enter the IP address and Subnet Mask of the address you would like to set the priority of into the IP Address and Subnet Mask fields respectively. Otherwise, skip this step.

Step 8. From the Priority drop-down list, choose the level of bandwidth priority you would like to allocate to the specific service or IP. Higher priority will allot more bandwidth to the service or address.

Step 9. If you chose Outbound in Step 3, check the check box in the Remarking field to enable remarking on Differentiated Services Code Point (DSCP). Otherwise skip to step 11. Enabling remarking puts priority on network traffic across the LAN based on the DSCP queue mapping of the device. For more information, refer to DSCP Settings on RV130 and RV130W.

Step 10. If you chose to enable Remarking in Step 9, enter the remarking value for the packets in the DSCP field. Otherwise, skip this step.

Step 11. Click Save to save your changes.
Revision History
| Revision | Publish Date | Comments |
|---|---|---|
1.0 |
11-Dec-2018 |
Initial Release |
 Feedback