Configure Web Filtering on the RV34x Series Router
Available Languages
Objective
Web filtering is a feature on your router that can enhance an already secured network and promote productivity in the workplace by screening websites according to a score on a Web Reputation Index, adding keywords or domain names to a block list, and by server IP address.
An administrator or a company may have existing guidelines that discuss general network security, the Internet of things, and rules they want to implement on a network yet find an exception to the rules when it comes to a particular department. The administrator can create scheduled rules and bind them to exception lists granting access to specific websites during a certain time of the day or granting access to all websites to a specific user or users while the rest of the users on the network have denied access.
This article aims to show you how to configure Web Filtering on the RV34x Series Routers.
Applicable Devices | Software Version
- RV34x Series | 1.0.03.20
Configure Web Filtering
Step 1
Log in to the web-based utility and choose Security > Application Control > Web Filtering.

Step 2
Select the On radio button.

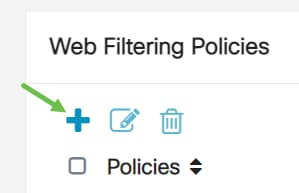
Step 3
Click the add icon.
Step 4
Enter a Policy Name, Description, and the Enable checkbox.
Note: If Content Filtering is enabled on your router, a notification will appear to inform you that Content Filtering has been disabled and that the two features cannot be enabled simultaneously. Click Apply to proceed with the configuration.

Step 5
Check the Web Reputation checkbox to enable filtering based on a web reputation index.

Note: Content will be filtered according to the notoriety of a website or URL based on a web reputation index. If the score falls below 40, the website will be blocked. To read more about the web reputation technology, click here for more details.
Step 6
From the Device Type drop-down list, select the source/destination of the packets to be filtered. Only one option can be chosen at a time. The options are:
- ANY — Choose this to apply the policy to any device.
- Camera — Choose this to apply the policy to cameras (such as IP security cameras).
- Computer — Choose this to apply the policy to computers.
- Game_Console — Choose this to apply the policy to Gaming Consoles.
- Media_Player — Choose this to apply the policy to Media Players.
- Mobile — Choose this to apply the policy to mobile devices.
- VoIP — Choose this to apply the policy to Voice over Internet Protocol devices.

Step 7
From the OS Type drop-down list, choose an Operating System (OS) to which the policy should be applicable. Only one option can be chosen at a time. The options are:
- ANY — Applies the policy to any type of OS. This is the default.
- Android — Applies the policy to Android OS only.
- BlackBerry — Applies the policy to Blackberry OS only.
- Linux — Applies the policy to Linux OS only.
- Mac_OS_X — Applies the policy to Mac OS only.
- Other — Applies the policy to an OS that is not listed.
- Windows — Applies the policy to the Windows OS.
- iOS — Applies the policy to iOS OS only.

Step 8
Scroll down to the Schedule section and select the option that best fits your needs.

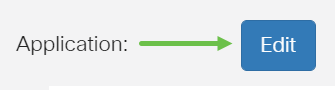
Step 9
Click the Edit button.
Step 10
In the Filtering Level column, click a radio button to quickly define the filtering extent that would best fit the network policies. The options are High, Moderate, Low, and Custom. Click on any of the filtering levels below to know the specific pre-defined sub-categories filtered to each of their enabled Web Content Category. Pre-defined filters cannot be altered any further and are greyed out.
- Low — This is the default option. Security is enabled with this option.
- Moderate — Adult/Mature Content, Illegal/Questionable, and Security are enabled with this option.
- High — Adult/Mature Content, Business/Investment, Illegal/Questionable, IT Resources, and Security are enabled with this option.
- Custom — No defaults are set to allow user-defined filters.

Step 11
Enter the Web Content that you want to filter. Click on the plus icon if you want more detail on one section.

Step 12 (Optional)
To view all Web Content sub-categories and descriptions, you can click the Expand button.

Step 13 (Optional)
Click Collapse to collapse the sub-categories and descriptions.

Step 14 (Optional)
To return to the default categories, click Restore to Default Categories.

Step 15
Click Apply to save the configuration and to return to the Filter page to continue the setup.

Note: In the Application List Table, the corresponding sub-categories based on the chosen filtering level will populate the table.
Step 16
Check the Web Reputation checkbox to enable filtering based on a web reputation index.
Note: Content will be filtered according to the notoriety of a website or URL based on a web reputation index. If the score falls below 40, the website will be blocked. To read more about the web reputation technology, click here for more details.
Step 17 (Optional)
Other options include URL Lookup and the message that shows when a requested page has been blocked.

Step 18
Click Apply.
Step 19
To save the configuration permanently, go to the Copy/Save Configuration page or click the save icon at the upper portion of the page.

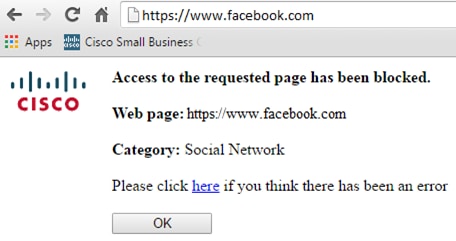
Step 20 (Optional)
To verify that a website or URL has been filtered or blocked, launch a web browser or open a new tab in your browser. Enter the domain name you have blocklisted or have filtered to be blocked or denied.
In this example, it would be www.facebook.com.
You should now have successfully configured web filtering on your RV34x Router.
 Feedback