Configure Attack Protection on the RV132W or RV134W VPN Router
Available Languages
Objective
Attack Protection allows you to protect your network against common types of attacks such as discovery, flooding, and echo storms. While the router has Attack Protection enabled by default, you can adjust the parameters to make the network more sensitive and more responsive to attacks it may detect.
This article aims to show you how to configure Attack Protection on the RV132W and the RV134W VPN Router.
Applicable Devices
- RV 132W
- RV134W
Software Version
- 1.0.0.17 — RV132W
- 1.0.0.24 — RV134W
Configure Attack Protection
Step 1. Log in to the web-based utility and choose Firewall > Attack Protection.

Step 2. Verify that the SYN Flood Detect Rate check box is checked to ensure that the feature is active. This is checked by default.

Step 3. Enter a value at the SYN Flood Detect Rate field. The default value is 128 SYN packets per second. You can enter a value from 0 to 10000. It will be the number of SYN packets per second that will cause the security appliance to determine that a SYN flood intrusion is occurring. A value of zero will indicate that the SYN Flood Detection feature is disabled. In this example, the value entered is 64. It means that the appliance would detect a SYN flood intrusion at only 64 SYN packets per second, making it more sensitive than the default configuration.

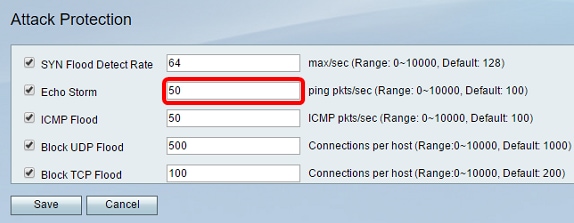
Step 4. Verify that the Echo Storm check box is checked to ensure that the feature is active. This is checked by default.

Step 5. Enter a value at the Echo Storm field. The default value is 100 pings per second. You can enter a value from 0 to 10000. It will be the number of pings per second that will cause the security appliance to determine that an echo storm intrusion event is occurring. A value of zero will indicate that the Echo Storm feature is disabled.
Note: In this example, the appliance would detect an Echo Storm event at only 50 pings per second.

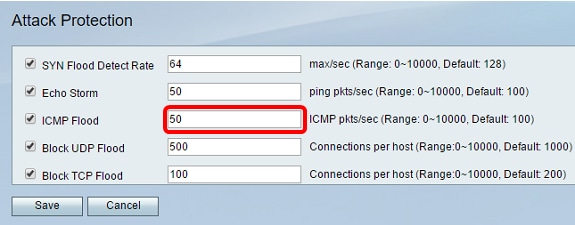
Step 6. Verify that the Internet Control Message Protocol (ICMP) Flood check box is checked to ensure that the feature is active. This feature is checked by default.

Step 7. Enter a numeric value at the ICMP Flood field. The default value is 100 ICMP packets per second. You can enter a value from 0 to 10000. It will be the number of ICMP packets per second that will cause the security appliance to determine that an ICMP flood intrusion event is occurring. A value of zero will indicate that the ICMP Flood feature is disabled.
Note: In this example, the value entered is 50, making it more sensitive to ICMP flooding than its default setting.

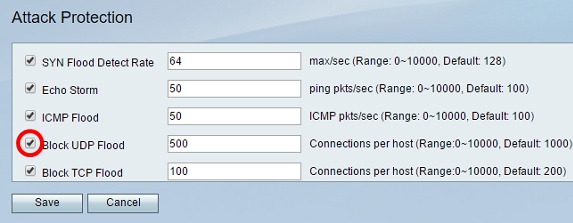
Step 8. Verify that the Block UDP Flood check box is checked to ensure that the feature is active, and to prevent the security appliance from accepting more than 150 simultaneous active User Datagram Protocol (UDP) connections per second from a single computer on the Local Area Network (LAN). This option is checked by default.

Step 9. Enter a value from 0 to 10000 in the Block UDP Flood field. The default value is 1000. In this example, the value entered is 500, making it more sensitive.

Step 10. Verify that the Block TCP Flood check box is checked to drop all invalid Transmission Control Protocol (TCP) packets. This option is checked by default.

Step 11. Enter a value from 0 to 10000 in the Block TCP Flood field to protect your network from a SYN flood attack. The default value is 200. In this example, 100 is entered, making it more sensitive.

Step 12. Click Save.

You should now have successfully configured Attack Protection on your RV132W or RV134W Router.
Revision History
| Revision | Publish Date | Comments |
|---|---|---|
1.0 |
13-Dec-2018 |
Initial Release |
 Feedback