System Log Configuration on RV016, RV042, RV042G and RV082 VPN Routers
Available Languages
Objective
A system log (Syslog) is used to log computer data. You can define the instances that will generate a log. Whenever an instance occurs, the time and event are recorded and sent to a syslog server or sent in an email. Syslog can then be used to analyze and troubleshoot a network along with increase network security.
This document explains the procedure to configure a Syslog server on RV016, RV042, RV042G and RV082 VPN Routers.
Applicable Devices
• RV016
• RV042
• RV042G
• RV082
Software Version
• v4.2.1.02
Configuration of Syslog and Alerts
Step 1. Log in to the web configuration utility and choose Log > System Log. The System Log page opens:

Syslog
This section explains how to enable the router to send detailed log files to your syslog server when events are logged.

Step 2. Check the Enable Syslog check box to enable the syslog service on the device.
Timesaver: Skip to Step 4 if Syslog needs to be disabled.
Step 3. Enter the domain name or the IP address of the syslog server in the Syslog server field.
This section explains how to enable the router to send email alerts when events are logged.
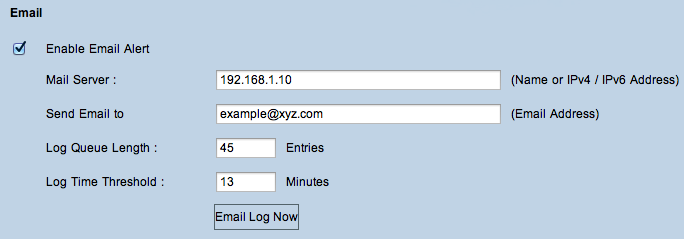
Step 4. Check Enable Email Alert to enable the feature. This enables the router to send email alerts to the user specified email address.
Timesaver: Skip to Step 10 if Email Alert needs to be disabled.
Step 5. Enter the IPv4 or IPv6 address of the SMTP server of your ISP in the Mail Server field.
Note: Your ISP may require that you identify your router with a host name. Choose Setup > Network to define your router host name.
Step 6. Enter the email address where you want to send the alerts in the Send Email to field.
Step 7. Enter the number of log entries to include in the email in the Log Queue Length field. The default is 50.
Step 8. Enter the number of minutes to collect data before sending the log in the Log Time Threshold field. The log time threshold is the maximum wait time before an email log message is sent. When the log time threshold expires an email is sent whether the email log buffer is full or not. The default is 10 minutes
Step 9. (Optional) Click Email Log Now to instantly send a message to the specified email address to test the settings.
Log Setting
This section explains the variety of events that can be reported in the logs:
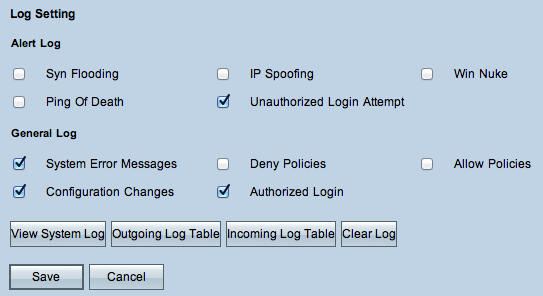
Step 10. The Alert Log area contains common types of attacks and unauthenticated login attempts. Check the check boxes of any type of desired attacks to include them in the event log, or uncheck them to omit them from the event log.
• SYN Flooding — The attacker sends many SYNC packets continuously which causes the router to open multiple sessions so that traffic becomes very crowded and it results in the router denying legitimate traffic.
• IP Spoofing — The attacker sends packets from a fake source IP address to make the attack look like legitimate traffic.
• Win Nuke — The attacker sends an Out of Band message to a Windows machine to make the target computer crash.
• Ping of Death — The attacker sends a large IP packet to make the target computer crash.
• Unauthorized Login Attempt — Someone tried to log in to the Router Configuration Utility without proper authentication.
Step 11. The General Log area includes the actions that are performed to enforce configured policies as well as routine events such as authorized logins and configuration changes. Check the check box of any desired event to include it in the General Log. Uncheck the check box to omit it from the General Log.
• System Error Messages — All system error messages.
• Deny Policies — Instances when the router denied access based on your Access Rules.
• Allow Policies — Instances when the router allowed access based on your Access Rules.
• Configuration Changes — Instances when someone saved changes in the configuration.
• Authorized Log In — Instances when someone successfully logged into the router configuration utility after entering the correct username and password.
• Output Blocking Event — Instances where there is an event in the ProtectLink web reputation, or URL filtering.
Note: Output Blocking Event is only available on RV082 VPN routers.
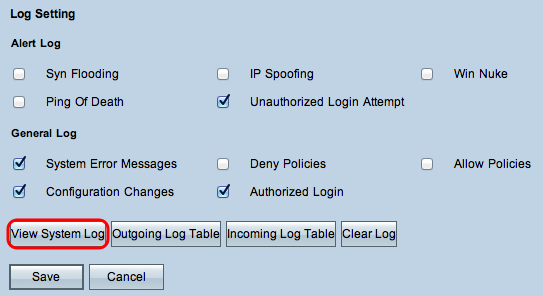
Step 12. (Optional) To view the system log click View System Log. The System Log window appears:

Note: Log entries give the date and time of the event type and a message. This message indicates the type of policy such as Access rule, the LAN IP address of the source, and the MAC address.
Step 13. Choose a particular log from the drop-down list.
Step 14. (Optional) To update the data click Refresh.
Step 15. (Optional) To erase all the shown information click Clear.
Step 16. Click Close to close the window.
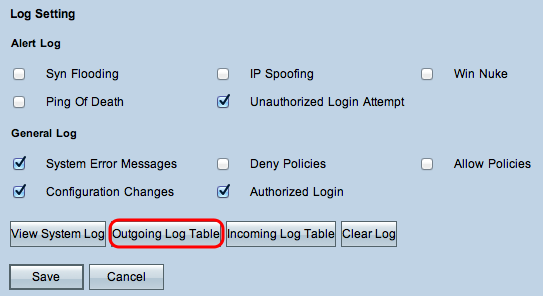
Step 17. (Optional) To view the information about the outgoing packets, click Outgoing Log Table. The information appears in a new window.

Step 18. (Optional) To update the data click Refresh.
Step 19. Click Close to close the window.
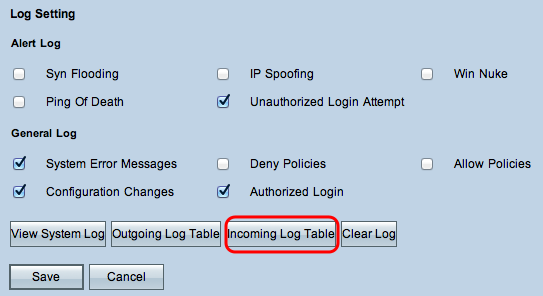
Step 20. (Optional) Click Incoming Log Table to view the information about the incoming packets. The information opens in a new window. If a warning appears about the pop-up window, allow the blocked content.

Step 21. (Optional) To update the data click Refresh.
Step 22. Click Close to close the window.
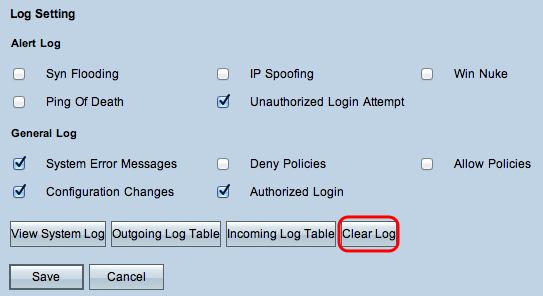
Step 23. (Optional) To clear out the log, click Clear Log Now. Click this button only if the information does not need to be viewed again in the future.
Step 24. Click Save to save the configuration.
Revision History
| Revision | Publish Date | Comments |
|---|---|---|
1.0 |
10-Dec-2018 |
Initial Release |
 Feedback