Configure Internet Protocol Version 4 (IPv4) Local Area Network (LAN) Connections on the RV132W or RV134W VPN Router
Available Languages
Objective
The Local Area Network (LAN) is separated from the Wide Area Network (WAN), allowing you to share a single Internet connection between multiple devices in the LAN. The LAN Configuration page of the web— based utility allows you to configure the Local Area Network (LAN) interface of the router. Although the default settings are typically enough, changing the LAN settings allows you to manipulate its configuration, affecting the network itself, including the device management IP address.
This article aims to show you how to configure the LAN connections on your RV132W or RV134W Router.
Applicable Devices
- RV132W
- RV134W
Software Version
- 1.0.0.17 — RV132W
- 1.0.0.24 — RV134W
Configure LAN Connections
Step 1. Log in to the web-based utility and choose Networking > LAN > LAN Configuration.

Step 2. (Optional) Enter the host name in the Host Name field. This is the nickname of the router. This is typically changed when you have two or more RV Series Routers in the network.

Note: In this example, the Host Name is RV134W.
Step 3. (Optional) Enter the domain name of your network in the Domain Name field.

Step 4. Choose the IPv4 VLAN from the drop-down menu.
Note: In this example, VLAN 20 is chosen.

Step 5. Enter the local IP address in the Local IP Address fields.
Note: In this example, the Local IP Address is 192.168.103.1. This will also be the router management IP address, or the IP address to access the router web-based utility.

Step 6. Enter the subnet mask in the Subnet Mask field. The default value is 255.255.255.0.

Step 7. Choose the DHCP Server mode. The options are:
- Enable — This is the default setting. It lets the router assign an IP address to its hosts automatically. If this option is chosen, skip to Step 9.
- Disable — This option disables the DHCP server. This is typically used when there is another DHCP server in the network.
- DHCP Relay — This option relays the IP addresses assigned by another DCHP server to the network devices. If this option is chosen, skip to Step 8.
Note: In this example, Enable is chosen.

Step 8. (Optional) If you have chosen DHCP Relay in Step 7, enter the IP Address of the remote DHCP Server in the Remote DHCP Server field. Then, skip to Step 22.

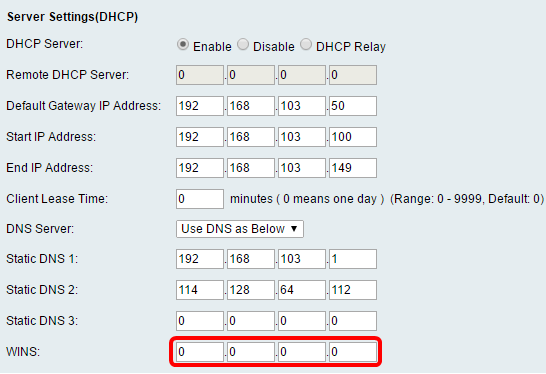
Step 9. (Optional) Enter the default gateway in the Default Gateway IP Address field.
Note: In this example, the Default Gateway IP Address is 192.168.103.50.

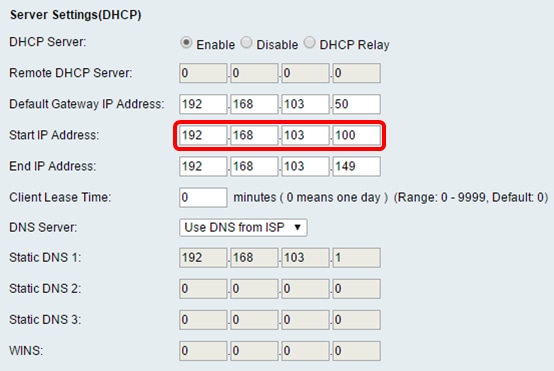
Step 10. (Optional) Enter the start IP address in the Start IP Address field. It is the first address in the IP address pool. Any DHCP client joining the LAN is assigned an IP address in this range.
Note: In this example, the Start IP Address is 192.168.103.100.
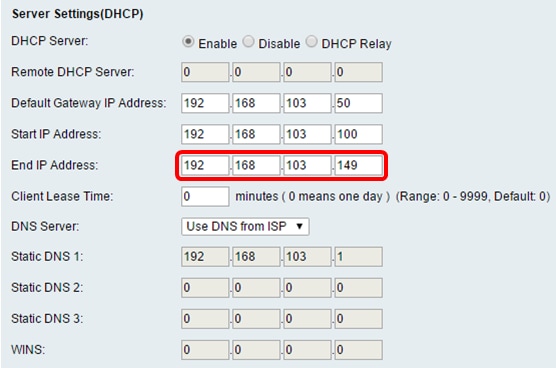
Step 11. (Optional) Enter the end IP address in the End IP Address field. It is the last address in the IP address pool. Any DHCP client joining the LAN is assigned an IP address in this range.
Note: In this example, the end IP Address is 192.168.103.149.
Step 12. (Optional) Enter the client lease time in the Client Lease Time field. This is the duration (in minutes) that IP addresses are leased to clients. The default value is 0.

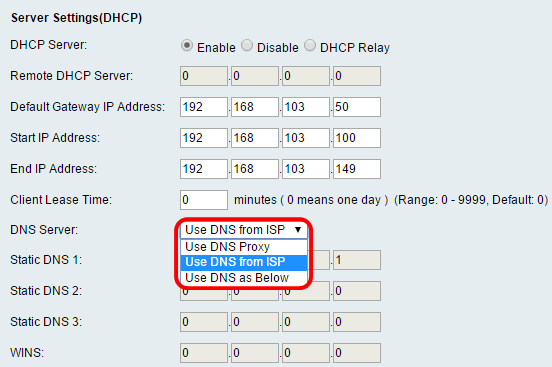
Step 13. (Optional) Choose the source of the DNS server from the drop-down menu. The options are:
- Use DNS Proxy — This option lets the DNS proxy relay DNS requests to the current public network DNS server for the proxy and reply as a DNS resolver to the client devices on the network.
- Use DNS from ISP — This option lets the router use the DNS address provided by the ISP. If this option is chosen, skip to Step 22.
- Use DNS as Below — This option lets the router use the DNS value specified in the Static DNS Server IP Address fields. If this option is chosen, skip to Step 14.
Note: In this example, Use DNS from ISP is chosen.
Step 14. (Optional) Enter the IP address of the primary DNS Server in the Static DNS 1 field.

Note: In this example, Static DNS 1 is 192.168.103.1.
Step 15. (Optional) Enter the IP address of the secondary DNS server in the Static DNS 2 field.
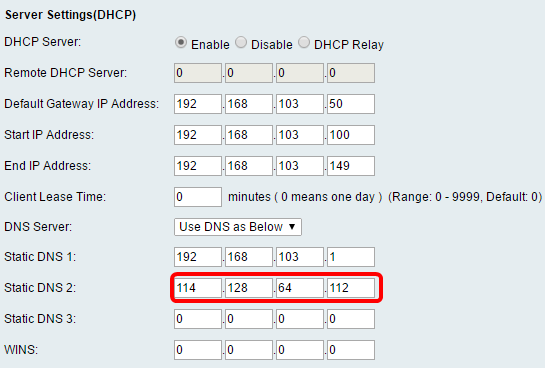
Note: In this example, Static DNS 2 is 114.128.64.112.
Step 16. (Optional) If you have the tertiary DNS server, enter the IP address in the Static DNS 3 field.

Note: In this example, Static DNS 3 is 0.0.0.0.
Step 17. (Optional) Enter the IP address of the primary WINS server in the WINS field.
Step 18. (Optional) Check the Enable DHCP Option 66/150 & 67 check box to activate the feature.

Step 19. (Optional) Enter the Trivial File Transfer Protocol (TFTP) host server name in the TFTP Server Host Name field.

Note: In this example, the TFTP Server Host Name is TFTP Server.
Step 20. (Optional) Enter the IP address of the TFTP server in the TFTP Server IP field.
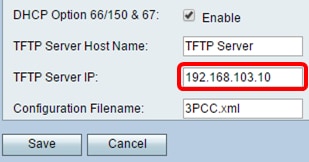
Note: In this example, the TFTP Server IP is 192.168.103.10.
Step 21. (Optional) Enter the configuration filename in the Configuration Filename field.

Note: In this example, the Configuration Filename is 3PCC.xml.
Step 22. Click Save.

You should now have successfully configured the LAN connection settings of your RV132W or RV134W Router.
 Feedback