Configure a Mobile Network on the RV132W and the RV134W Virtual Private Network (VPN) Router
Available Languages
Objective
The RV132W ADSL2+ Wireless-N VPN Router and the RV134W VDSL2 Wireless-AC VPN Router allow you to share the Internet connection from your 4G, 3G, and Long Term Evolution (LTE) Mobile Broadband Universal Serial Bus (USB) modem to multiple devices by connecting the modem to the USB interface of the router. Doing this allows you to share the Internet connection between your devices.
This article aims to show you how to configure a mobile network on the RV132W and the RV134W router.
Applicable Devices
- RV132W
- RV134W
Software Version
- 1.0.0.17 — RV132W
- 1.0.0.21 — RV134W
Configure a Mobile Network
Configure Global Mobile Network Settings
Step 1. Log in to the web-based utility and choose Networking > WAN > Mobile Network.

Step 2. Connect the USB Modem to the USB port of the router.
Note: If the modem is supported, it is automatically detected and appears on the Mobile Network page.

Step 3. Click a radio button from the Connect Mode area. The options are:
- Auto (USB is backup WAN) — This option lets your modem establish a connection to the Internet automatically. When this option is chosen, set an idle time (in minutes) in the Connect on Demand: Max Idle Time field. This will terminate the Internet connection of the USB modem when the idle time is reached. This option is useful when you do not want to rack up charges to your USB broadband Internet subscription. If you want to keep the connection active, choose Keep alive.
- Manual (USB is primary WAN) — This option uses your USB broadband Internet connection as the primary source of Internet. It lets you connect your USB modem to the Internet manually.
Note: In this example, Connection Mode is Auto, Keep Alive.

Step 4. Verify that the Card Status area shows your mobile card is Connected.
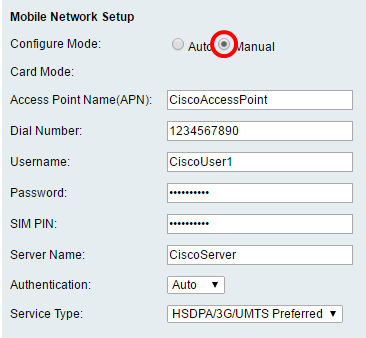
Step 5. Under the Mobile Network Setuparea, choose the Configure Mode. The options are:
- Auto — This option lets the USB modem connect to the Internet automatically. This is typically selected when the supplier of the USB modem did not provide you with login credentials for Internet connection. Proceed to Step 10.
- Manual — This option lets you configure the settings of the Internet connection manually. This option is typically selected when the supplier of the USB modem provided you with credentials that accompany the USB modem. Proceed to Step 6.
Note: In this example, Manual is chosen.

Step 6. (Optional) Enter the access point name in the Access Point Name (APN) field. This is the access point name provided by the service provider of the USB modem.
Note: In this example, the access point name is CiscoAccessPoint.

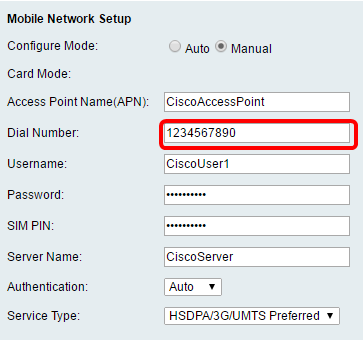
Step 7. (Optional) Enter the number to be dialed for the Internet connection in the Dial Number field. This is the telephone provided by the service provider of the USB modem.
Note: In this example, the dial number is 1234567890.

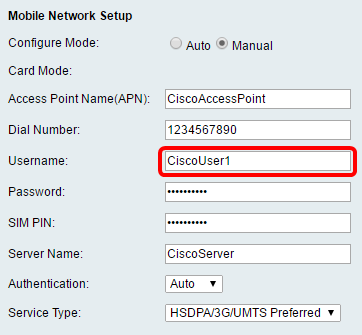
Step 8. (Optional) Enter the username in the Username field. This is the username provided by the service provider of the USB modem.
Note: In this example, the user name is CiscoUser1.

Step 9. (Optional) Enter the password provided by the service provider of the USB modem in the Password field.

Step 10. (Optional) Enter the Subscriber Identification Module (SIM) Personal Identification Number (PIN) in the SIM PIN field. This is the PIN provided by the supplier of the USB modem.

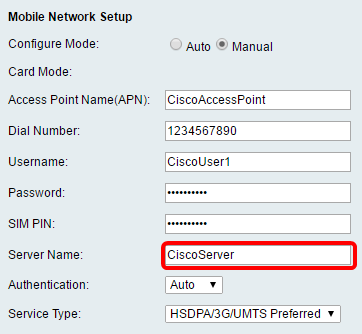
Step 11. (Optional) Enter the name of the server provided by your Internet service provider in the Server Name field.
Note: In this example, the server name is CiscoServer.

Step 12. (Optional) Choose the Authentication type from the drop-down menu. This is the authentication used by your service provider. The default option is Auto. If you do not know which option to choose, choose Auto. The options are:
- Auto — This option automatically detects the authentication used by the Internet service provider of your USB modem.
- PAP — This option is also known as the Password Authentication Protocol. It uses a password to validate users before they are allowed to access the resources of the server.
- CHAP — This option is also known as Challenge-Handshake Authentication Protocol. It authenticates a user to an authenticating entity, which can be your ISP.
Note: In this example, Auto is chosen.

Step 13. (Optional) Choose the Service Type from the drop-down menu. This is typically provided by the Internet service provider.
Note: In this example, HSDPA/3G/UMTS Preferred is chosen.

Step 14. Click Save.

You should now have successfully configured a mobile network on your router.
 Feedback