Manage Certificates on the RV34x Series Router
Available Languages
Objective
A digital certificate certifies the ownership of a public key by the named subject of the certificate. This allows relying parties to depend upon signatures or assertions made by the private key that corresponds to the public key that is certified. A router can generate a self-signed certificate, a certificate created by a network administrator. It can also send out requests to Certificate Authorities (CA) to apply for a digital identity certificate. It is important to have legitimate certificates from third party applications.
Let's talk about obtaining a Certificate from a Certificate Authority (CA). A CA is used for authentication. Certificates are purchased from any number of third party sites. It is an official way to prove that your site is secure. Essentially, the CA is a trusted source that verifies that you are a legitimate business and can be trusted. Depending on your needs, a certificate at a minimal cost. You get checked out by the CA, and once they verify your information, they will issue the certificate to you. This certificate can be downloaded as a file on your computer. You can then go into your router (or VPN server) and upload it there.
The objective of this article is to show you how to generate, export, and import and certificates on the RV34x Series Router.
Applicable Devices | Software Version
- RV34x Series | 1.0.03.20
Manage Certificates on the Router
Generate CSR/Certificate
Step 1
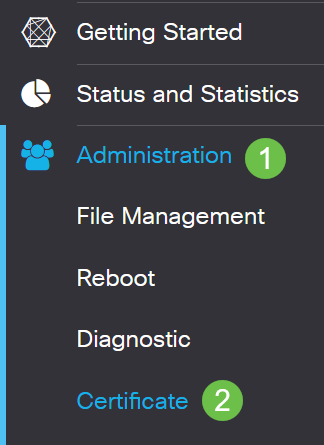
Log in to the web-based utility of the router and choose Administration > Certificate.

Step 2
Click Generate CSR/Certificate. You will be brought to the Generate CSR/Certificate page.

Step 3
Fill in the boxes with the following:
- Choose the appropriate certificate type
- Self-Signing Certificate — This is a Secure Socket Layer (SSL) certificate which is signed by its own creator. This certificate is less trusted, as it cannot be cancelled if the private key is compromised somehow by an attacker.
- Certified Signing Request — This is a Public Key Infrastructure (PKI) which is sent to the certificate authority to apply for a digital identity certificate. It is more secure than self-signed as the private key is kept secret.
- Enter a name for your certificate in the Certificate Name field to identify the request. This field cannot be blank nor contain spaces and special characters.
- (Optional) Under the Subject Alternative Name area, click a radio button. The options are:
- IP Address — Enter an Internet Protocol (IP) address
- FQDN — Enter a Fully Qualified Domain Name (FQDN)
- Email — Enter an email address
- In the Subject Alternative Name field, enter the FQDN.
- Choose a country name in which your organization is legally registered from the Country Name drop-down list.
- Enter a name or abbreviation of the state, province, region, or territory where your organization is located in the State or Province Name(ST) field.
- Enter a name of the locality or city in which your organization is registered or located in the Locality Name field.
- Enter a name under which your business is legally registered. If you are enrolling as a small business or sole proprietor, enter the name of the certificate requester in the Organization Name field. Special characters cannot be used.
- Enter a name in the Organization Unit Name field to differentiate between divisions within an organization.
- Enter a name in the Common Name field. This name must be the fully-qualified domain name of the website for which you use the certificate for.
- Enter the Email Address of person who wants to generate the certificate.
- From the Key Encryption Length drop-down list, choose a key length. The options are 512, 1024, and 2048. The greater the key length, the more secure the certificate.
- In the Valid Duration field, enter the number of days the certificate will be valid. The default is 360.
- Click Generate.

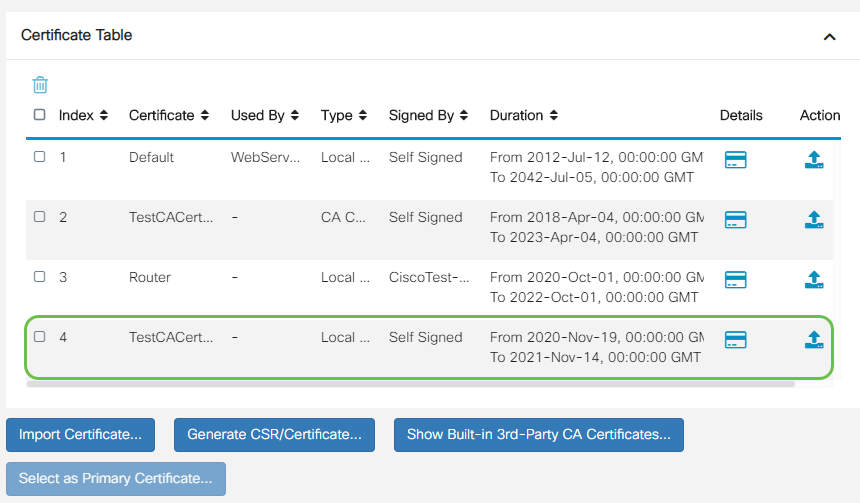
Note: The generated certificate should now appear in the Certificate Table.

You should now have successfully created a certificate on the RV345P router.
Export a Certificate
Step 1
In the Certificate Table, check the check box of the certificate you want to export and click the export icon.

Step 2
- Click a format to export the certificate. The options are:
- PKCS #12 — Public Key Cryptography Standards (PKCS) #12 is an exported certificate that comes in a .p12 extension. A password will be required in order to encrypt the file to protect it as it is exported, imported, and deleted.
- PEM — Privacy Enhanced Mail (PEM) is often used for web servers for their ability to be easily translated into readable data by using a simple text editor such as notepad.
- If you chose PEM, just click Export.
- Enter a password to secure the file to be exported in the Enter Password field.
- Re-enter the password in the Confirm Password field.
- In the Select Destination area, PC has been chosen and is the only option currently available.
- Click Export.

Step 3
A message indicating the success of the download will appear below the Download button. A file will begin to download in your browser. Click Ok.

You should now have successfully exported a certificate on the Rv34x Series Router.
Import a Certificate
Step 1
Click on Import Certificate....

Step 2
- Choose the type of certificate to import from the drop-down list. The options are:
- Local Certificate — A certificate generated on the router.
- CA Certificate — A certificate that is certified by a trusted third-party authority that has confirmed that the information contained in the certificate is accurate.
- PKCS #12 Encoded file — Public Key Cryptography Standards (PKCS) #12 is a format of storing a server certificate.
- Enter a name for the certificate in the Certificate Name field.
- If PKCS #12 was chosen, enter a password for the file in the Import Password field. Otherwise, skip to Step 3.
- Click a source to import the certificate. The options are:
- Import from PC
- Import from USB
- If the router does not detect a USB drive, the Import from USB option will be grayed out.
- If you chose Import From USB and your USB is not being recognized by the router, click Refresh.
- Click on the Choose File button and choose the appropriate file.
- Click Upload.

Once successful, you will automatically be taken to the main Certificate page. The Certificate Table will populate with the recently imported certificate.

You should now have successfully imported a certificate on your RV34x Series Router.
 Feedback