Configure Virtual Local Area Network (VLAN) Settings on an RV34x Series Router
Available Languages
Objective
The RV34x Series Dual-WAN VPN Router is an easy-to-use, flexible, high-performance device that is well-suited for small businesses. With added security features, such as Web Filtering, Application Control, and IP Source Guard, this router series delivers highly secure, broadband, wired connectivity to small offices and remote employees. These new security features also provide the ease of fine tuning permitted activity on the network.
A Virtual Local Area Network (VLAN) is a logical group of hosts combined to form a broadcast domain, irrespective of their physical location. The management VLAN is configured so that only the users configured on the management VLAN can access the device. Configuration of the management VLAN is necessary to add more security to the network. An attack on the management VLAN can breach the network security, so it is advised to change the management VLAN to something other than the default. This allows secure communication between members of VLAN across different physical LANs.
VLANs can be configured with 2 types of Internet Protocol (IP) versions: IP version 4 (IPv4) and IP version 6 (IPv6). Originally, IPv4 was the main address system which used 32-bit binary numbers represented in dotted decimal notation. Today, IPv4 addresses have almost run out, and a new system, IPv6, has increased in use for new addresses. IPv6 uses hexadecimal numbers and colons to represent a 128-bit binary number.
The objective of this document is to show you how to configure a VLAN with different types of IP versions on an RV34x Series Router.
Applicable Devices
- RV34x Series
Software Version
- 1.0.1.16
Configure a VLAN on an RV34x Series Router
Configure an IPv4-based VLAN
Step 1. Log in to the web-based utility of the router and choose LAN > VLAN Settings.

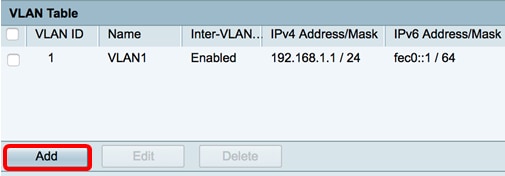
Step 2. In the VLAN Table, click Add to create a new VLAN.

Step 3. In the VLAN ID field, enter a number between 2-4094 to be the VLAN ID.
Note: In this example, the VLAN ID is 20. The VLAN name will automatically populate in accordance to the entered VLAN ID.

Step 4. (Optional) Check the Enable Inter-VLAN Routing check box to allow communication between different VLANs. This is checked by default.
Note: VLANs divide broadcast domains in a LAN environment. Whenever hosts in one VLAN need to communicate with hosts in another VLAN, the traffic must be routed between them.

Step 5. In the IPv4 Address field, assign an IPv4 address.
Note: In this example, 192.168.2.1 is used as the IPv4 address.

Step 6. Enter the prefix length for the IPv4 address. This determines the number of hosts in the subnetwork.
Note: In this example, 24 is used.

Step 7. Click Apply.

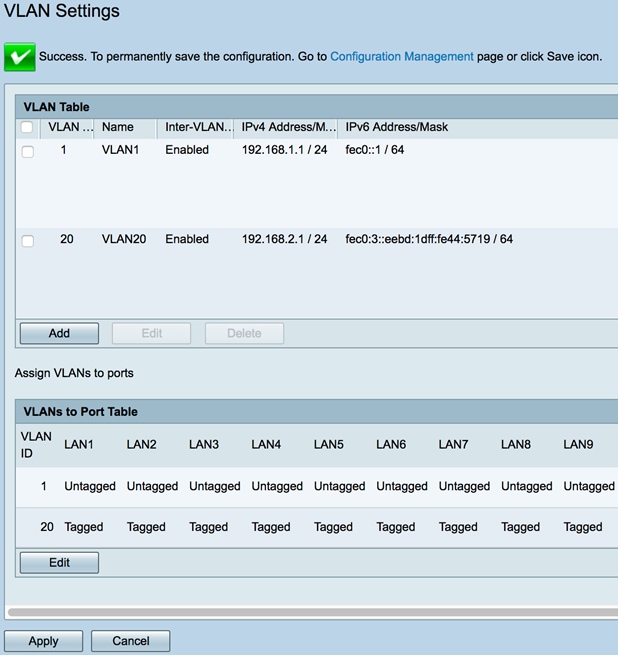
You should now have successfully configured an IPv4-based VLAN on an RV34x Series Router.

Configure an IPv6-based VLAN
Step 1. The IPv6 column is right beside the IPv4 Address/Mask column. In the IPv6 Address/Mask column, click a radio button to determine the method the IPv6 will obtain a prefix. The options are:
- Static — Manually enter a Unique Local address or prefix.
- Prefix from DHCP-PD — A prefix is obtained through an IPv6 Dynamic Host Configuration Protocol Prefix Delegation (DHCP-PD). If this was chosen, skip to Step 3.
Note: In this example, Static is chosen.

Step 2. Enter the prefix of the Unique Local address in the Prefix field.
Note: In this example, fec0:3:: is used.

Step 3. (Optional) If Prefix from DHCP-PD was chosen, enter a maximum of a 4-character combination of letters A to F and 0-9 in the field. If this is chosen, other fields are grayed out. Skip to Step 7.
Note: In this example, 842a is used.

Step 4. In the Prefix Length field, enter a desired prefix length for the IPv6 address.
Note: In this example, 64 is used as the prefix length.

Step 5. Click a radio button in the Interface Identifier area to determine how the last 64 bits of the IPv6 address will be obtained. The options are:
- EUI-64 — Extended Unique Identifier (EUI)-64 is a method of automatically configuring IPv6 host addresses.
- Static — Statically enter a 64-bit address as the Interface ID. Enter a maximum of a 4-character combination of letters A to F and 0-9 in the field.
Note: In this example, EUI-64 is chosen.

Step 6. (Optional) If Static was chosen, enter a maximum of 4-character combination of letters A to F and 0 to 9 in the field.
Note:In this example, 842a is used.

Step 7. Click Apply to save the settings.

You should now have successfully configured the IPv6 Settings on an RV34x Series Router.
Assign a VLAN to a Port
Step 1. In the VLANs to Port Table, click Edit to assign a VLAN to a port.

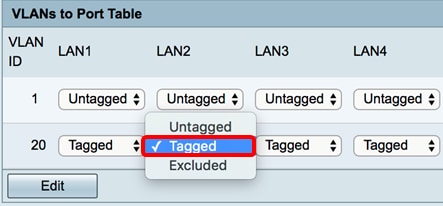
Step 2 Choose a port to assign a VLAN. Each port has a drop-down option to choose from. The options are:
- Untagged — This mode specifies that the association between a given VLAN and the port is untagged. The incoming traffic is forwarded to the VLAN with an untagged association with the port. Traffic from this VLAN egress from this port is untagged.
- Tagged — This mode specifies that the association between a given VLAN and the port is tagged. The incoming traffic on this port is forwarded to the given VLAN based on the VLAN information present in the VLAN tag in the frame. Egress traffic on this port will have the VLAN tag preserved when association is tagged.
- Excluded — This mode specifies that there is no association between the given VLAN and port. Traffic from the VLAN will not be allowed in ingress and egress from this port.
Note: The number of ports may vary depending on the model of your device. RV340 has 4 LAN ports while the RV345 and RV345P both have 16 ports. In this example, VLAN 20 is tagged on LAN2.

Step 3. Click Apply to save the settings.

Step 4. To save the configuration permanently, go to the Copy/Save Configuration page or click the  icon at the upper portion of the page.

You should now have successfully assigned a VLAN to a port on an RV34x Series Router.
 Feedback