Configure and Manage User Accounts on an RV34x Series Router
Available Languages
Objective
The objective of this article is to show you how to configure and manage the local and remote user accounts on an RV34x Series Router. This includes, how to configure local users password complexity, configure/edit/import local users, configure remote authentication service using RADIUS, Active Directory, and LDAP.
Applicable Devices | Firmware Version
- RV34x Series | 1.0.01.16 (Download latest)
Introduction
The RV34x Series Router provides user accounts in order to view and administer settings. Users can be from different groups or belong to logical groups of Secure Sockets Layer (SSL) Virtual Private Networks (VPN) that share the authentication domain, Local Area Network (LAN) and service access rules, and idle timeout settings. User management defines which type of users can utilize a certain type of facility and how that can be done.
The external database priority is always Remote Authentication Dial-In User Service (RADIUS)/Lightweight Directory Access Protocol (LDAP)/Active Directory (AD)/Local. If you add the RADIUS server on the router, the Web Login Service and other services will use the RADIUS external database to authenticate the user.
There is no option to enable an external database for Web Login Service alone and configure another database for another service. Once RADIUS is created and enabled on the router, the router will use the RADIUS service as an external database for Web Login, Site to Site VPN, EzVPN/3rd Party VPN, SSL VPN, Point-to-Point Transport Protocol (PPTP)/ Layer 2 Transport Protocol (L2TP) VPN, and 802.1x.
Table of Contents
- Configure a Local User Account
- Local Users Password Complexity
- Configure Local Users
- Edit Local Users
- Import Local Users
- Configure Remote Authentication Service
- RADIUS
- Active Directory Configuration
- Active Directory Integration
- Active Directory Integration Settings
- LDAP
Configure a Local User Account
Local Users Password Complexity
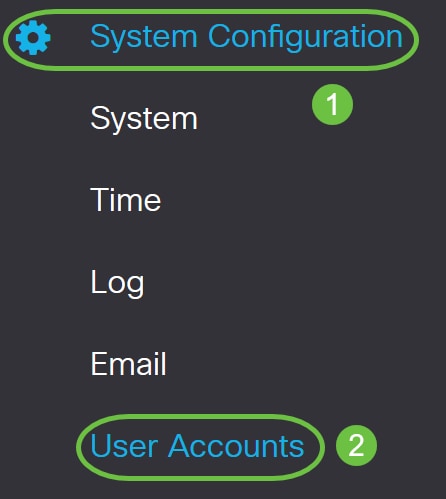
Step 1. Log in to the web-based utility of the router and choose System Configuration > User Accounts.
Step 2. Check the Enable Password Complexity Settings check box to enable password complexity parameters.
If this is left unchecked, skip to Configure Local Users.

Step 3. In the Minimal password length field, enter a number ranging from 0 to 127 to set the minimum number of characters a password must contain. The default is 8.
For this example, the minimum number of characters is set to 10.

Step 4. In the Minimal number of character classes field, enter a number from 0 to 4 to set the class. The number entered represents the number minimum or maximum characters of the different classes:
- Password is composed of upper case characters (ABCD).
- Password is composed of lower case characters (abcd).
- Password is composed numerical characters (1234).
- Password is composed of special characters (!@#$).
In this example, 4 is used.

Step 5. Check the Enable check box for the new password must be different than the current one.

Step 6. In the Password Aging Time field, enter number of days (0 - 365) for password expiry. In this example, 180 days has been entered.
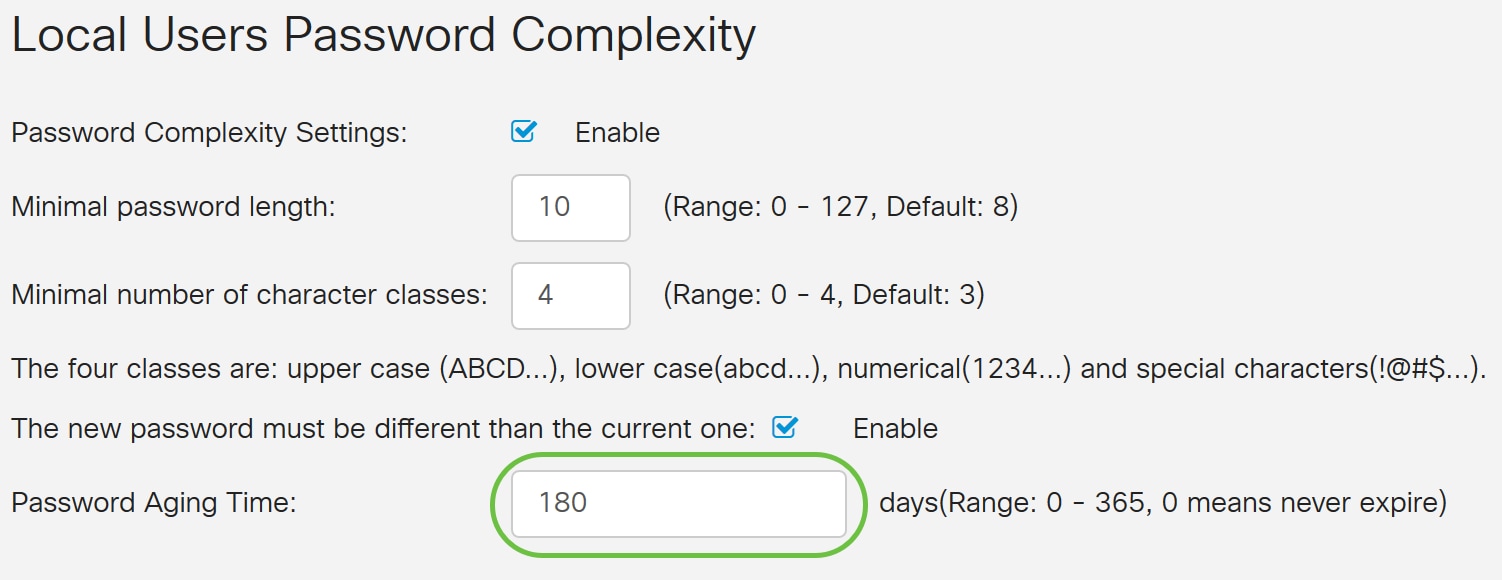
You have now successfully configured the Local Users Password Complexity settings on your router.
Configure Local Users
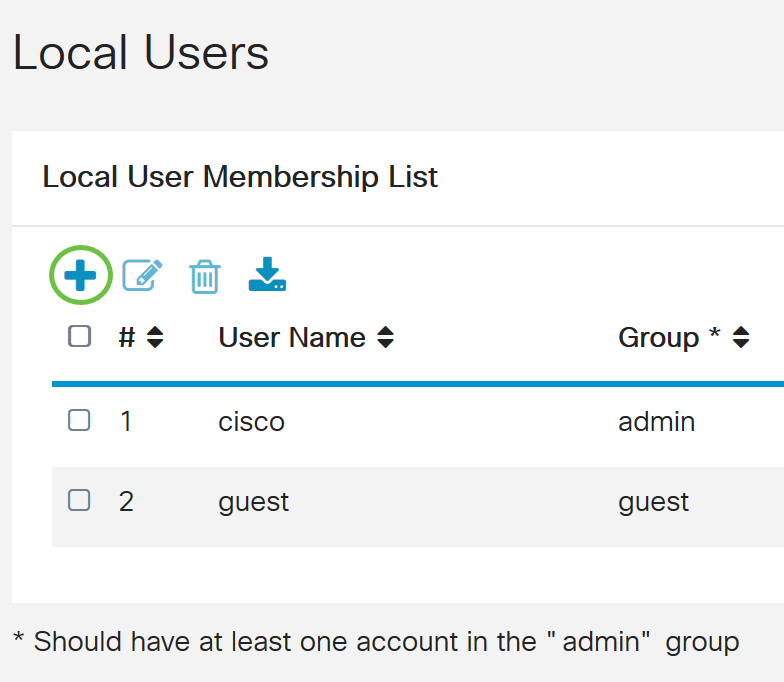
Step 1. In the Local User Membership List table, click Add to create a new user account. You will be taken to the Add User Account page.
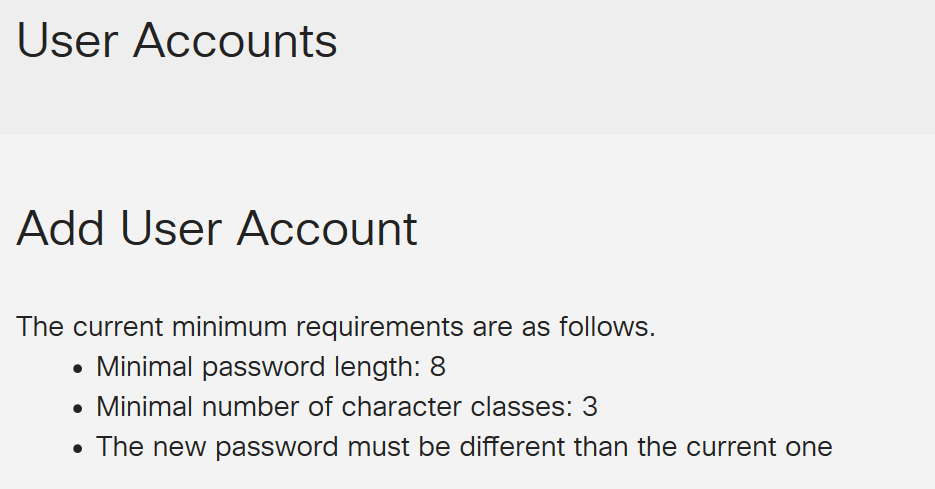
Under the Add User Account header, the parameters defined under Local Password Complexity steps are displayed.
Step 2. In the User Name field, enter a user name for the account.
In this example, Administrator_Noah is used.
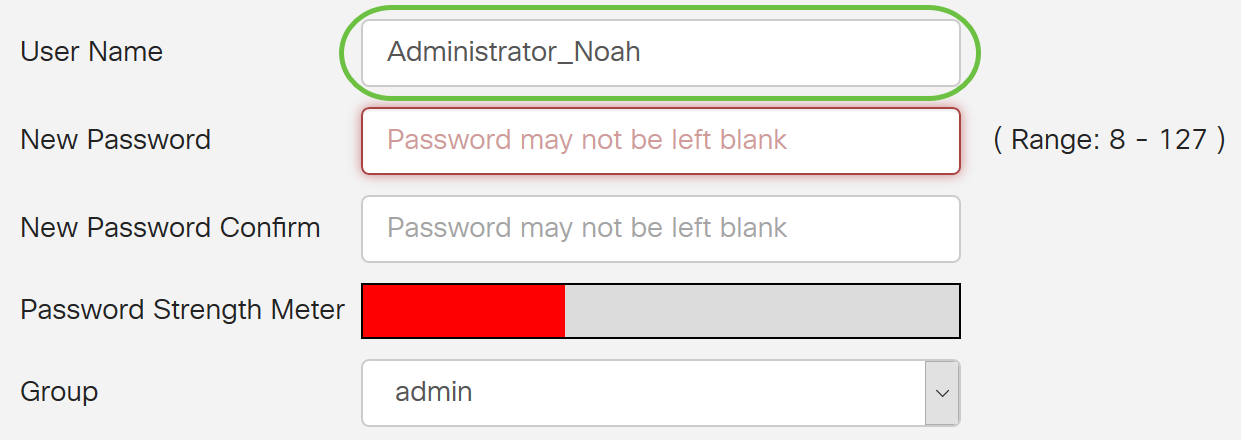
Step 3. In the New Password field, enter a password with the defined parameters. In this example, the minimum password length must be composed of 10 characters with a combination of upper case, lower case, numerical, and special characters.

Step 4. In the New Password Confirm field, re-enter the password to confirm. A text beside the field will appear if the passwords do not match.
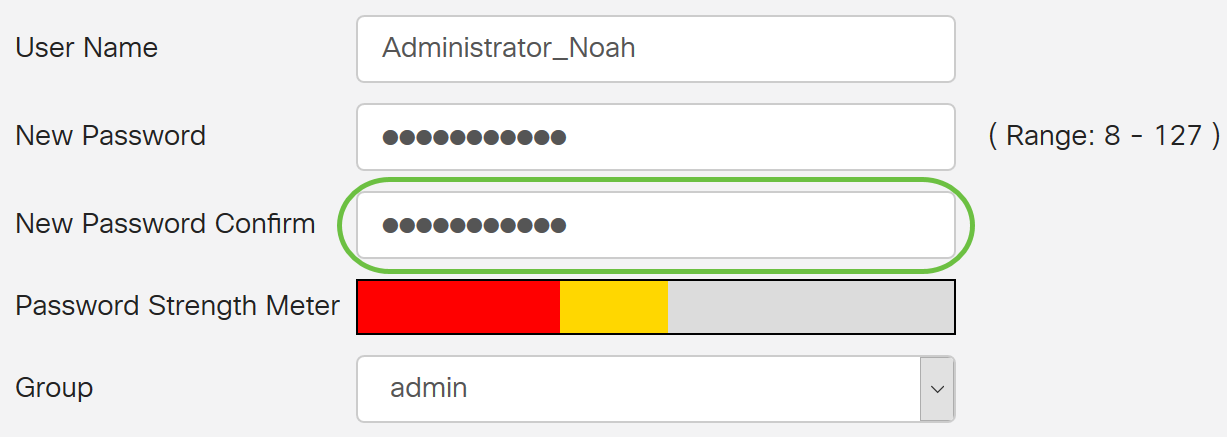
The Password Strength Meter changes depending on the strength of your password.

Step 5. From the Group drop-down list, choose a group to assign a privilege to a user account. The options are:
- admin - Read & write privileges.
- guest - Read-only privileges.
For this example, admin is chosen.
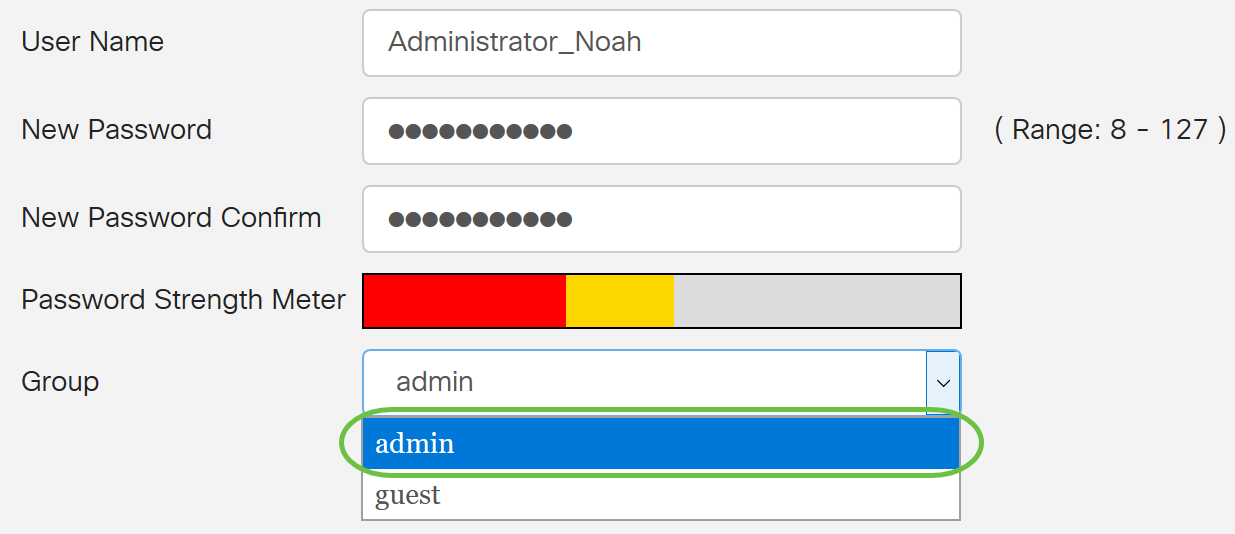
Step 6. Click Apply.
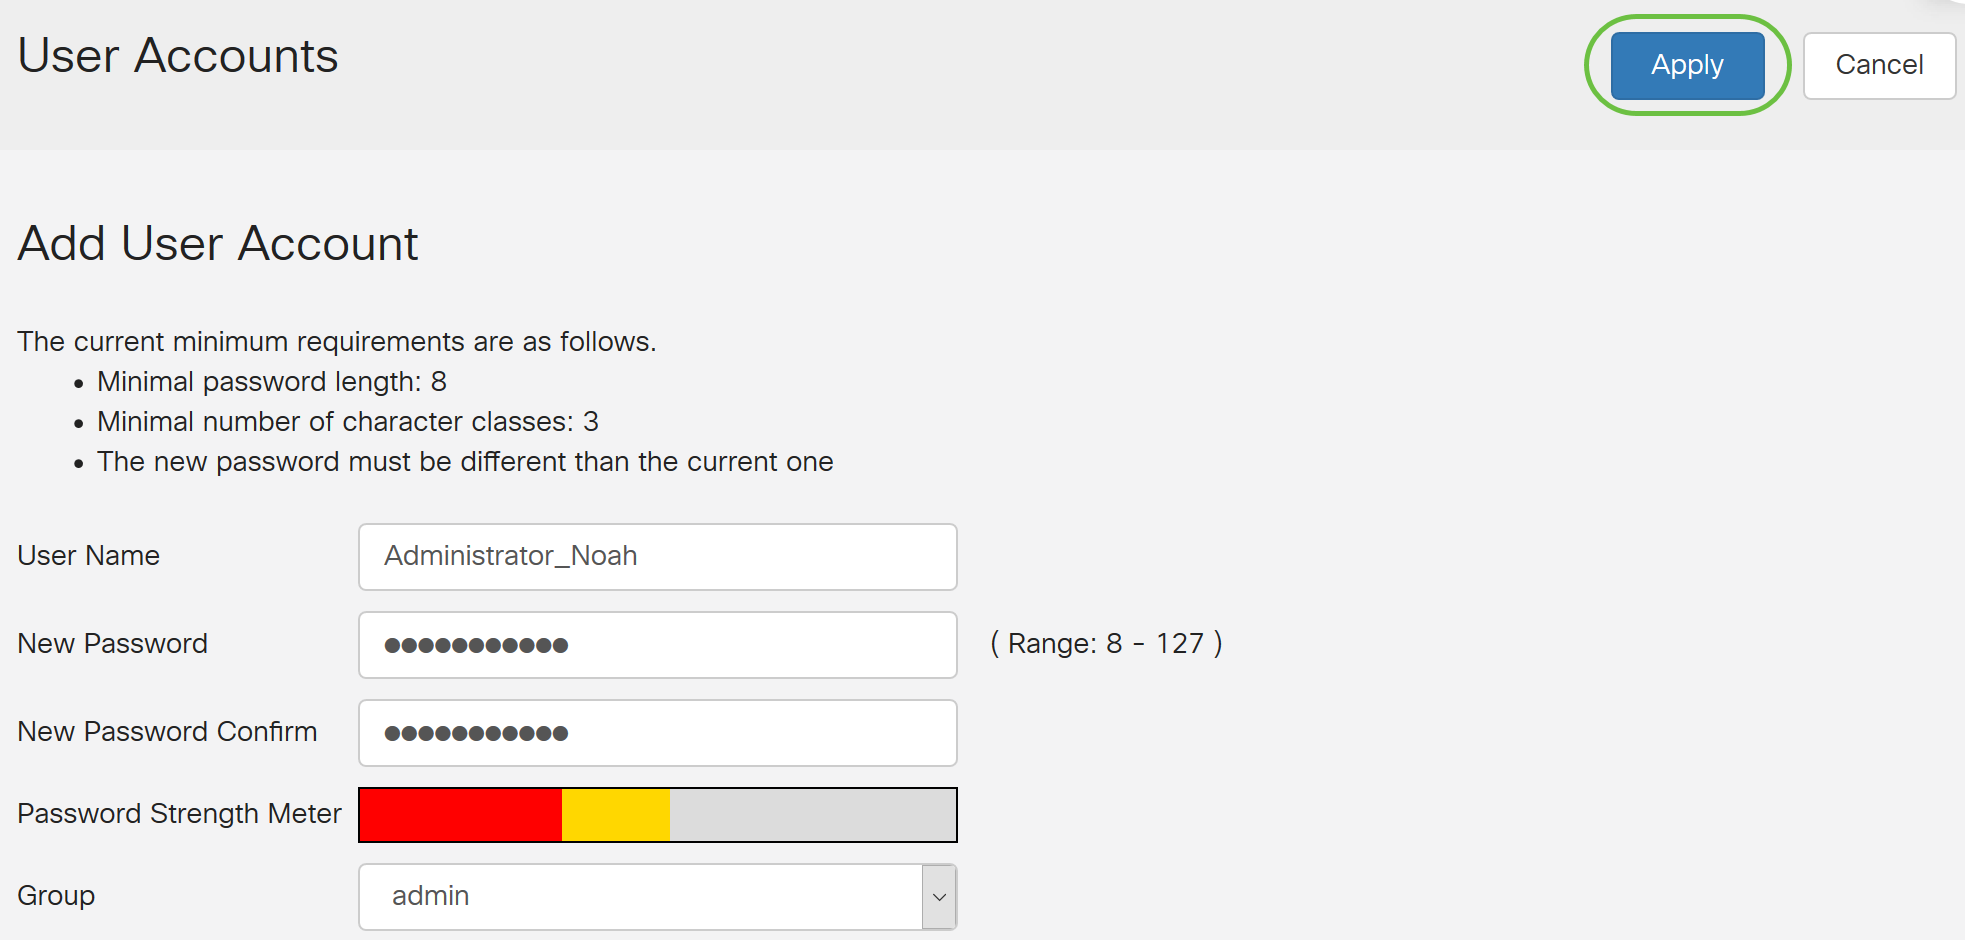
You have now successfully configured the Local User Membership on an RV34x Series Router.
Edit Local Users
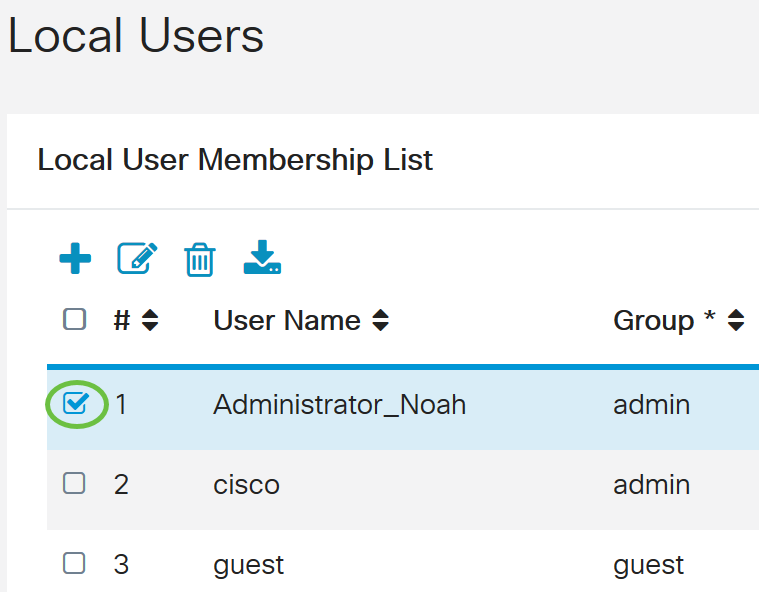
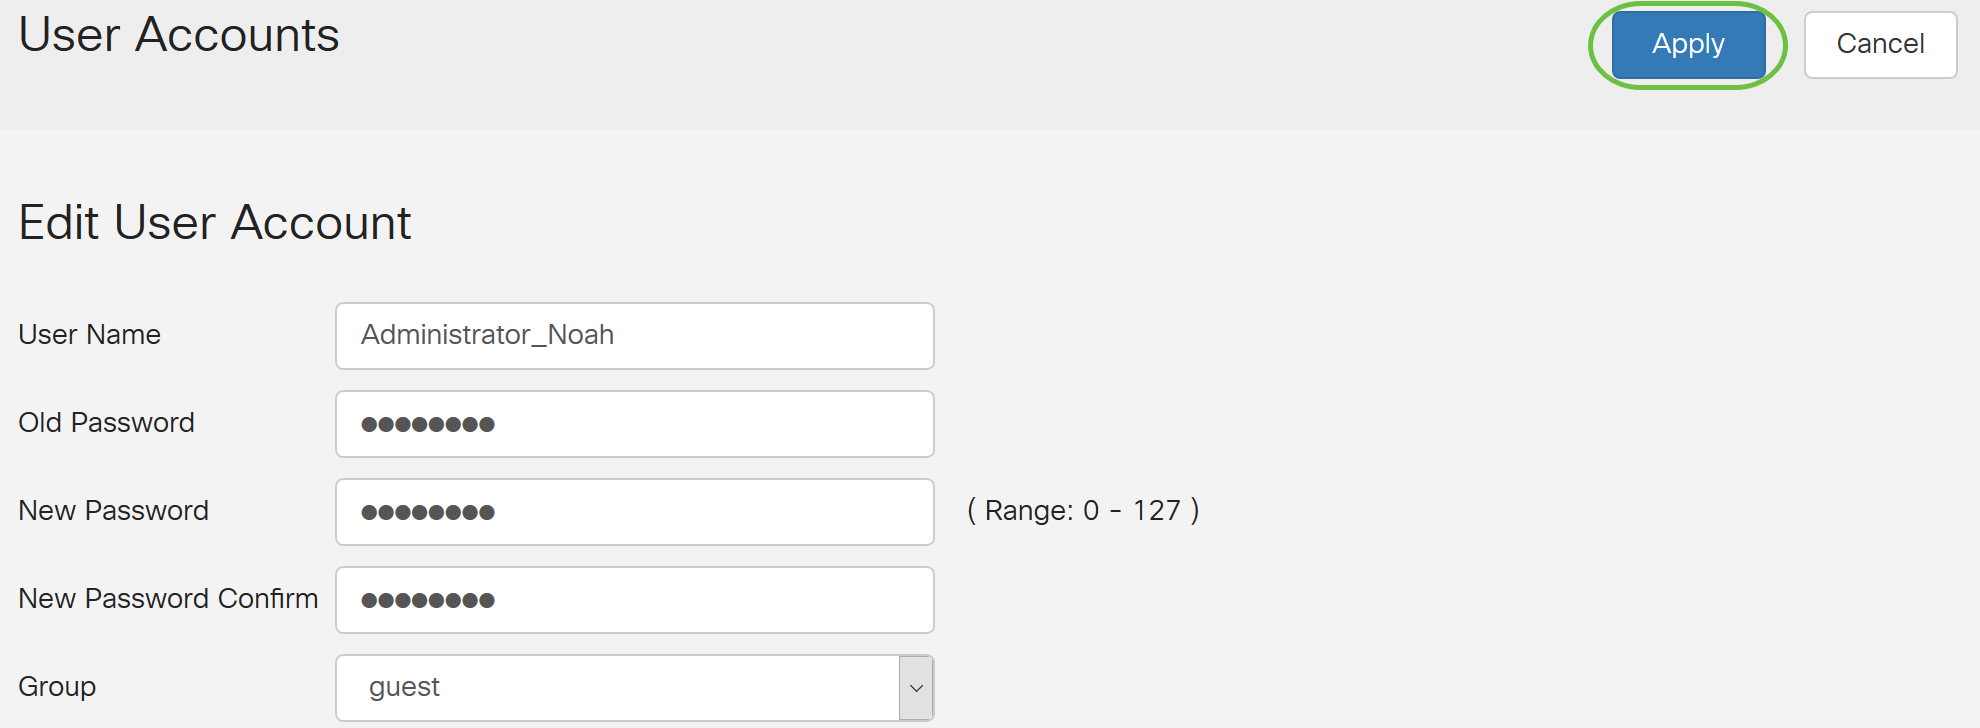
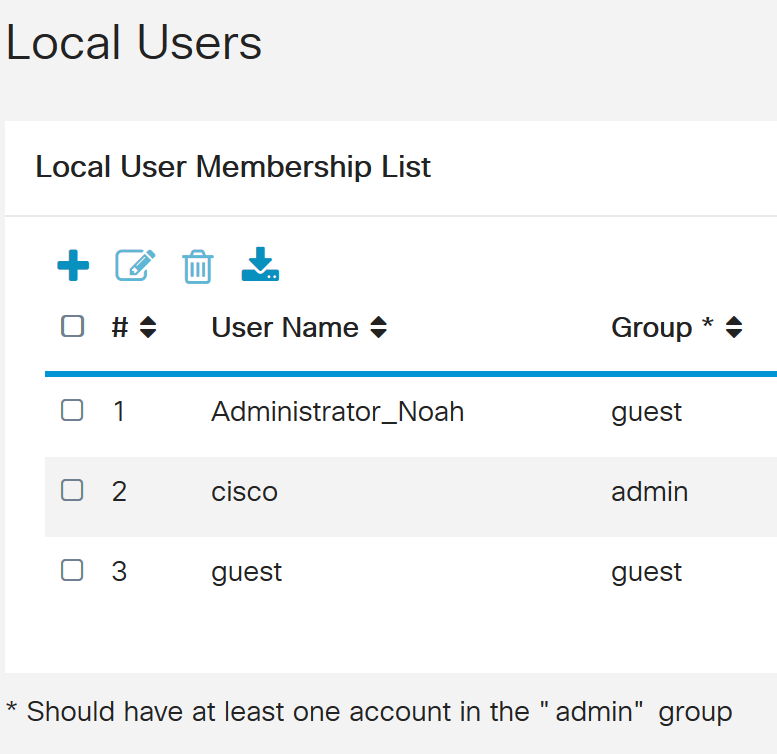
Step 1. Check the check box beside the user name of the local user in the Local User Membership List table.
For this example, Administrator_Noah is chosen.
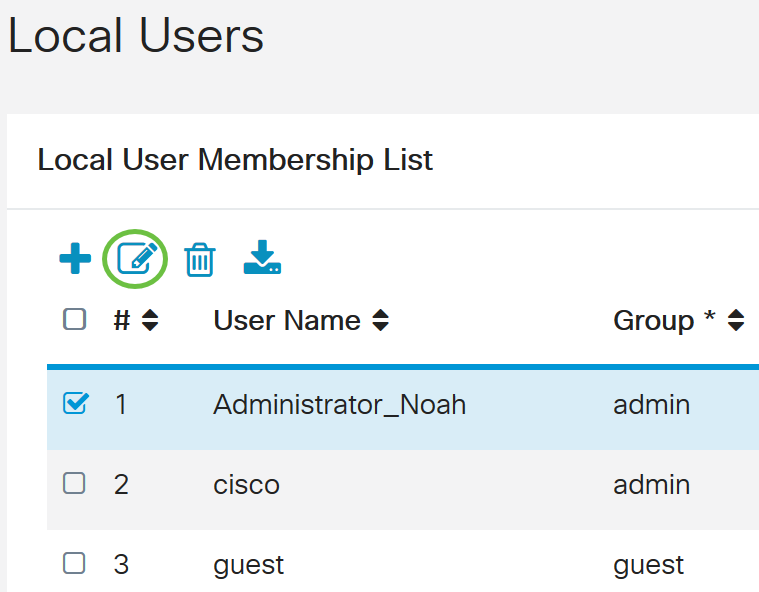
Step 2. Click Edit.
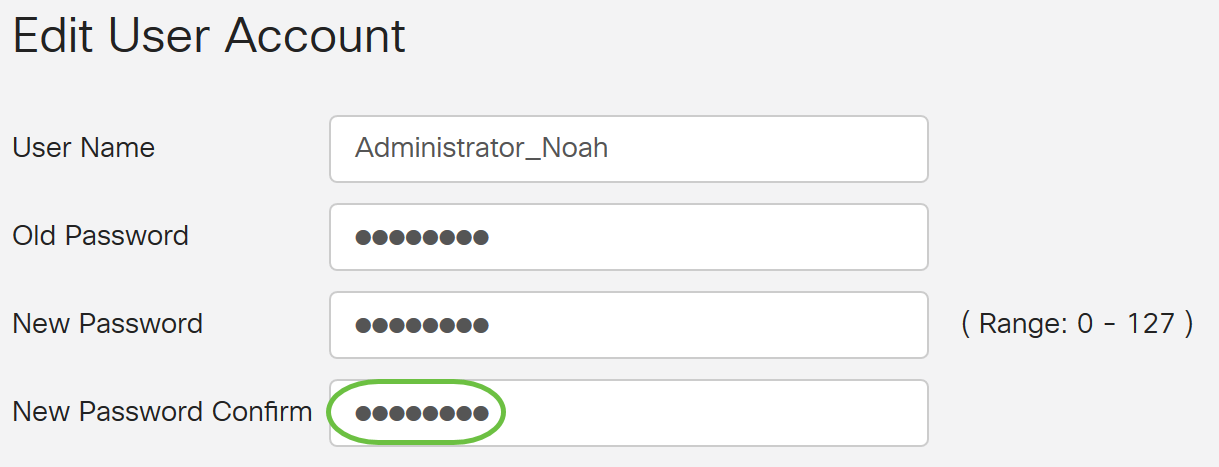
The user name cannot be edited.
Step 3. In the Old Password field, enter the password that was previously configured for the local user account.

Step 4. In the New Password field, enter a new password. The new password must meet the minimum requirements.

Step 5. Enter the new password once more in the New Password Confirm field to confirm. These passwords must match.
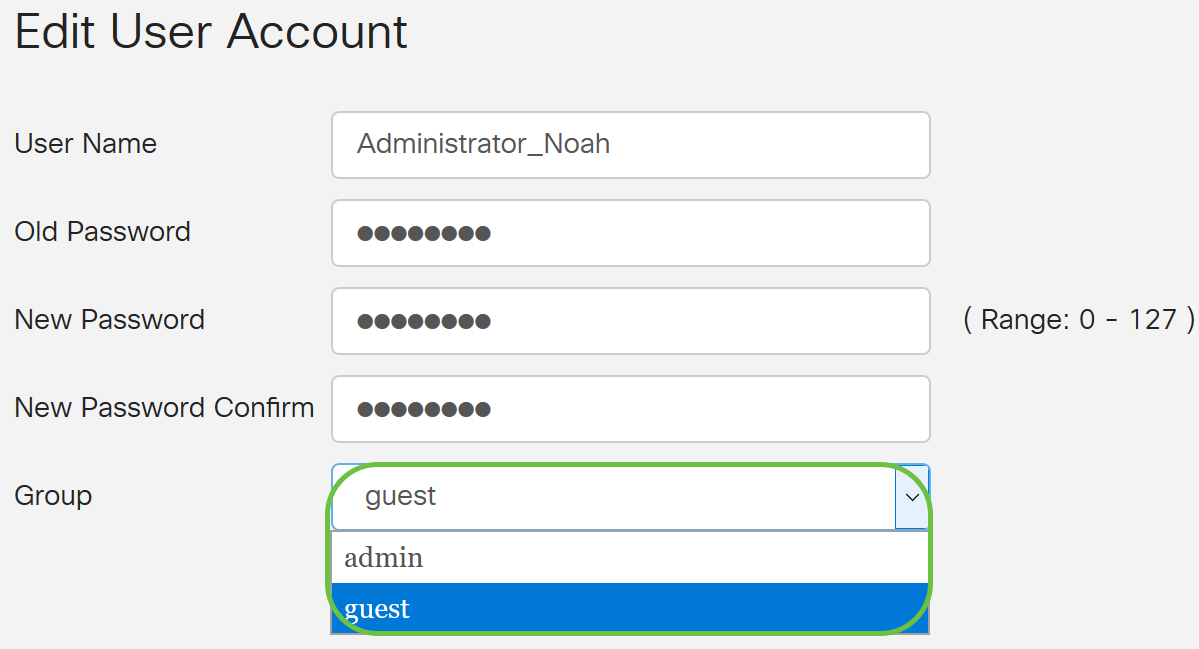
Step 6. (Optional) From the Group drop-down list, choose a group to assign a privilege to a user account.
In this example, guest is chosen.
Step 7. Click Apply.
You should now have successfully edited a local user account.
Import Local Users
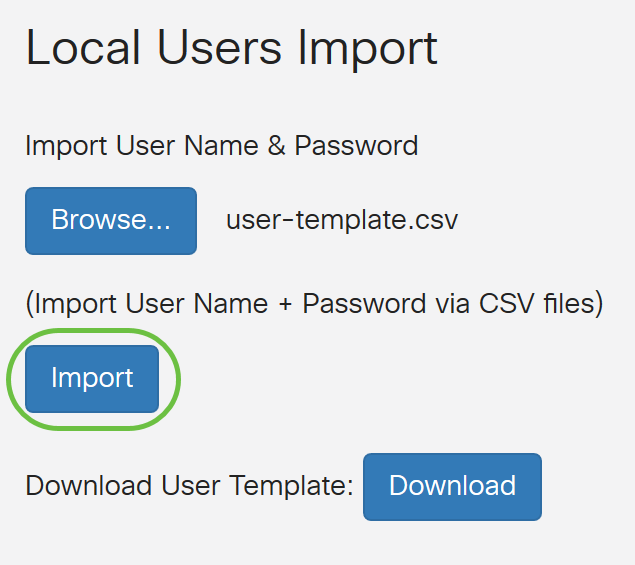
Step 1. In the Local Users Import area, click  .
.
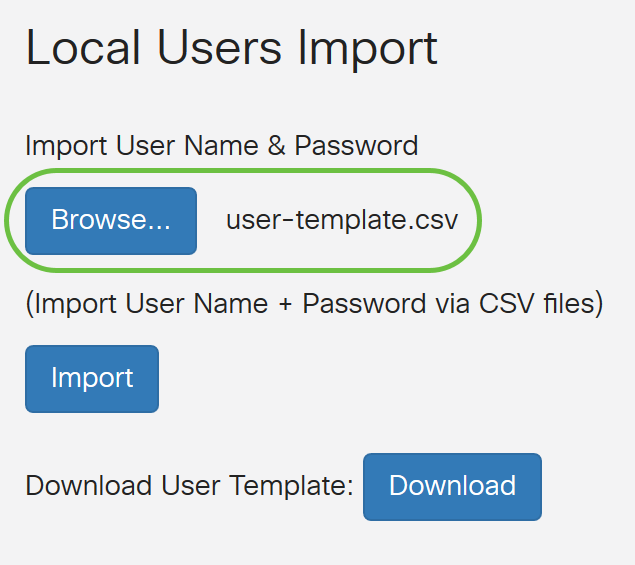
Step 2. Under Import User Name & Password, click Browse... to import a list of users. This file is typically a spreadsheet saved in a Comma Separated Value (.CSV) format.
In this example, user-template.csv is chosen.
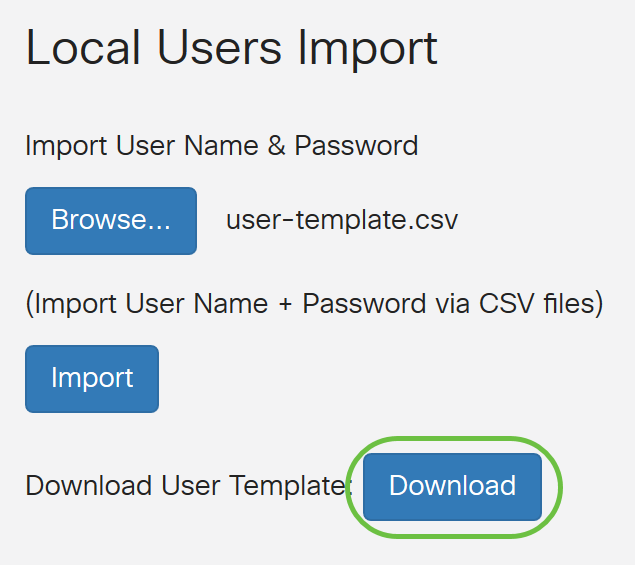
Step 3. (Optional) If you do not have a template, click on the Download in the Download User Template area.
Step 4. Click Import.
A message beside the import button will appear that the import was successful.
You have now successfully imported a list of local users.
Configure Remote Authentication Service
RADIUS
Step 1. In the Remote Authentication Service Table, click Add to create an entry.
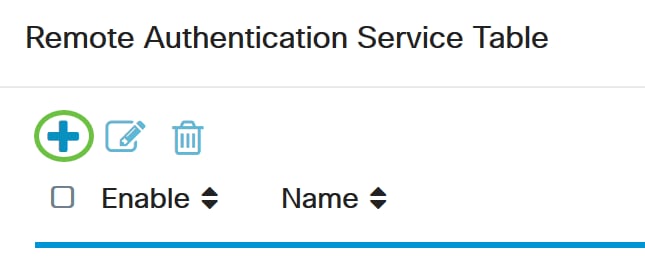
Step 2. In the Name field, create a username for the account.
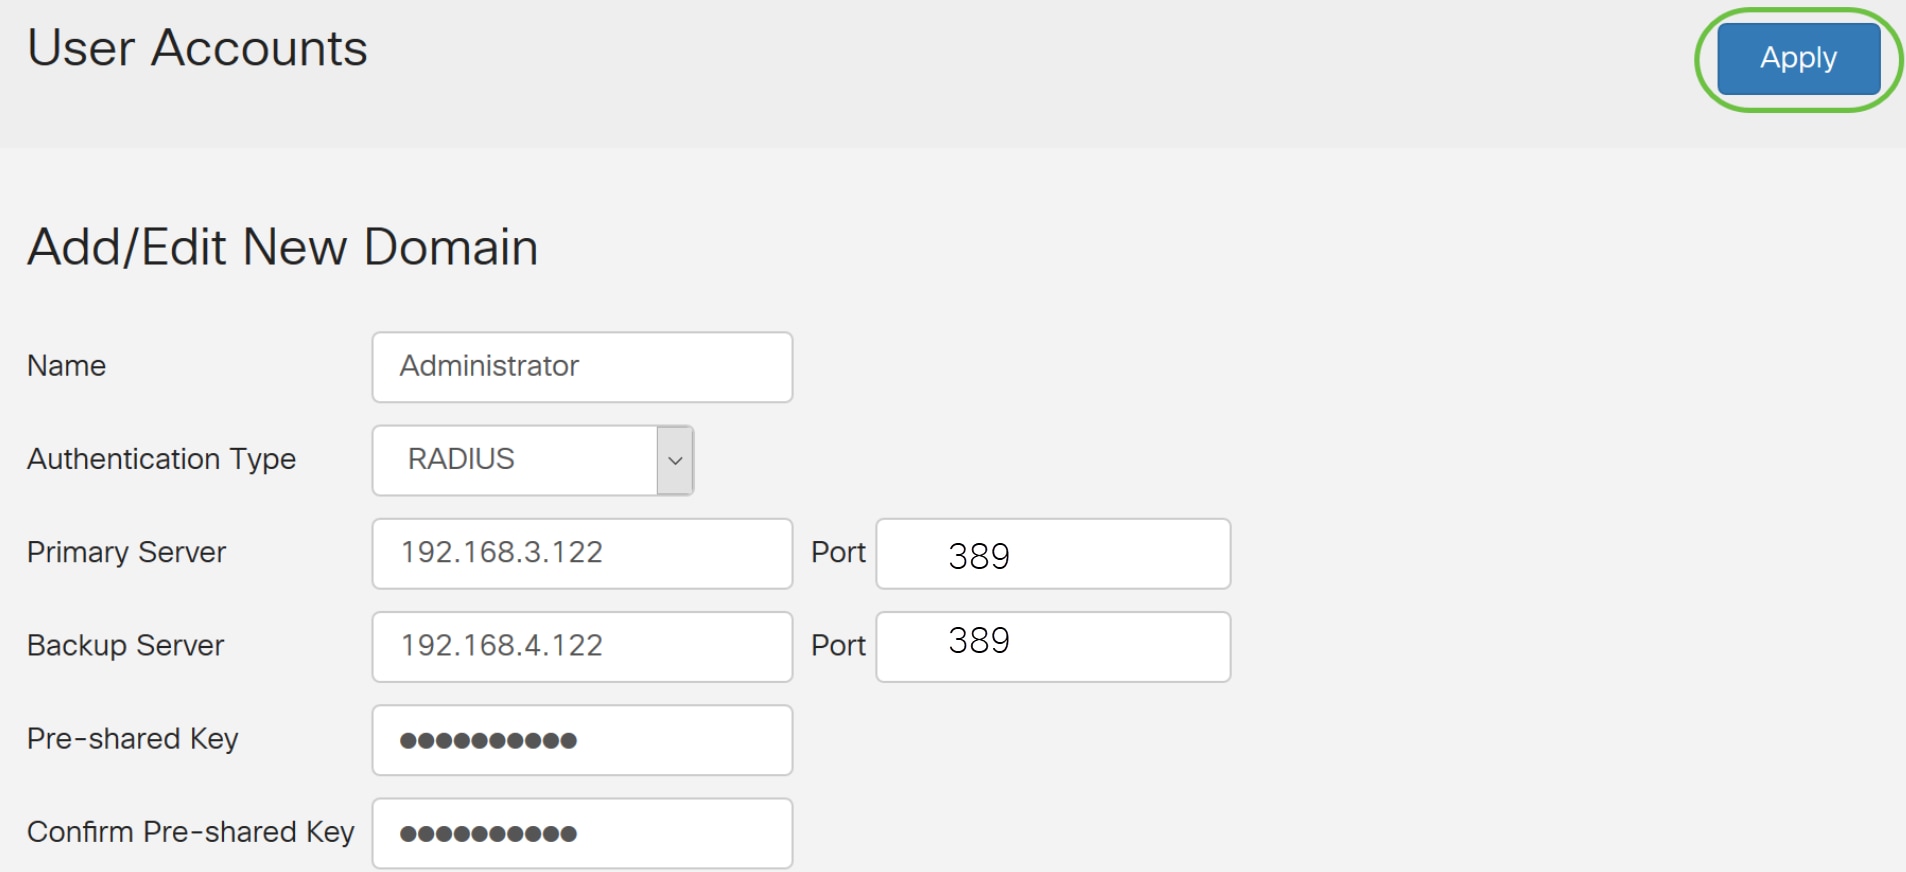
For this example, Administrator is used.

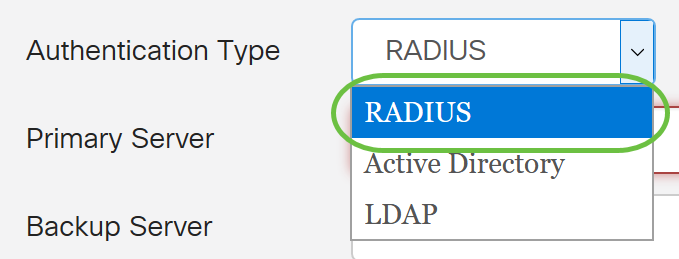
Step 3. From the Authentication Type drop-down menu, choose Radius. This means that user authentication will be made through a RADIUS server.
Only a single remote user account under RADIUS can be configured.
Step 4. In the Primary Server field, enter the IP address of the primary RADIUS server.
In this example, 192.168.3.122 is used as the primary server.

Step 5. In the Port field, enter the port number of the primary RADIUS server.
For this example, 1645 is used as the port number.

Step 6. In the Backup Server field, enter the IP address of the backup RADIUS server. This serves as a failover in case the primary server goes down.
In this example, the backup server address is 192.168.4.122.

Step 7. In the Port field, enter the number of backup RADIUS server.

In this example, 1646 is used as the port number.
Step 8. In the Preshared-Key field, enter the pre-shared key that was configured on the RADIUS server.

Step 9. In the Confirm Preshared-key field, re-enter the preshared-key to confirm.

Step 10. Click Apply.
You will be taken to the main user account page. The recently configured account now appears in the Remote Authentication Service table.
You have now successfully configured RADIUS authentication on an RV34x Series Router.
Active Directory Configuration
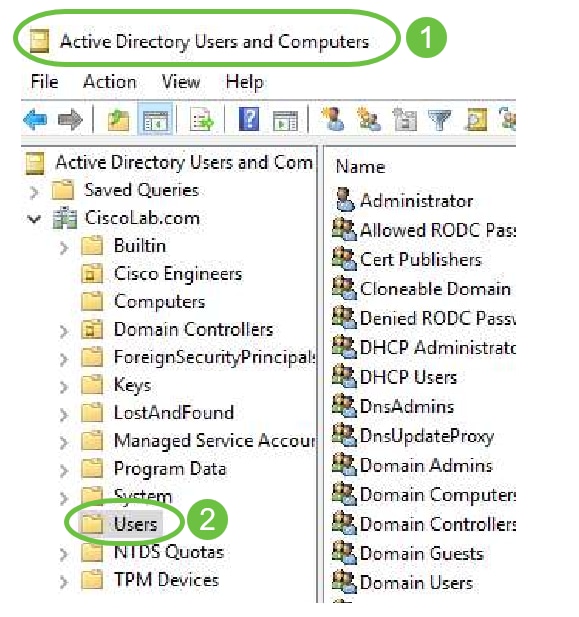
Step 1. To complete the Active Directory Configuration you will need to be logged in to the Active Directory Server. On your PC, open Active Directory users and Computers and navigate to the container that will have the user accounts used to login remotely. In this example, we will use the Users container.
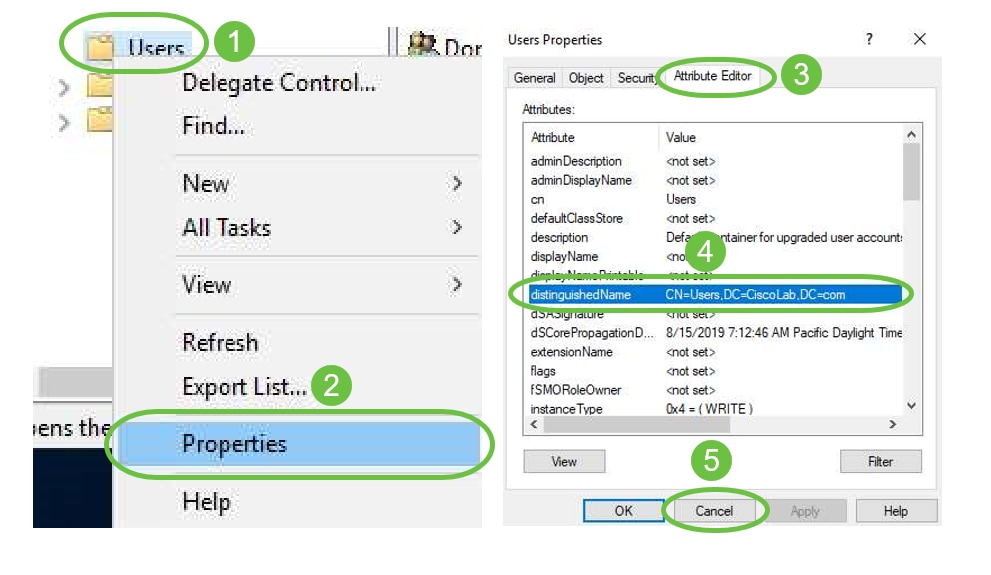
Step 2. Right-Click the Container and select Properties. Navigate to the Attribute Editor tab and find the distinguishedName field. If this tab is not visible, you will need to enable the advanced features view in Active Directory Users and computers and start over. Make a note of this field and click Cancel. This will be the user container path. This field will also be needed when configuring the RV340 and must match exactly.
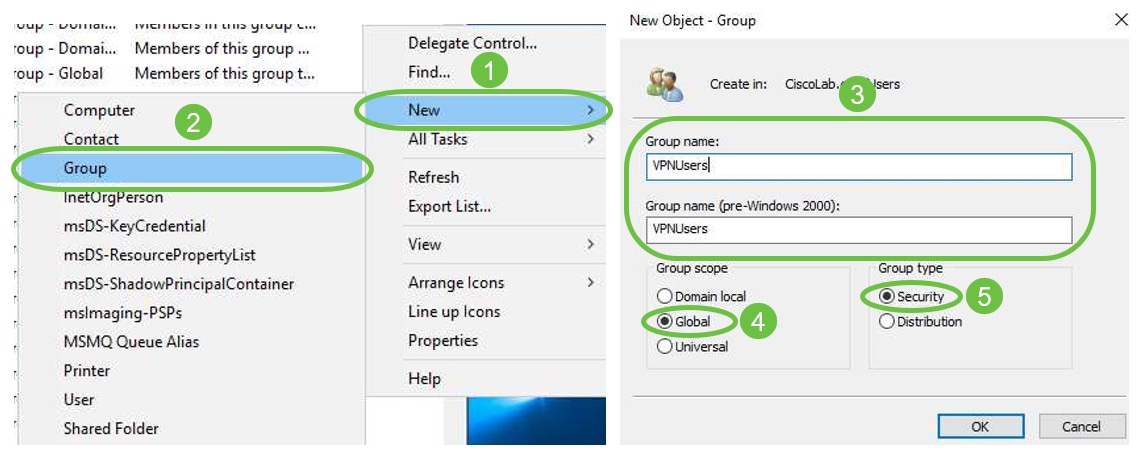
Step 3. Create a Global Security Group in the same container as the User Accounts that will be used.
In the selected Container, right-click on a blank area and select New > Group.
Select the following:
- Group Name - This name will have to be an exact match to the User Group name created on the RV340. In this example, we will use VPNUsers.
- Group Scope - Global
- Group Type - Security
Click OK.
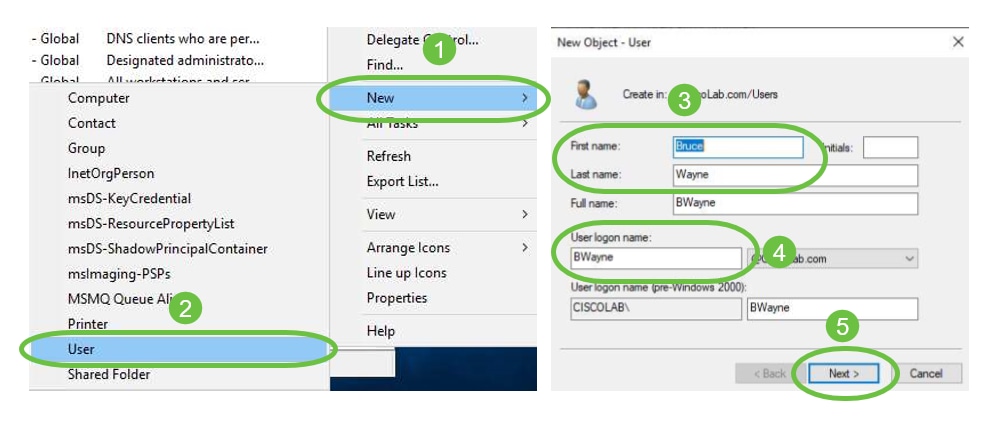
Step 4. To create new User Accounts, do the following:
- Right-click an empty space in the Container and select New > User.
- Enter First Name, Last Name.
- Enter the User Logon Name.
- Click Next.
You will be prompted to enter a password for the user. If User must change password at next logon box is checked, the user will have to login locally and change password BEFORE logging in remotely.
Click Finish.
If User Accounts are already created that need to be used, adjustments may need to be made. To adjust a user’s canonical name, select the user, right-click and select Rename. Ensure all spaces are removed and that it matches the user's Logon Name. This will NOT change the users Display Name. Click OK.
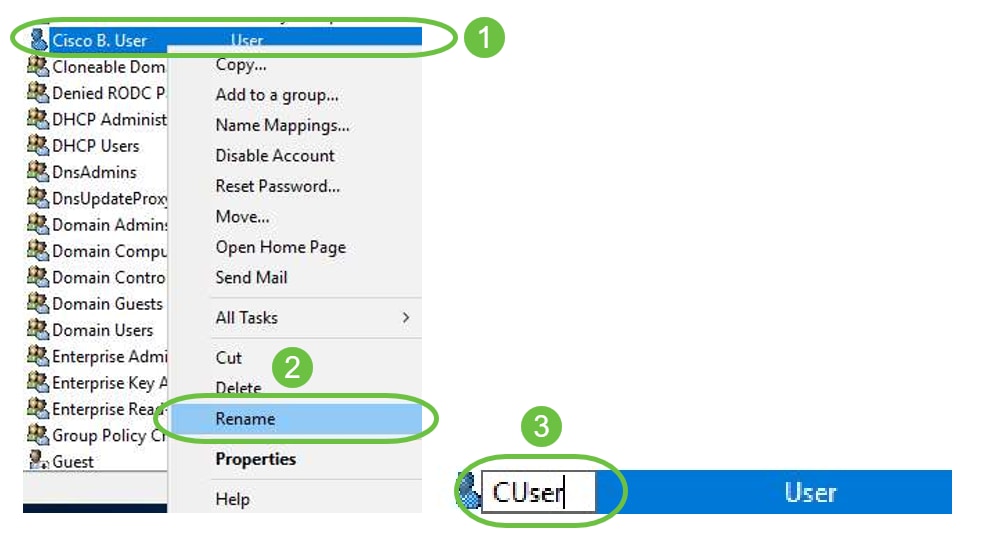
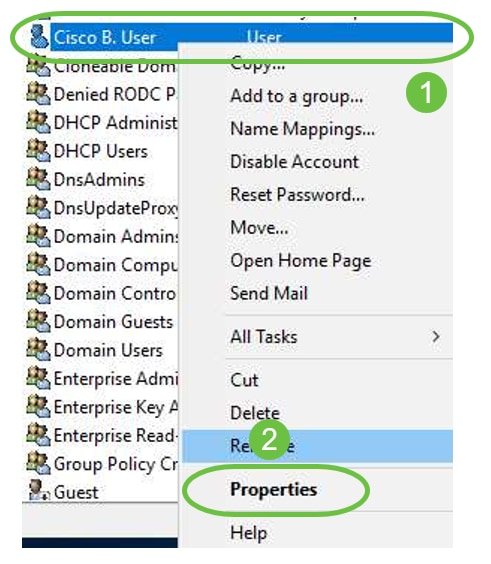
Step 5. Once User accounts are structured correctly they will need to be granted rights to login remotely.
To do this, select the user account, right-click and select Properties.
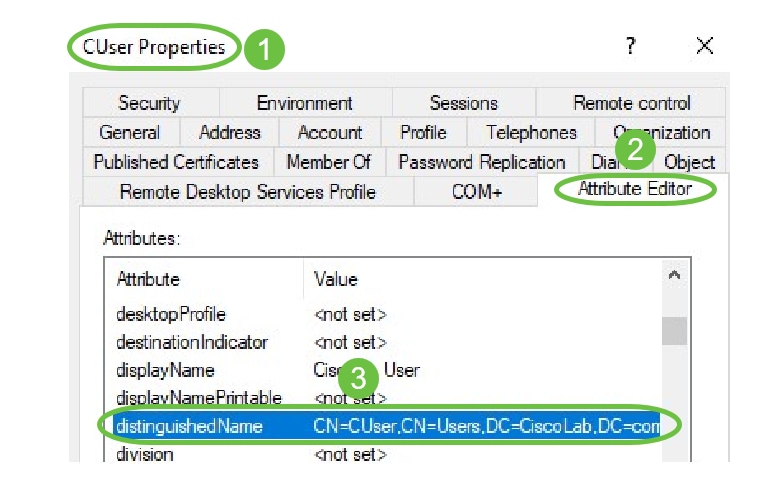
In the User Properties select Attribute Editor tab and scroll down to distinguishedName. Ensure that the first CN= has the correct user logon name with no spaces.
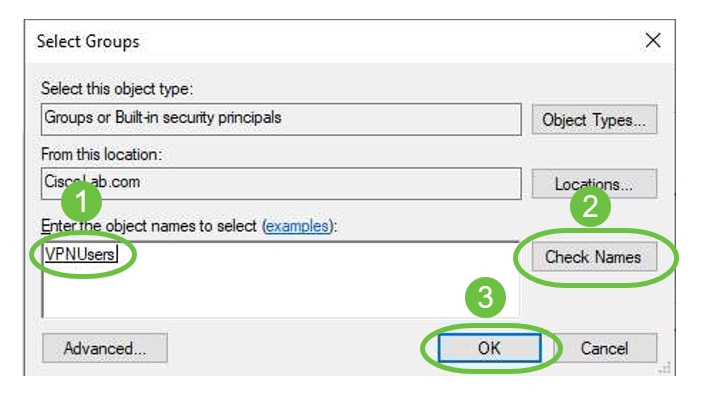
Select the Member Of tab and click on Add.
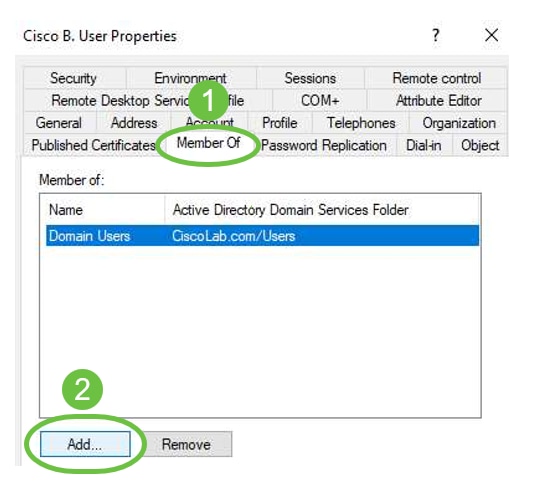
Enter the name of the Global Security Group and select Check Name. If the entry is underlined, click OK.
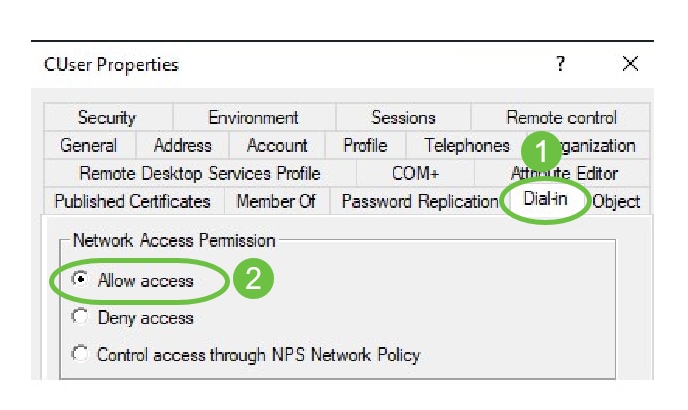
Select the Dial-In tab. Under Network Access Permission section, select Allow Access and leave the rest as default.
Active Directory Integration
Active Directory requires that the time of the RV34x router match that of the AD Server. For steps on how to configure time settings on an RV34x series router, click here.
AD also requires that the RV340 have a User Group that matches AD Global Security Group.
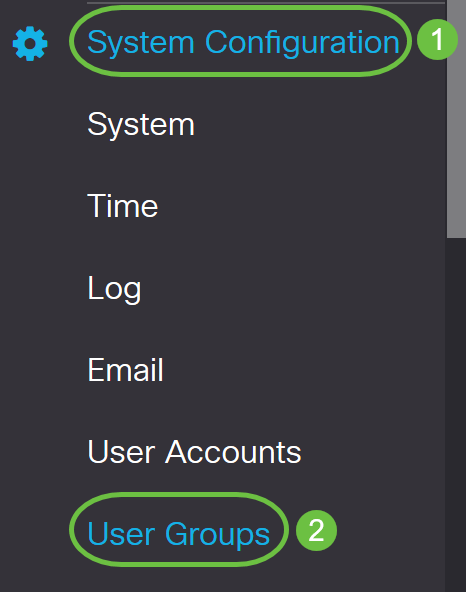
Step 1. Navigate to System Configuration > User Groups.
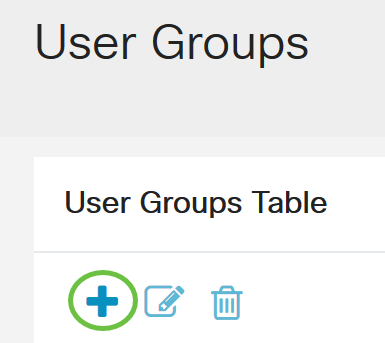
Step 2. Click on the plus icon to add a User Group.
Step 3. Enter the Group Name. In this example, it is VPNUsers.

Group Name must be the exact same as the AD Global Security Group.
Step 4. Under Services, Web Login/NETCONF/RESTCONF should be marked as Disabled. If AD Integration does not work immediately, you will still be able to access the RV34x.

Step 5. You can add the VPN tunnels that will use AD Integration to log their users in.
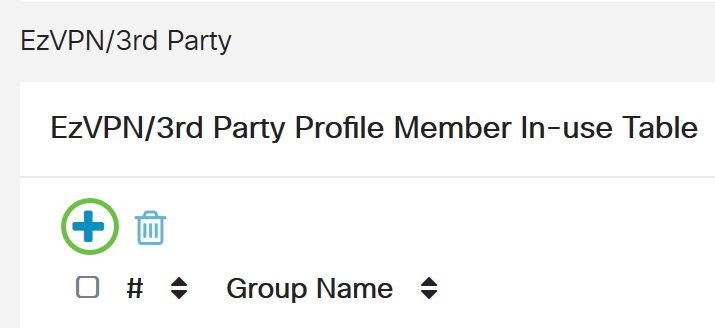
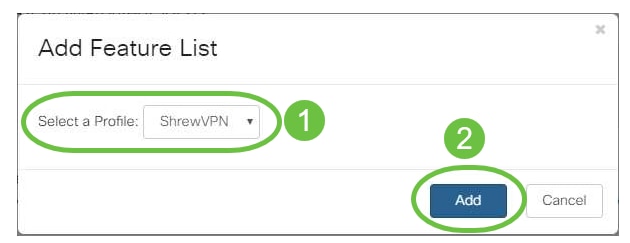
- To add a Client-to-Site VPN that has already been configured, go the EZVPN/3rd Party section and click the plus icon. Select the VPN profile from the drop-down menu and click Add.
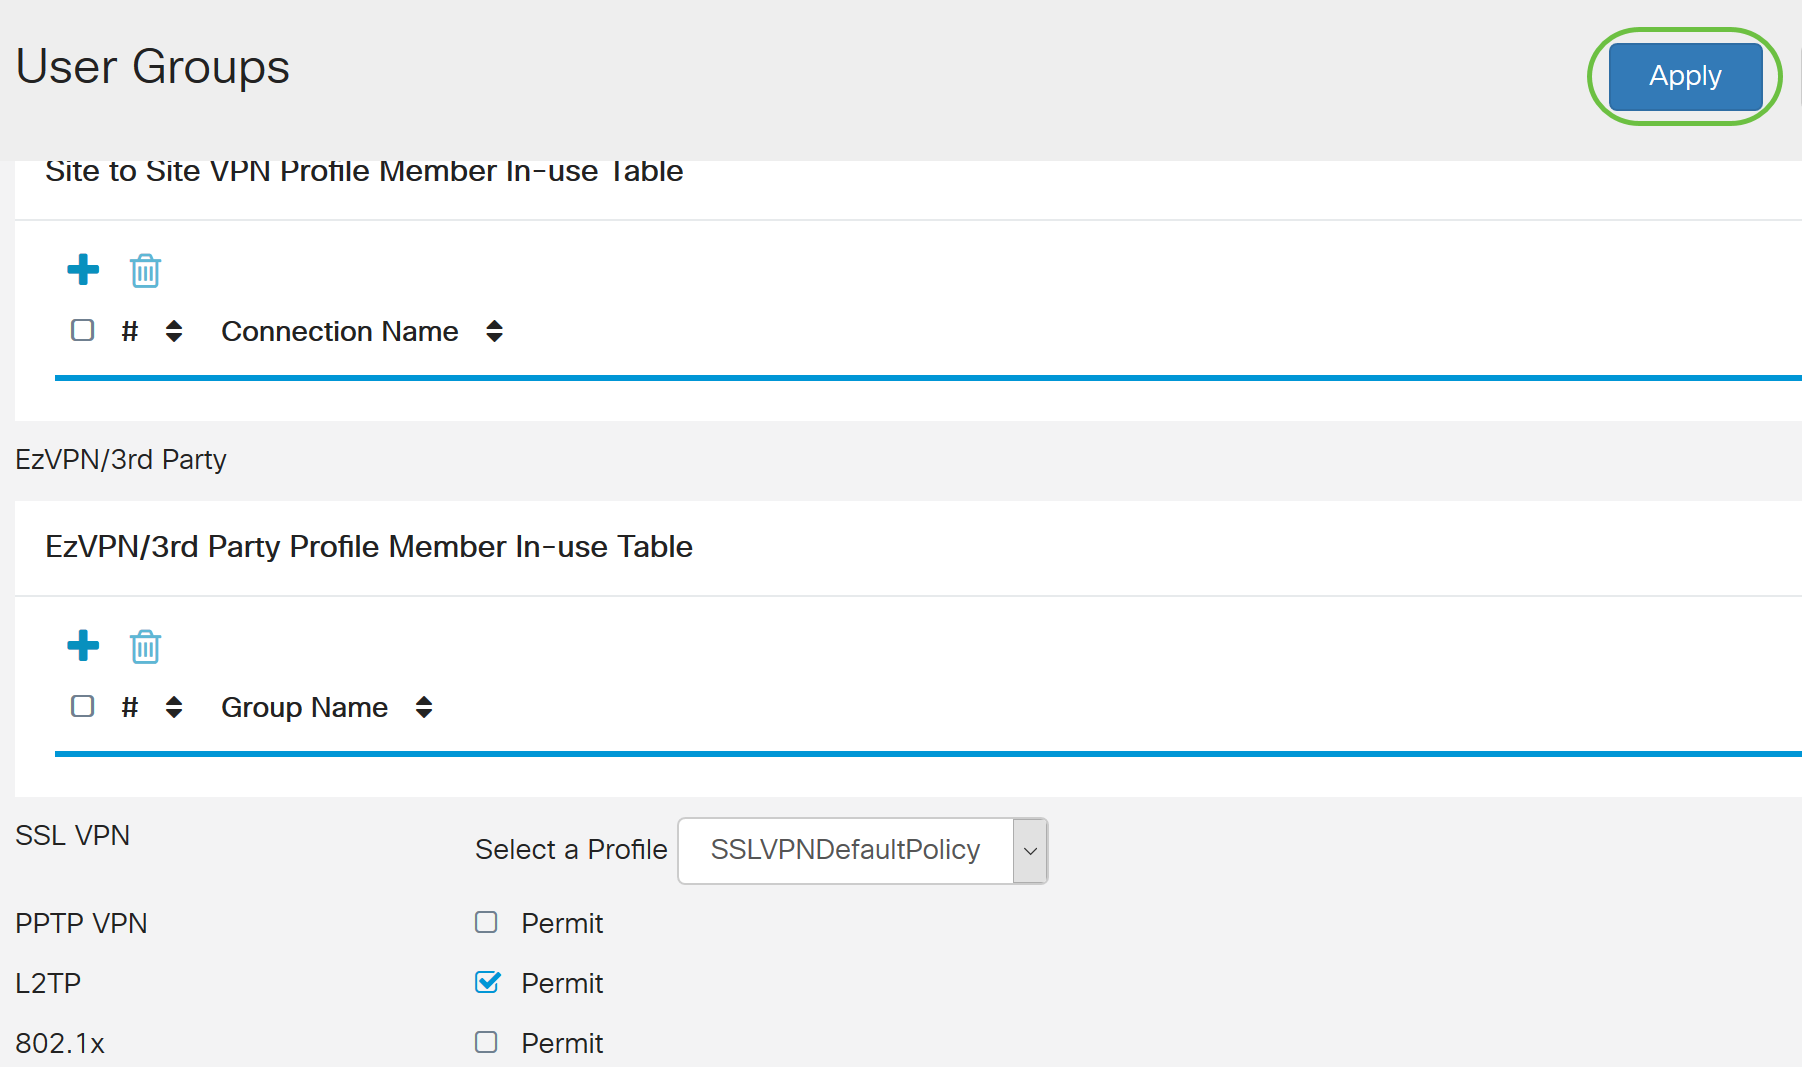
- SSL VPN - If a SSL VPN tunnel will be used, select the policy from the drop-down menu next to Select a Profile.
- PPTP/L2TP/802.1x - To allow these to use AD, simply click the check box next to them to Permit.


Step 6. Click Apply to save your changes.
Active Directory Integration Settings
Step 1. Navigate to System Configuration > User Accounts .

Step 2. In the Remote Authentication Service Table, click Add to create an entry.

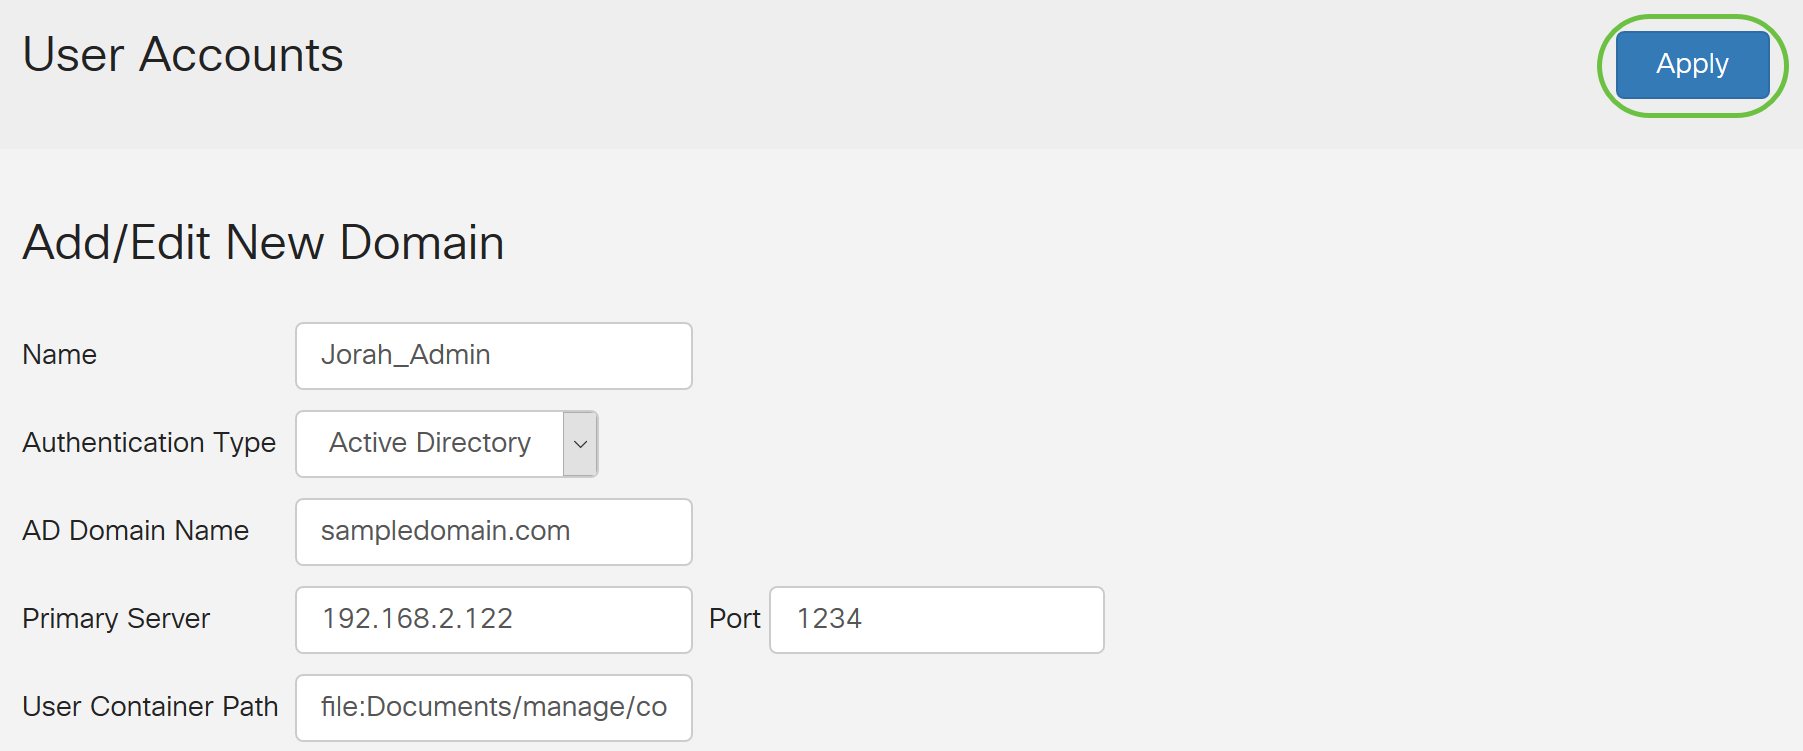
Step 3. In the Name field, create a username for the account. In this example, Jorah_Admin is used.

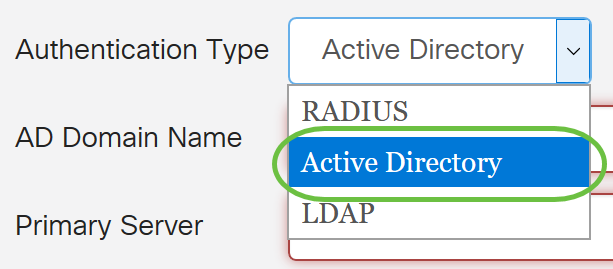
Step 4. From the Authentication Type drop-down menu, choose Active Directory. AD is used to assign wide policies to all elements of the network, deploy programs to many computers, and apply critical updates to an entire organization.
Step 5. In the AD Domain Name field, enter the fully qualified domain name of the AD.
In this example, sampledomain.com is used.

Step 6. In the Primary Server field, enter the address of the AD.
In this example, 192.168.2.122 is used.

Step 7. In the Port field, enter a port number for the Primary Server.
In this example, 1234 is used as the port number.

Step 8. (Optional) In the User Container Path field, enter a root path where the users are contained.
Note: In this example, file:Documents/manage/containers is used.

Step 9. Click Apply.
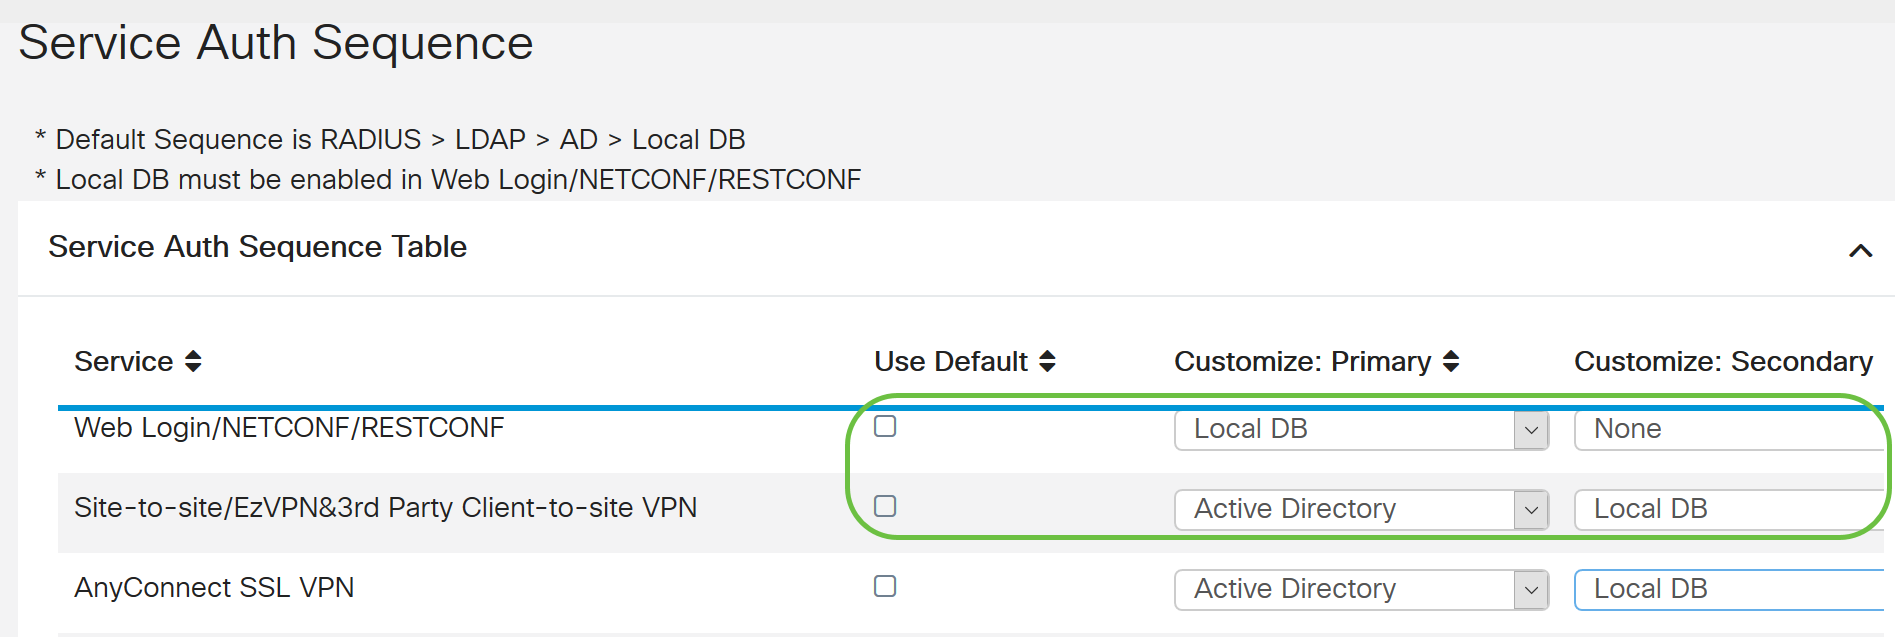
Step 10. Scroll down to Service Auth Sequence to set the login method for the various options.
- Web Login/NETFCONF/RESTCONF - This is how you login to the RV34x router. Uncheck the Use Default checkbox and set the Primary method to Local DB. This will ensure that you will not be logged out of the router even if Active Directory Integration fails.
- Site-to-site/EzVPN&3rd Party Client-to-site VPN - This is to set Client-to-Site VPN tunnel to use AD. Uncheck the Use Default checkbox and set the Primary method to Active Directory and Secondary Method to Local DB.
Step 11. Click Apply.

Step 12. Save your Running Configuration to Startup Configuration.
You have now successfully configured the Active Directory settings on an RV34x Series Router.
LDAP
Step 1. In the Remote Authentication Service Table, click Add to create an entry.

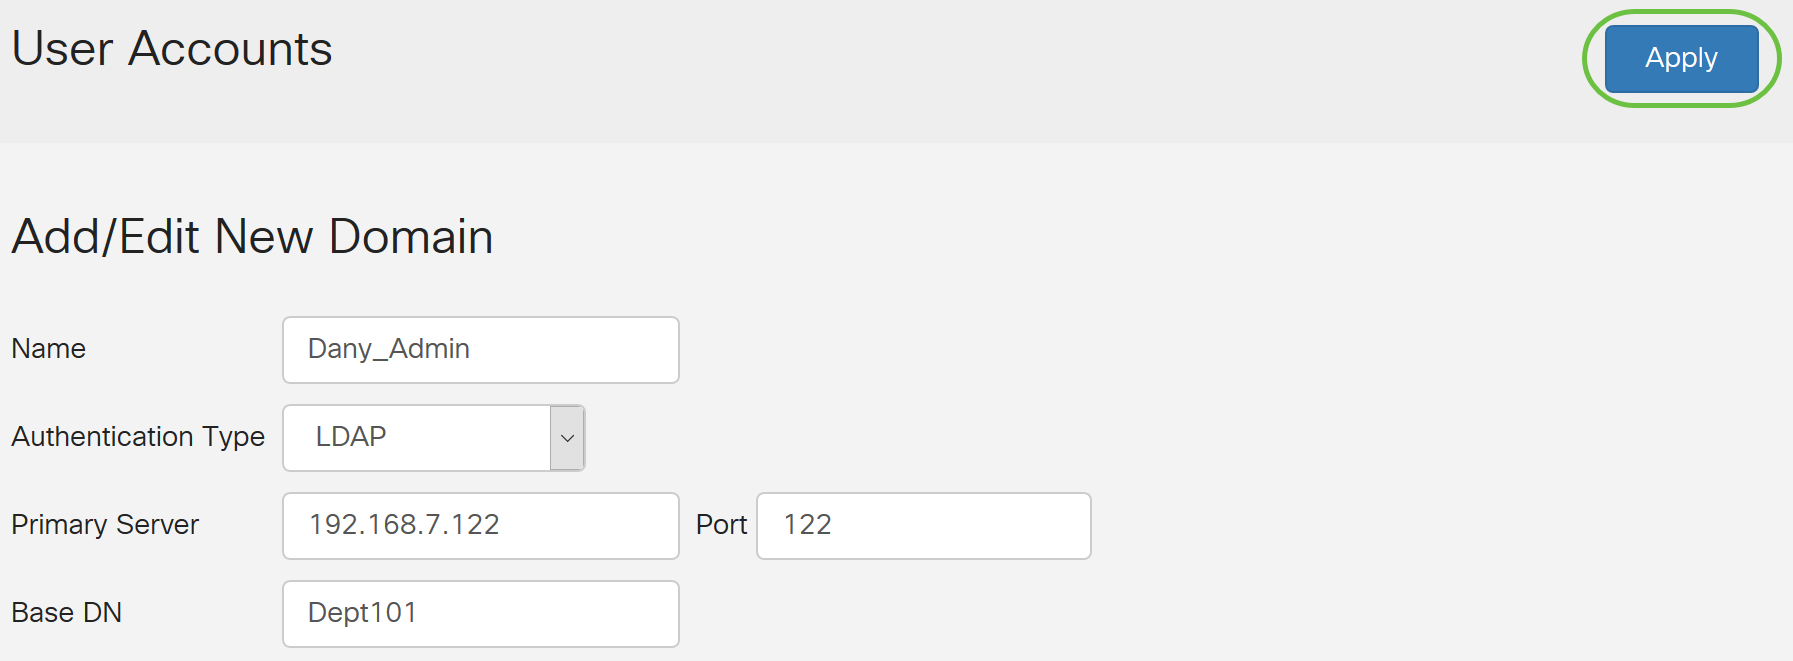
Step 2. In the Name field, create a user name for the account.
Only a single remote user account under LDAP can be configured.
In this example, Dany_Admin is used.

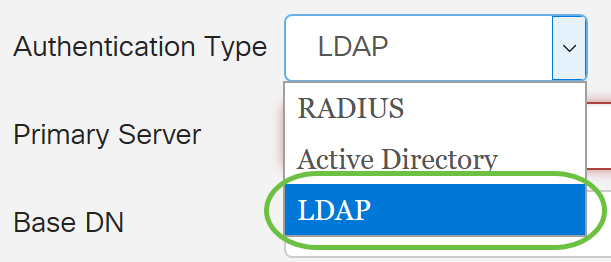
Step 3. From the Authentication Type drop-down menu, choose LDAP. Lightweight Directory Access Protocol is an access protocol that is used to access a directory service. It is a remote server that runs a directory serve to perform authentication for the domain.
Step 4. In the Primary Server field, enter the server address of the LDAP.
In this example, 192.168.7.122 is used.

Step 5. In the Port field, enter a port number for the Primary Server.
In this example, 122 is used as the port number.

Step 6. Enter the base distinguished name of the LDAP server in the Base DN field. The base DN is the location where the LDAP server searches for users when it receives an authorization request. This field should match the base DN that is configured on the LDAP server.
In this example, Dept101 is used.

Step 7. Click Apply. You will be taken to the Remote Authentication Service Table.
Step 8. (Optional) If you want to enable or disable the remote authentication service, check or uncheck the check box next to the service you want to enable or disable.
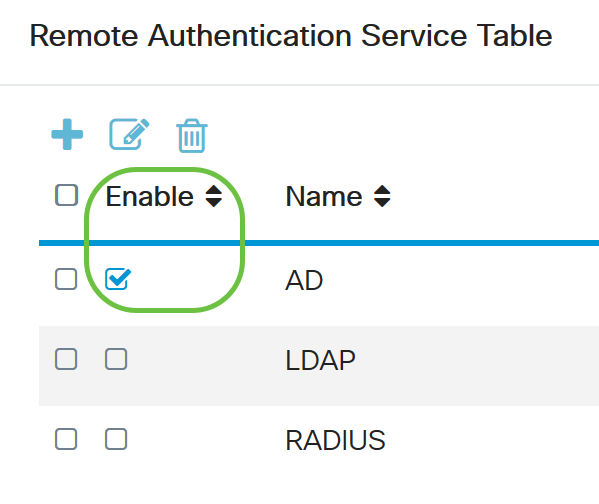
Step 9. Click Apply.

You have now successfully configured the LDAP on an RV34x Series Router.