Configure Session Timeout Settings on an RV34x Series Router
Available Languages
Objective
The Session Timeout feature allows an administrator to configure the amount of time that a particular session can remain idle. This in turn also limits the possibility of having unwanted access to the network by logging out of the session when it has been idle.
Configuring the session timeout settings is also advantageous if you are conducting configurations that take some time, so you can set the set session timeouts to a much longer time. This helps avoid situations where in the administrator must re-do an entire configuration because a session timed out.
The objective of this article is to show you how to configure the session timeout settings on the RV34x Series Router.
Applicable Devices
- RV34x Series
Software Version
- 1.0.01.16
Configure Session Timeout Settings
Step 1. Log in to the web-based utility of the router and choose Firewall > Session Timeout.

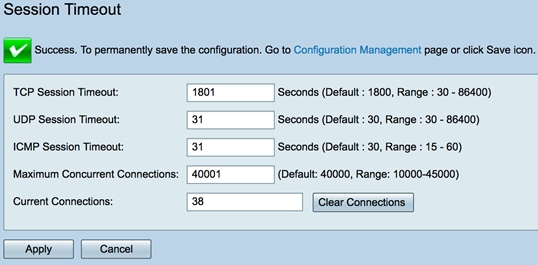
Step 2. In the TCP Session Timeout field, enter the duration in seconds after which inactive Transmission Control Protocol (TCP) sessions are removed from the session table. The range is from 30 to 86400 seconds. The default is 1800.
Note: For this example, 1801 is used.

Step 3. In the UDP Session Timeout field, enter the duration in seconds which inactive User Datagram Protocol (UDP) sessions are removed from the session table. The range is from 30 to 86400 seconds. The default is 30 seconds.
Note: In this example, 31 is used.

Step 4. Enter the time in seconds in the ICMP Session Timeout Duration field, after which inactive Internet Control Message Protocol (ICMP) sessions are removed from the session table. The range is from 15 to 60 seconds. The default is 30.
Note: In this example, 31 is used.

Step 5. In the Maximum Concurrent Connections field, enter the number of concurrent connections allowed.
Note: In this example, 40001 is used.

The Current Connectionsarea displays the number of active concurrent connections.
Step 6. (Optional) To clear the current connections, click the Clear Connections button.

Step 7. Click Apply to save the settings.

Step 8. (Optional) To save the configuration permanently, go to the Copy/Save Configuration page or click the  icon at the upper portion of the page.

You should now have successfully configured the Session Timeout Settings on the RV34x Series Router.
 Feedback