Configure Secure Sockets Layer Virtual Private Network (SSL VPN) on the RV340 or RV345 Router
Available Languages
Special Notice: Licensing Structure - Firmware versions 1.0.3.15 and later. Moving forward, AnyConnect will incur a charge for client licenses only.
For additional information on AnyConnect licensing on the RV340 series routers, check out the article AnyConnect Licensing for the RV340 Series Routers.
Objective
The Secure Sockets Layer Virtual Private Network (SSL VPN) gateway allows remote users to establish a secure VPN tunnel using a web browser. This feature allows easy access to a wide range of web resources and web-enabled applications using native Hypertext Transfer Protocol (HTTP) over SSL Hypertext Transfer Protocol Secure (HTTPS) browser support.
SSL VPN allows users to remotely access restricted networks, using a secure and authenticated pathway by encrypting the network traffic.
The RV340 and RV345 routers support Cisco AnyConnect VPN client, or also known as Anyconnect Secure Mobility Client. These routers support two SSL VPN tunnels by default, and the user can register a license to support up to 50 tunnels. Once installed and activated, the SSL VPN will establish a secure, remote-access VPN tunnel.
This article aims to show you how to configure SSL VPN on the RV340 or the RV345 router.
Applicable Devices
- RV340
- RV345
- Cisco Secure Mobility Client
Software Version
- 1.0.03.15 — RV340, RV345
- 4.4.01054 — AnyConnect Secure Mobility Client
Configure SSL VPN
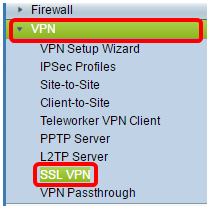
Step 1. Access the router web-based utility and choose VPN > SSL VPN.
Step 2. Click the On radio button to enable Cisco SSL VPN Server.

Mandatory Gateway Settings
The following configuration settings are mandatory:
Step 3. Choose the Gateway Interface from the drop-down list. This will be the port that will be used for passing traffic through the SSL VPN Tunnels. The options are:
- WAN1
- WAN2
- USB1
- USB2

Note: In this example, WAN1 is chosen.
Step 4. Enter the port number that is used for the SSL VPN gateway in the Gateway Port field ranging from 1 to 65535.

Note: In this example, 8443 is used as the port number.
Step 5. Choose the Certificate File from the drop-down list. This certificate authenticates users who attempt to access the network resource through the SSL VPN tunnels. The drop-down list contains a default certificate and the certificates that are imported.

Note: In this example, Default is chosen.
Step 6. Enter the IP address of the client address pool in the Client Address Pool field. This pool will be the range of IP addresses that will be allocated to remote VPN clients.
Note: Make sure that the IP address range does not overlap with any of the IP addresses on the local network.

Note: In this example, 192.168.0.0 is used.
Step 7. Choose the Client Netmask from the drop-down list.
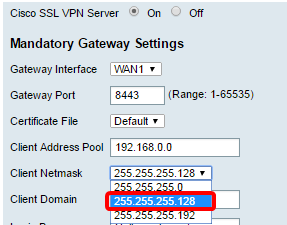
Note: In this example, 255.255.255.128 is chosen.
Step 8. Enter the client domain name in the Client Domain field. This will be the domain name that should be pushed to SSL VPN clients.
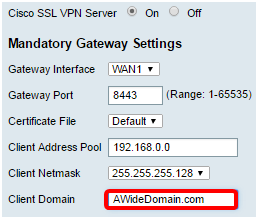
Note: In this example, AWideDomain is used as the client domain name.
Step 9. Enter the text that would appear as login banner in the Login Banner field. This will be the banner that will be displayed each time a client logs in.

Note: In this example, Welcome to my domain! is used as the Login Banner.
Optional Gateway Settings
The following configuration settings are optional:
Step 1. Enter a value in seconds for the Idle Timeout ranging from 60 to 86400. This will be the time duration that the SSL VPN session can remain idle.

Note: In this example, 3000 is used.
Step 2. Enter a value in seconds in the Session Timeout field. This is the time it takes for the Transmission Control Protocol (TCP) or User Datagram Protocol (UDP) session to time out after the specified idle time. The range is from 60 to 1209600.

Note: In this example, 60 is used.
Step 3. Enter a value in seconds in the ClientDPD Timeout field ranging from 0 to 3600. This value specifies the periodic sending of HELLO/ACK messages to check the status of the VPN tunnel.
Note: This feature must be enabled on both ends of the VPN tunnel.

Note: In this example, 350 is used.
Step 4. Enter a value in seconds in the GatewayDPD Timeout field ranging from 0 to 3600. This value specifies the periodic sending of HELLO/ACK messages to check the status of the VPN tunnel.
Note: This feature must be enabled on both ends of the VPN tunnel.
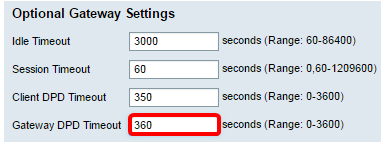
Note: In this example, 360 is used.
Step 5. Enter a value in seconds in the Keep Alive field ranging from 0 to 600. This feature ensures that your router is always connected to the Internet. It will attempt to re-establish the VPN connection if it is dropped.

Note: In this example, 40 is used.
Step 6. Enter a value in seconds for the duration of the tunnel to be connected in the Lease Duration field. The range is from 600 to 1209600.

Note: In this example, 43500 is used.
Step 7. Enter the packet size in bytes that can be sent over the network. The range is from is from 576 to 1406.

Note: In this example, 1406 is used.
Step 8. Enter the relay interval time in the Rekey Interval field. The Rekey feature allows the SSL keys to renegotiate after the session has been established. The range is from 0 to 43200.
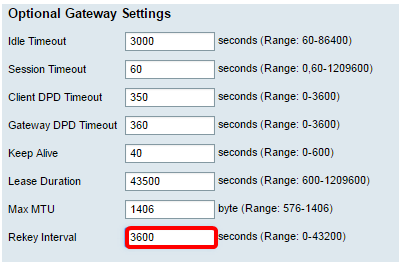
Note: In this example, 3600 is used.
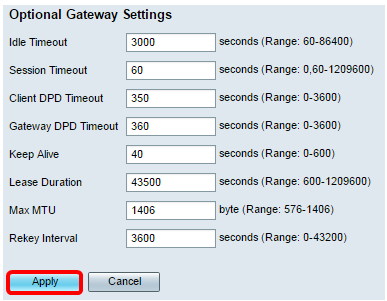
Step 9. Click Apply.
Step 10. (Optional) To permanently save the configuration, click on the blinking  icon.
icon.
You should now have successfully configured SSL VPN on your RV34x router.
 Feedback