Configure Advanced Settings for Gateway to Gateway VPN on RV016, RV042, RV042G, and RV082 VPN Routers
Available Languages
Objective
A Virtual Private Network (VPN) is a private network that is used to virtually connect devices of the remote user through a public network to provide security. More specifically, a gateway-to-gateway VPN connection allows for two routers to securely connect to each other and for a client in one end to logically appear to be part of the same remote network on the other end. This enables data and resources to be shared more easily and securely over the Internet. An identical configuration must be done on both sides of the connection for a successful gateway-to-gateway VPN connection to be established.
Advanced Gateway to Gateway VPN configuration provides the flexibility to configure optional configurations for the VPN tunnel to be more user friendly for the VPN users. The Advanced options are only available for IKE with Preshared key mode. The advanced settings should be the same on both sides of the VPN connection.
The objective of this document is to show you how to configure advanced settings for gateway to gateway VPN tunnel on RV016, RV042, RV042G and RV082 VPN Routers.
Note: If you would like to find out more about how to configure a Gateway to Gateway VPN, refer to the article, Configuration of Gateway to Gateway VPN on RV016, RV042, RV042G and RV082 VPN Routers.
Applicable Devices
• RV016
• RV042
• RV042G
• RV082
Software Version
• v4.2.2.08
Configuration of Advanced Settings for Gateway to Gateway VPN
Step 1. Log in to the router configuration utility and choose VPN > Gateway To Gateway. The Gateway To Gateway page opens:

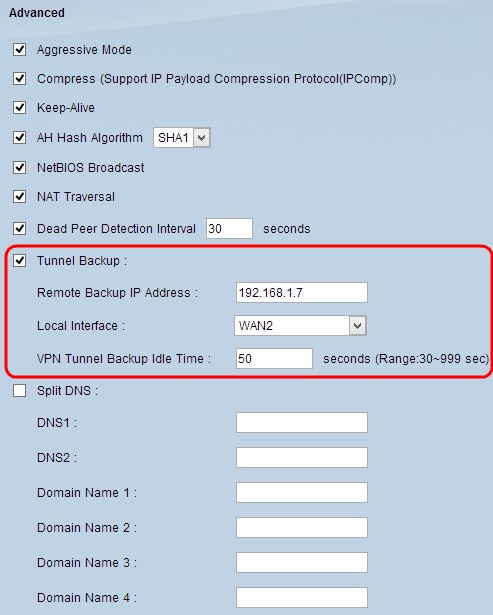
Step 2. Scroll down to the IPSec Setup section and click Advanced +. The Advanced area appears:

Step 3. Check the Aggressive Mode check box if your network speed is low. This exchanges the IDs of the end points of the tunnel in clear text during SA connection (Phase 1), which requires less time to exchange but is less secure.
Step 4. Check the Compress (Support IP Payload Compression Protocol (IPComp)) check box if you want to compress the size of the IP datagrams. IPComp is an IP compression protocol which is used to compress the size of IP datagrams. IP compression is useful if the network speed is low and the user wants to quickly transmit the data without any loss through the slow network, but it does not provide any security.
Step 5. Check the Keep-Alive check box if you always want the connection of the VPN tunnel to remain active. Keep-Alive helps to re-establish the connections immediately if any connection becomes inactive.

Step 6. Check the AH Hash Algorithm check box if you want to enable Authenticate Header (AH). AH provides authentication to origin data, data integrity through checksum and protection into the IP header. The tunnel should have the same algorithm for both sides.
• MD5 — Message Digest Algorithm-5 (MD5) is a 128 digit hexadecimal hash function which provides protection to the data from malicious attack by the checksum calculation.
• SHA1 — Secure Hash Algorithm version 1 (SHA1) is a 160 bit hash function which is more secure than MD5 but it takes more time to compute.

Step 7. Check the NetBIOS Broadcast check box if you want to allow non-routable traffic through the VPN tunnel. The default is unchecked. NetBIOS is used to detect network resources such as printers and computers in the network through some software applications and Windows features like Network Neighborhood.
Step 8. Check the NAT Traversal check box if you want to access the Internet from your private LAN through a public IP address. If your VPN router is behind a NAT gateway, check this check box to enable NAT traversal. Both ends of the tunnel must have the same settings.
Step 9. Check Dead Peer Detection Interval to check the liveliness of the VPN tunnel through hello or ACK in a periodic manner. If you check this check box, enter the interval (in seconds) between hello messages.
Note: If you do not check Dead Peer Detection Interval, skip to Step 11.

Step 10. Check the Tunnel Backup check box to enable tunnel backup. This feature is only available when the Dead Peer Detection Interval has been checked. The feature enables the device to reestablish the VPN tunnel via an alternative local WAN interface or remote IP address.
• Remote Backup IP Address — Enter an alternative IP address for the remote gateway or enter the WAN IP address that was already set for the remote gateway in this field.
• Local Interface — The WAN interface used to reestablish the connection. Choose the desired interface from the drop-down list.
• VPN Tunnel Backup Idle Time — Enter the time (in seconds) that the primary tunnel has to connect before the backup tunnel is used.

Step 11. Check the Split DNS check box to enable split DNS. Split DNS allows requests for specified domain names to be handled by a different DNS server than is usually used. When the router receives any DNS request from the client, it checks the DNS request and matches with the domain name and sends the request to that specific DNS server.

Step 12. Enter the DNS server IP address in the DNS1 field. If there is another DNS server, enter the DNS server IP address in the DNS2 field.
Step 13. Enter the domain names in the Domain Name 1 through Domain Name 4 fields. Requests for these domain names will be handled by the DNS servers specified in Step 12.
Step 14. Click Save to save your changes.
Revision History
| Revision | Publish Date | Comments |
|---|---|---|
1.0 |
10-Dec-2018 |
Initial Release |
 Feedback