Configure the LAN and DHCP Settings on the RV34x Series Router
Available Languages
Objective
A Local Area Network (LAN) is a network limited to an area such as a home or small business that is used to interconnect devices. LAN settings can be configured to limit the number of devices that can be connected and what IP addresses those devices will receive. Dynamic Host Configuration Protocol (DHCP) is a network configuration protocol that automatically configures the IP addresses of devices on a network so that they can connect to one another. IP addresses are logical identifiers for network devices that allow communication between networks. The address is leased to a host for a specified time. After the expiration of the lease time, that IP address may be assigned to a different host.
If you already have a DHCP server, you can use the router as a DHCP relay. When a client sends the router a DHCP request, the router will then ask the DHCP server to provide an IP address for the client. The router and the DHCP server do not need to be on the same subnet to function. The router acts as a liaison between the host and a DHCP server.
Option 82 is a DHCP relay information option. DHCP relay is a feature that is used to allow DHCP communication between hosts and remote DHCP servers that are not on the same network. It allows a DHCP relay agent to include information about itself when it sends DHCP packets to and from clients to a DHCP server. It adds more security to the DHCP process by thoroughly identifying the connection.
This document aims to show you how to configure the LAN and DHCP settings on the RV34x Series Router.
Applicable Devices
- RV34x Series
Software Version
- 1.0.01.17
Add New DHCP Configuration
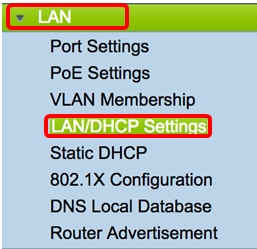
Step 1. Log in to the web-based utility of the router and choose LAN > LAN/DHCP Settings.
Step 2. In the LAN/DHCP Settings Table, click on the Add button to create a new entry in the table.

Step 3. In the Add/Edit New DHCP Configuration area, click a radio button to select the method in which the DHCP settings will be configured. The options are:
- Interface — If this is chosen, choose a VLAN interface from the drop-down menu. The contents of the list depend on the user-defined VLANs. Skip to the Configure an Interface section for instructions.
- Option 82 Circuit — If this is chosen, enter a description and user-defined American Standard Code for Information Interchange (ASCII) string that identifies the circuit interface upon which the DHCP request was sent. Skip to the Configure Option 82 section for instructions.

Configure an Interface
Step 1. From the Interface drop-down menu, choose a VLAN ID. Then, click Next.
Note: In this example, VLAN 25 is chosen.

Step 2. Click a radio button to choose the DHCP Type for IPv4. The options are:
- Disabled — Disables the DHCP server for IPv4 on the router. If this is chosen skip to the Configure IPv6 DHCP section.
- Server — The DHCP server assigns the addresses to clients from their respective pools. If this is chosen, skip to Configure IPv4 DHCP Server section and click Next.
- Relay — Sends the DHCP requests and replies from another DHCP server through the router. If this is chosen, enter the IP Address of the remote DHCP server in the IP Address (IPv4) field and click Next. Then, skip to the Configure IPv6 DHCP Server section and click Next.

Step 1. In the Client Lease Time field, enter the time, in minutes, for the lease duration. It is the amount of time a client is allowed to connect to the router with the IP address it was given through the DHCP process.
Note: In this example, the default value of 1440 is used as the Client Lease Time.

Step 2. In the Range Start field, enter the starting IP address for the pool of IP addresses to be assigned to hosts in the VLAN. The range can be up to the maximum number of IP addresses that the server can assign without overlapping the PPTP and SSL VPN.
Note: In this example, the address 192.168.11.100 is used since it is within the range of IP Addresses defined in the VLAN.

Step 3. In the Range End field, enter the ending IP address for the pool of IP addresses to be assigned to hosts in the VLAN. This must be within the range of IP addresses configured in the VLAN.
Note: In this example, 192.168.11.149 is used.
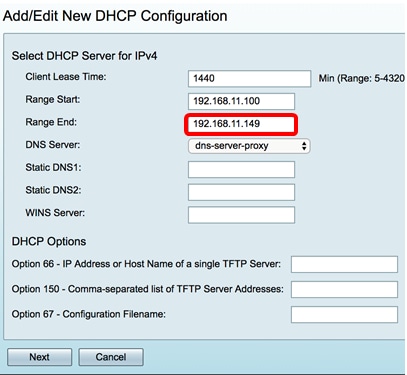
Step 4. From the DNS Server drop-down list choose the type of DNS to use. Domain Name System (DNS) is an Internet service that translates domain names, which are more easily understandable to users, into IP addresses that devices work with.
- dns-server-proxy — Router performs as DNS server for its DHCP clients. The router acts as an intermediary for all DNS incoming queries on it and sends unknown requests out and stores them for future use.
- dns-server-provided-isp — Gives DHCP clients the Internet Service Provider (ISP) DNS servers IPs for DNS queries.
- dns-server-static — Gives DHCP clients the user entered DNS server IP addresses to resolve DNS queries.
Note: In this example, dns-server-static is chosen. If others are chosen, skip to Step 7.

Step 5. In the Static DNS1 field, enter the IPv4 address of the primary DNS server.
Note: In this example, 10.49.5.11 is used.

Step 6. In the Static DNS2 field, enter the IPv4 address of the secondary DNS server.
Note: In this example, 10.22.22.11 is used.

Step 7. (Optional) In the WINS Server field, enter the IPv4 address of the Windows Internet Naming Service (WINS) that resolves NetBIOS names to IP addresses.
Note: In this example, it is left blank.

DHCP Options
A TFTP server allows an administrator to store, retrieve, and download configuration files for devices on a network. A DHCP Server leases and distributes IP addresses to devices on the network. When a device boots up, and an IPv4 or IPv6 address and TFTP server IP address is not preconfigured, the device will send out a request to the DHCP server with Options 66, 67, and 150. These options are requests to the DHCP server to obtain information about the TFTP server
Step 8. (Optional) In the Option 66 field, enter the IP address or host name of a single TFTP server.
Note: In this example, 10.13.52.1 is used.

Step 9. (Optional) In the Option 150 field, enter a stream of IP addresses separated by commas.
Note: In this option, the field is left blank.

Step 10. (Optional) In the Option 67 field, enter the boot file name.
Note: In this example, config.txt is used.

Step 11. Click Next.
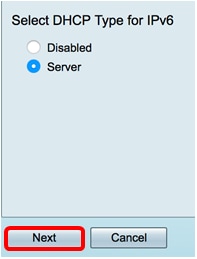
Step 12. In the Select DHCP Type for IPv6, choose a radio button whether to enable or disable the DHCP server for IPv6. The options are:
- Disabled — Choose this option if you do not want to configure the IPv6 DHCP server.
- Server — Choose this option to configure the IPv6 DHCP Server settings.
Note: In this example, Server is chosen.

Step 13. Click Next.
Step 14. In the Client Lease Time field, enter the time, in minutes, for the lease duration. It is the amount of time a client is allowed to connect to the router with the IP address it was given through the DHCP process.
Note: In this example, 1440 is used.

Step 15. In the Range Start field, enter the starting IP address for the pool of IP addresses to be assigned to hosts in the VLAN. The range can be up to the maximum number of IP addresses that the server can assign without overlapping the PPTP and SSL VPN.
Note: In this example, fec0:2:0:0:0:0:0:1 is used.

Step 16. In the Range End field, enter the ending IP address for the pool of IP addresses to be assigned to hosts in the VLAN. This must be within the range of IP addresses configured in the VLAN.
Note: In this example, fec0:2:0:0:0:0:0:1fff is used. The IPv6 addresses will automatically contract.
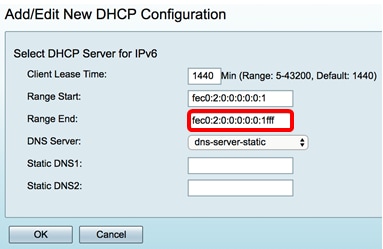
Step 17. From the DNS Server drop-down list choose the type of DNS to use. Domain Name System (DNS) is an Internet service that translates domain names, which are more easily understandable to users, into IP addresses that devices work with.
- dns-server-proxy — Router performs as DNS server for its DHCP clients. The router acts as an intermediary for all DNS incoming queries on it and sends unknown requests out and stores them for future use.
- dns-server-provided-isp — Gives DHCP clients the Internet Service Provider (ISP) DNS servers IPs for DNS queries.
- dns-server-static — Gives DHCP clients the user entered DNS server IP addresses to resolve DNS queries.
Note: In this example, dns-server-provided-isp is used. The IPv6 addresses will automatically contract.

Step 18. (Optional) In the Static DNS1 andStatic DNS2 fields, enter the IPv6 address of the primary and secondary DNS server.
Note: In this example, the fields are left blank since dns-server-provided-isp is used.

Step 19. Click OK.

You will be taken back to the main LAN/DHCP page. In this area, the recently configured DHCP settings are displayed.

Step 20. Click Apply.
You should now have successfully configured the LAN/DHCP settings for a VLAN.
Configure Option 82
Step 1. In the Option 82 Circuit field, enter a user-defined description of the circuit ID.
Note: In this example, DiscoNetwork is used.
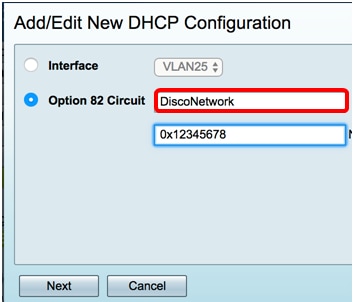
Step 2. In the Circuit ID field, enter a user-defined ASCII string that identifies the circuit interface upon which the DHCP request was sent.
Note: In this example, 0x12345678 is used as the circuit ID.

Step 3. Click Next.

Step 4. In the IP Address field under the Configure Default Gateway IP Address for Option 82 area, enter an IPv4 address to set as the default gateway.
Note: In this example, 192.168.11.1 is used.

Step 5. In the Subnet Mask field, enter the subnet mask of the IP address above.
Note: In this example, 255.255.255.0 is used.

Step 6. Click Next.
Configure IPv4 DHCP Server
Step 1. In the Client Lease Time field, enter the time, in minutes, for the lease duration. It is the amount of time a client is allowed to connect to the router with the IP address it was given through the DHCP process.

Step 2. In the Range Start field, enter the starting IP address for the pool of IP addresses to be assigned to hosts in the VLAN. The range can be up to the maximum number of IP addresses that the server can assign without overlapping the PPTP and SSL VPN.

Step 3. In the Range End field, enter the ending IP address for the pool of IP addresses to be assigned to hosts in the VLAN. This must be within the range of IP addresses configured in the VLAN.

Step 4. From the DNS Server drop-down list choose the type of DNS to use. Domain Name System (DNS) is an Internet service that translates domain names, which are more easily understandable to users, into IP addresses that devices work with.
- dns-server-proxy — Router performs as DNS server for its DHCP clients. The router acts as an intermediary for all DNS incoming queries on it and sends unknown requests out and stores them for future use.
- dns-server-provided-isp — Gives DHCP clients the Internet Service Provider (ISP) DNS servers IPs for DNS queries.
- dns-server-static — Gives DHCP clients the user entered DNS server IP addresses to resolve DNS queries.
Note: In this example, dns-server-static is chosen. If others are chosen, skip to Step 7.

Step 5. In the Static DNS1 field, enter the IPv4 address of the primary DNS server.
Note:In this example, 10.49.5.11 is used.
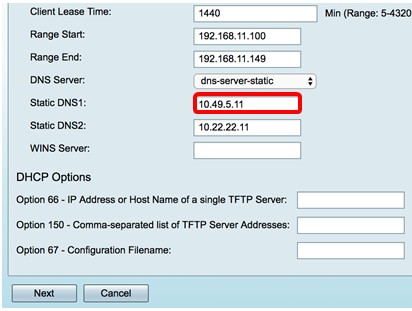
Step 6. In the Static DNS2 field, enter the IPv4 address of the secondary DNS server.
Note: In this example, 10.22.22.11 is used.

Step 7. (Optional) In the WINS Server field, enter the IPv4 address of the Windows Internet Naming Service (WINS) that resolves NetBIOS names to IP addresses.
Note: In this example, it is left blank.

DHCP Options
Step 8. (Optional) In the Option 66 field, enter the IP address or host name of a single TFTP server.
Note: In this example, 10.13.52.1 is used.

Step 9. (Optional) In the Option 150 field, enter a stream of IP addresses separated by commas.
Note: In this option, the field is left blank.

Step 10. (Optional) In the Option 67 field, enter the boot file name.
Note: In this example, config.txt is used.

Step 11. Click  .
.
You will be taken back to the LAN/DHCP Settings page.
Step 12. Click Apply.

You should now have successfully configured the LAN and DHCP settings on the RV34x Series Router.
You might find this article informative: RV34x Series Router Frequently Asked Questions (FAQs)
This site offers several links to other articles you might find interesting: RV34x Series Router Product Page
 Feedback