Configure Port Forwarding/Port Triggering/NAT on RV34x Series Routers
Available Languages
Objective
Explain the purpose of port forwarding and port triggering and provide instructions to set up these features on your RV34x Series router.
- Comparing Port Forwarding and Port Triggering
- Setting Up Port Forwarding and Port Triggering
- Setting up Network Address Translation (NAT)
Applicable Devices
- RV34x Router series
Software Version
- 1.0.01.17
Comparing Port Forwarding and Port Triggering
These features allow some internet users to have access to specific resources on your network, while protecting the resources that you want to keep private. Some examples of when this is used: hosting web/email servers, alarm system and security cameras (to send the video back to an offsite computer). Port forwarding opens ports in response to inbound traffic for a specified service.
A list of these ports and their description are set up when you enter the information in the Service Management section of the set up wizard. When you set these up, you cannot use the same port number for both port forwarding and port triggering.
Port Forwarding
Port forwarding is a technology that allows public access to services on network devices on the Local Area Network (LAN) by opening a specific port for a service in response to inbound traffic. This ensures that the packets have a clear path to the intended destination, which allows for faster download speeds and lower latency. This is set for a single computer on your network. You need to add the specific computer's IP address and it cannot change.
This is a static operation that opens a specific range of ports that you select and doesn't change. This may increase security risk as the configured ports are always open.
Imagine that a door is always open on that port to that device that it was assigned.
Port Triggering
Port triggering is similar to port forwarding but a little more secure. The difference is that the trigger port is not always open for that specific traffic. After a resource on your LAN sends outbound traffic through a trigger port, the router listens for inbound traffic through a specified port or port range. Triggered ports are closed when there is no activity, which adds to the security. Another benefit is that more than one computer on your network can access this port at different times. Therefore, you do not need to know the IP address of the computer that will trigger it in advance, it does this automatically.
Think of you giving someone a pass but there is a doorman there that checks your pass each time you enter and then closes the door until the next person with a pass arrives.
Setting Up Port Forwarding and Port Triggering
Port Forwarding
To configure port forwarding, follow these steps:
Step 1. Log in to the web configuration utility. Enter the IP address for the router in the search/address bar. The browser might issue a warning that the website is untrusted. Continue to the website. For more guidance with this step, click here.
Enter the username and password for the router and click Log In. The default username and password is cisco.

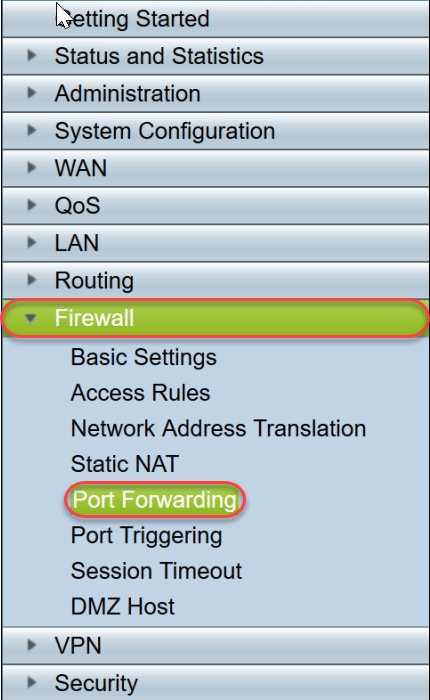
Step 2.From the main menu on the left side,Click Firewall > Port Forwarding
In the Port Forwarding Table, click Add or select the row and click Edit to configure the following:
|
External Service |
Select an external service from the drop-down list. (If a service is not listed, you can add or modify the list by following the instructions in the Service Management section.) |
|
Internal Service |
Select an internal service from the drop-down list. (If a service is not listed, you can add or modify the list by following the instructions in the Service Management section.) |
|
Internal IP Address |
Enter the internal IP addresses of the server. |
|
Interfaces |
Select the interface from the drop-down list, to apply port forwarding on. |
|
Status |
Enable or disable the port forwarding rule. |

For example, a company hosts a web server (with an internal IP address of 192.0.2.1) on their LAN. A port forwarding rule for HTTP traffic could be enabled. This would allow requests from the internet into that network. The company sets the port number 80 (HTTP) to be forwarded to IP address 192.0.2.1, then all HTTP requests from outside users will be forwarded to 192.0.2.1. It is set up for that specific device in the network.
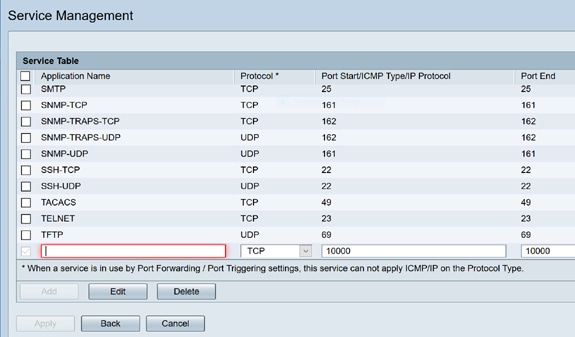
Step 3 .Click Service Management
In the Service Table, click Add or select a row and click Edit and configure the following:
- Application Name – Name of the service or application
- Protocol – Required protocol. Refer to the documentation for the service that you are hosting
- Port Start/ICMP Type/IP Protocol – Range of port numbers reserved for this service
- Port End – Last number of the port, reserved for this service
Step 4. Click Apply
Port Triggering
To configure port triggering, follow these steps:
Step 1.Log in to the web configuration utility. From the main menu on the left side,click Firewall > Port Triggering
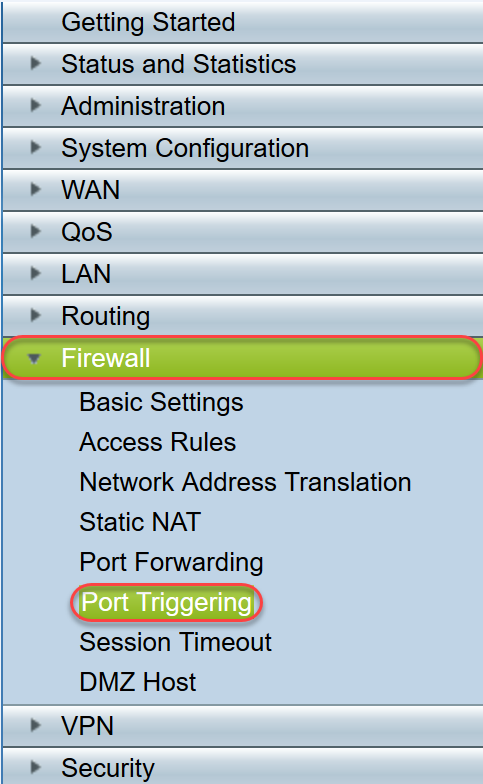
Step 2.To add or edit a service to the port triggering table, configure the following:
|
Application Name |
Enter the name of the application. |
|
Trigger Service |
Select a service from the drop-down list. (If a service is not listed, you can add or modify the list by following the instructions in the Service Management section.) |
|
Incoming Service |
Select a service from the drop-down list. (If a service is not listed, you can add or modify the list by following the instructions in the Service Management section.) |
|
Interfaces |
Select the interface from the drop-down list. |
|
Status |
Enable or disable the port triggering rule. |
Click Add (or select the row and click Edit) and enter the following information:

Step 3 . Click Service Management, to add or edit an entry on the Service list.
In the Service Table, click Add or Edit and configure the following:
- Application Name – Name of the service or application
- Protocol – Required protocol. Refer to the documentation for the service that you are hosting
- Port Start/ICMP Type/IP Protocol – Range of port numbers reserved for this service
- Port End – Last number of the port, reserved for this service

Step 4 .Click Apply
Network Address Translation
Network address translation (NAT) enables private IP networks with unregistered IP addresses to connect to the public network. This is a commonly configured protocol in most networks. NAT translates the private IP addresses of the internal network to public IP addresses before packets are forwarded to the public network. This allows a large number of hosts on an internal network to access the internet through a limited number of public IP addresses. This also helps to protect the private IP addresses from any malicious attack or discovery as the private IP addresses are kept hidden.
To configure NAT, follow these steps
Step 1.Click Firewall> Network Address Translation
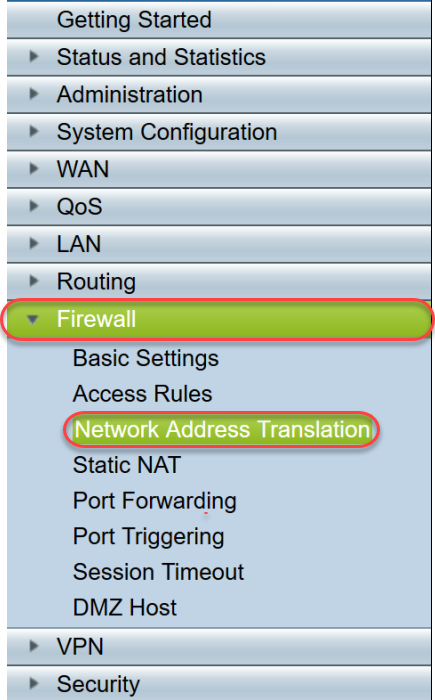
Step 2. In the NAT Table, check Enable NAT for each applicable Interface on the list to enable
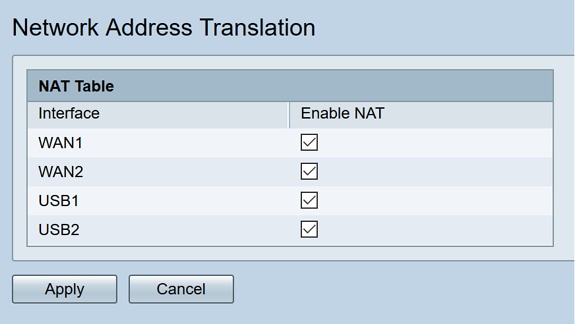
Step 3. Click Apply
You have now successfully configured Port forwarding, Port Triggering, and NAT.
Other Resources
- For configuration of Static NAT, click here
- For answers to many questions about routers, including the RV3xx series, click here
- For FAQs on RV34x series, click here
- For more information on RV345 and RV345P, click here
- For more information on configuring Service Management on the RV34x series, click here
 Feedback