Create a User Group for VPN Setup on the RV34x Router
Available Languages
Objective
This article aims to show you how to create a user group for Virtual Private Network (VPN) setup on the RV340 Router.
User groups are created on the router for a collection of users that share the same set of services. These user groups can be authorized to access multiple services like Web Login, Point-to-Point Tunneling Protocol (PPTP), L2TP, and EzVPN. This enables the administrators to control and filter authorized users only to access the network. Green Bow is one of the more common VPN Clients available for download. The VPN requires configuration of the VPN settings on the router for the client to be able to successfully establish a VPN tunnel.
Prerequisites for Using the Green Bow VPN Client
The following items must be configured on the VPN router first to establish a connection with the Green Bow VPN client. View the Green Bow article by clicking here.
- Create a user group on the router by following the instructions in this article.
- Create a User Account on the router. For instructions, click here.
- Create a Client-to-Site Profile on the router. To learn how, click here.
- Configure an Internet Protocol Security (IPSec) Profile on the router. To learn how, click here.
Applicable Devices | Firmware Version
- RV34x Series | 1.0.01.17 (Download latest)
Create a User Group
Step 1. Log in to the web-based utility of the router and choose System Configuration > User Groups.
Note: The images on this article are from an RV340 Router. Options may vary depending on the model of your device.

Step 2. Click Add to add a User Group.

Step 3. In the Overview area, enter the name of the group in the Group Name field.

Note: In this example, VPN is used.
Step 4. Under Local Membership List, check the check boxes of the user names that need to be in the same group.

Note: In this example, vpnuser are chosen.
Step 5. Under Services, choose a permission to be granted to the users in the group. The options are:
- Disabled - This option means that members of the group are not permitted to access the web-based utility through a browser.
- Read Only - This option means that the members of the group can only read the status of the system after they log in. They cannot edit any of the settings.
- Administrator - This option gives the members of the group read and write privileges, and be able to configure the system status.

Note: In this example, Read Only is chosen.
Step 6. In the EzVPN/3rd Party Profile Member In-use Table, click Add.

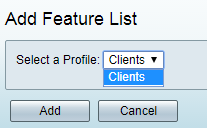
Step 7. Choose a profile from the Select a Profile drop-down list. The options may vary, depending on the profiles that have been configured on the VPN gateway.

Note: In this example, Clients is chosen.
Step 8. Click Add.

Step 9. Click Apply.

Step 10. Click Save.

You should now have successfully created a user group on the RV34x Series Router.
 Feedback