Replace the Default Self-Signed Certificate with a 3rd Party SSL Certificate on the RV34x Series Router
Available Languages
Introduction
A digital certificate certifies the ownership of a public key by the named subject of the certificate. This allows relying parties to depend upon signatures or assertions made by the private key that corresponds to the public key that is certified. A router can generate a self-signed certificate, a certificate created by a network administrator. It can also send out requests to Certificate Authorities (CAs) to apply for a digital identity certificate. It is important to have legitimate certificates from third-party applications.
There are two ways that CA signs the certificates:
1. CA signs the certificate with private keys.
2. CA signs the certificates using Certificate Signing Request (CSR) generated by the RV34x.
Most commercial certificate vendors use intermediate certificates. As the intermediate certificate is issued by the Trusted Root CA, any certificate issued by the intermediate certificate inherits the trust of the Trusted Root, like a certification chain of trust.
Objective
This article aims to show how to request and upload a 3rd party Secure Sockets Layer (SSL) certificate issued by a CA to replace the self-signed certificate on the RV34x Router.
Applicable Devices
- RV340
- RV340W
- RV345
- RV345P
Software Version
- 1.0.01.17
Replace the Default Self-Signed Certificate with a 3rd Party SSL Certificate
Generate a CSR
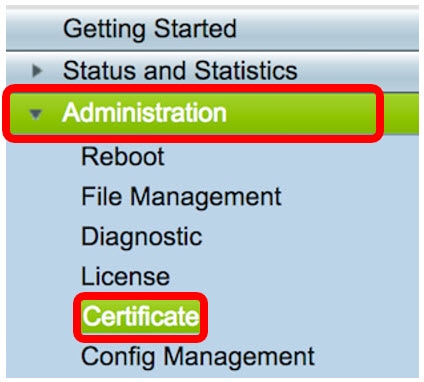
Step 1. Log in to the web-based utility of the router and choose Administration > Certificate.
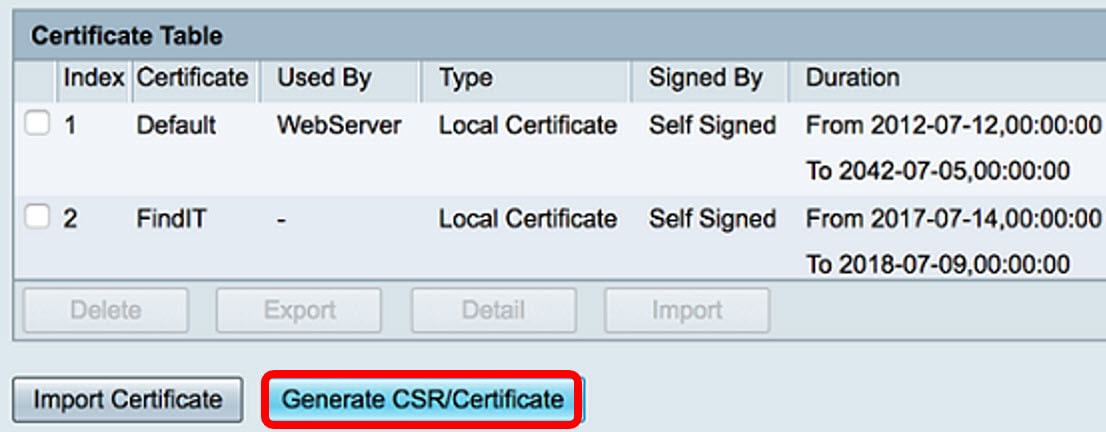
Step 2. Under the Certificate Table, click the Generate CSR/Certificate button.
Step 3. In the Generate CSR/Certificate window,click the Type drop-down arrow and choose Certificate Signing Request.

Step 4. Enter a name for the certificate in the Certificate Name field.

Note: In this example, 34xrouter is used.
Step 5. Enter an alternative name in the Subject Alternative Name field and then click the FQDN radio button below it to match. The alternative name will be the domain name that can be used to access the router.

Note: In this example, RVrouter.com is used.
Step 6. Click the Country Name drop-down arrow to choose the country of your location.

Note: In this example, US - United States is chosen.
Step 7. Enter the name of the state or province in the State or Province Name(ST) field.

Note: In this example, California is used.
Step 8. Enter the locality in the Locality Name(L) field.

Note: In this example, Irvine is used.
Step 9. Enter the Organization Name(O) in the field provided.

Note: In this example, Cisco is used.
Step 10. Enter the Organization Unit Name(OU) in the field provided.

Note: In this example, SBKM is used.
Step 11. Enter a name in the Common Name(CN) field.

Note: In this example, 34xrouter is used.
Step 12. Enter your email address or any email address where you want the certificate to be sent.

Note: In this example, a gmail.com email address is used.
Step 13. Choose a Key Encryption Length from the drop-down menu to set the number of bits in your key. The default length is 512.

Note: In this example, 2048 is used. This is highly recommended since a longer encryption is more difficult to decode compared to shorter keys, thus, making it more secure.
Step 14. Click Generate.

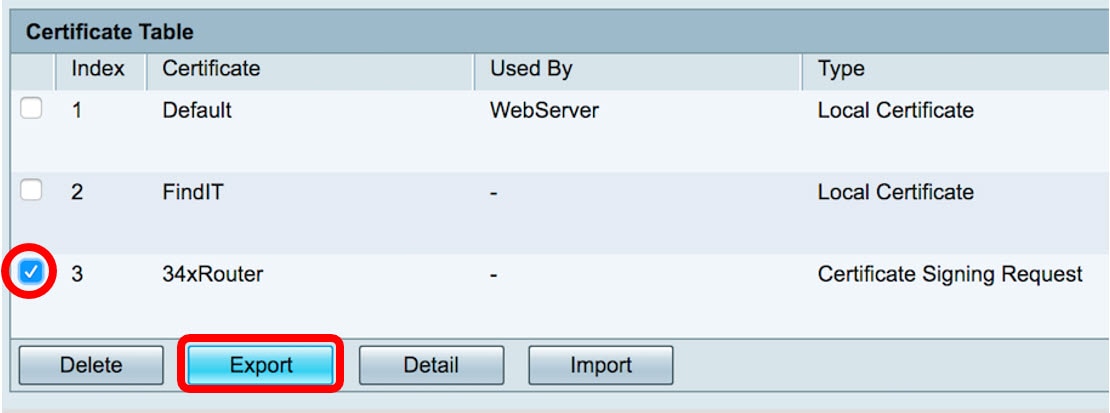
The certificate request you have created will now appear in the Certificate Table.

You now have successfully generated a CSR.
Export the CSR
Step 1. Check the box beside the certificate request in the Certificate Table and click Export.
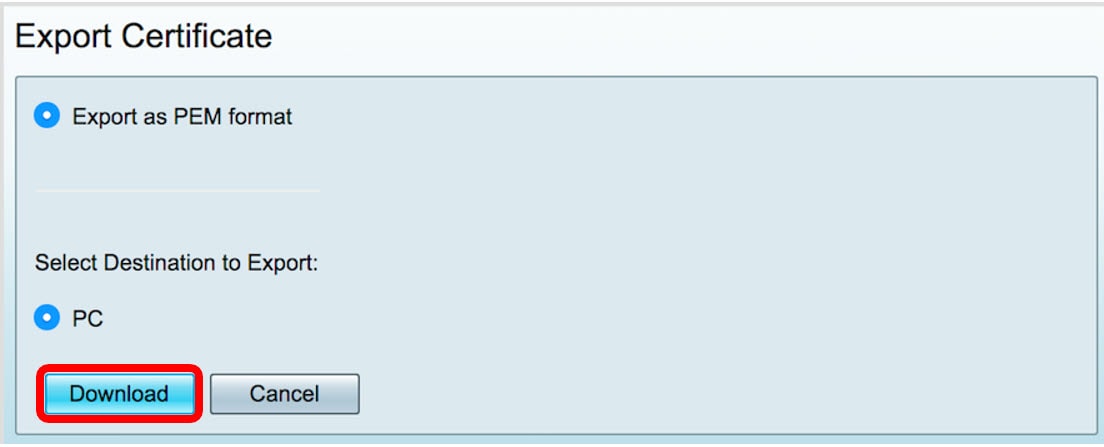
Step 2. Click Download in the Export Certificate window to download the file into your computer in PEM format.
You now have successfully exported the CSR into your computer.
Upload the CSR to the Certificate Provider
Step 1. Open the downloaded file using a notepad and copy the CSR then paste it into the field provided in the 3rd party SSL certificate provider site.
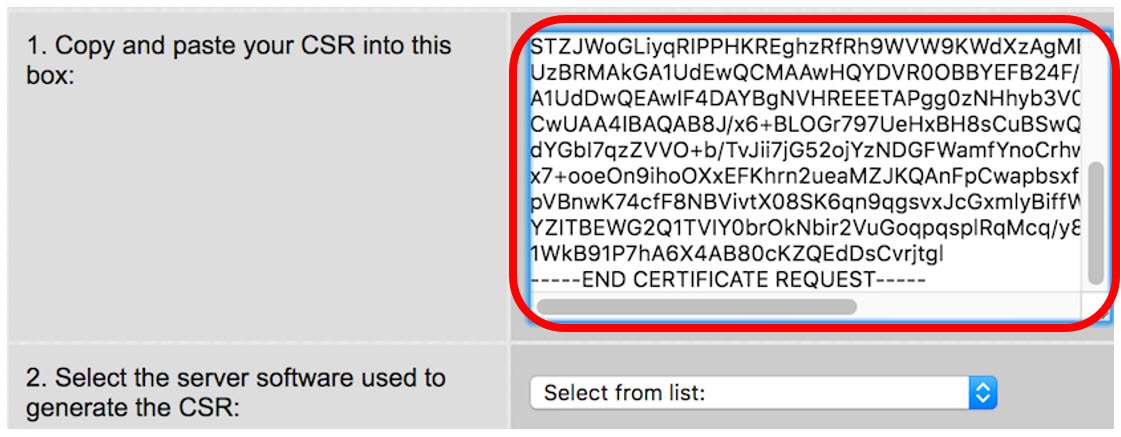
Note: In this example, Comodo.com is used as the certificate provider.
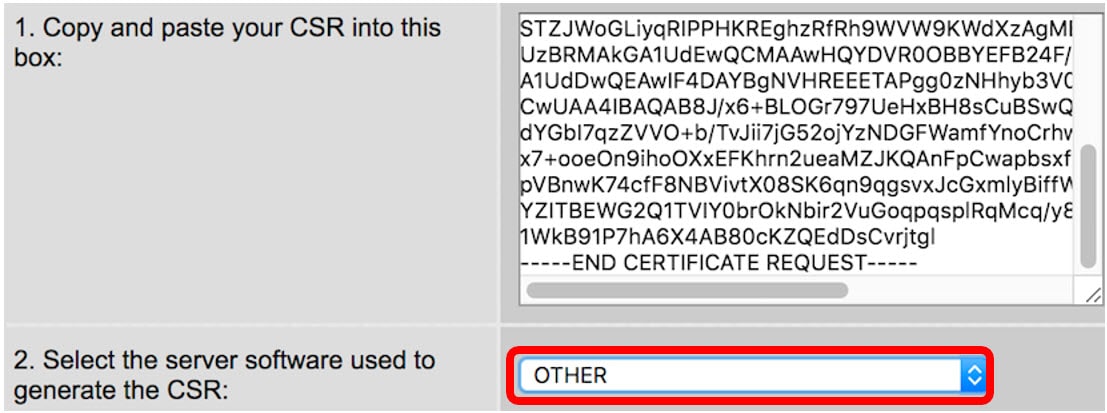
Step 2. Select the server software used to generate the CSR. In this case, since the RV34x router is not on the list, OTHER is chosen.
Step 3. Download your certificate into your computer.
Upload the 3rd SSL Party Certificate
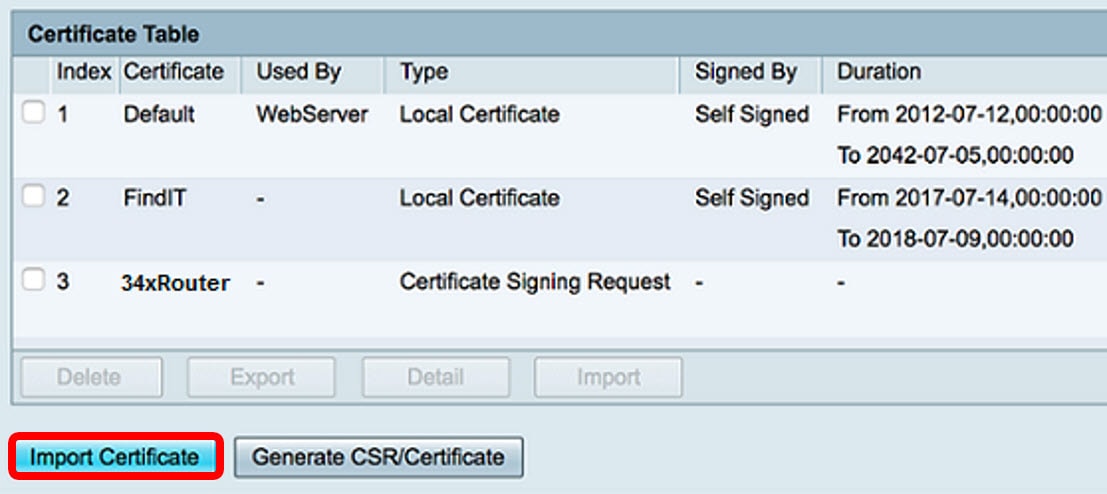
Step 1. In the web-based utility of the router, click the Import Certificate button under the Certificate Table.
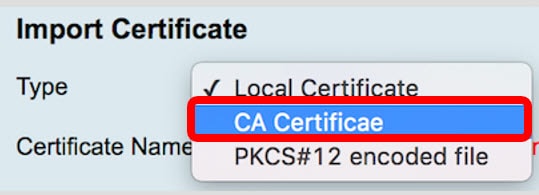
Step 2. In the Import Certificate window, click the Type drop-down menu and choose CA Certificate.
Step 3. Enter a Certificate Name in the field provided.
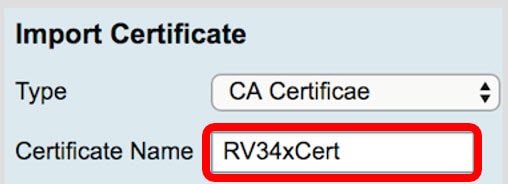
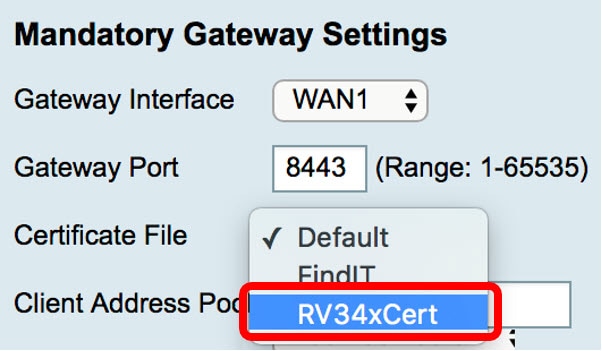
Note: In this example, RV34xCert is used.
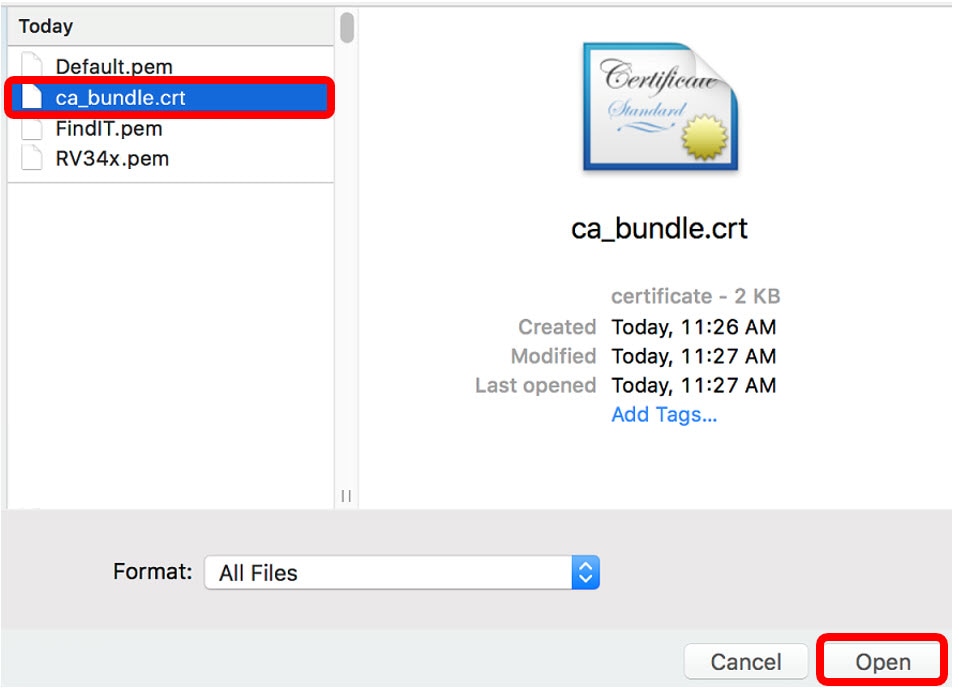
Step 4. Click the Choose File button and locate the certificate file you have downloaded from the CA.

Step 5. Click on the file and then click Open.
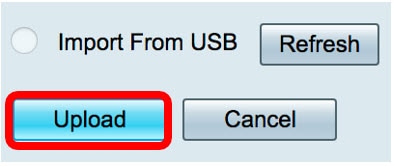
Step 6. Click Upload.
The Certificate Table will now show the new certificate name and the type is now replaced with CA certificate with the label that it has been signed by the 3rd party CA.
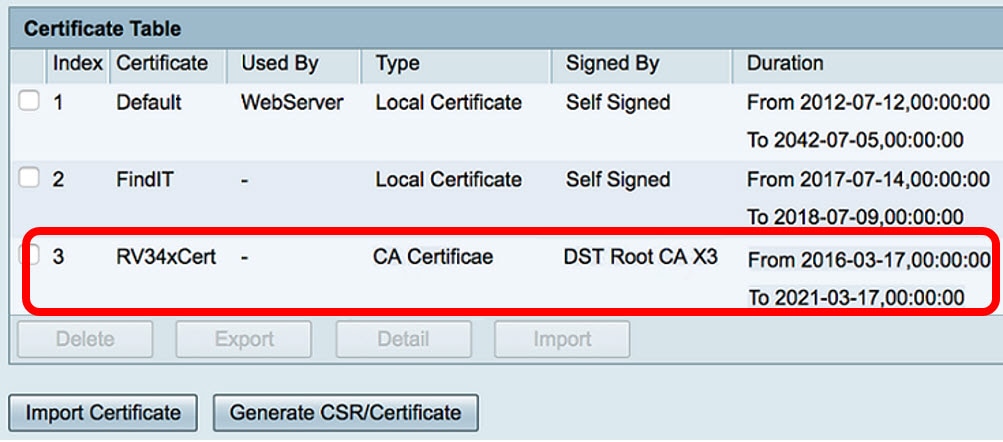
You now have successfully uploaded a 3rd party SSL certificate on the RV34x Router.
Replace the Default Self-Signed Certificate
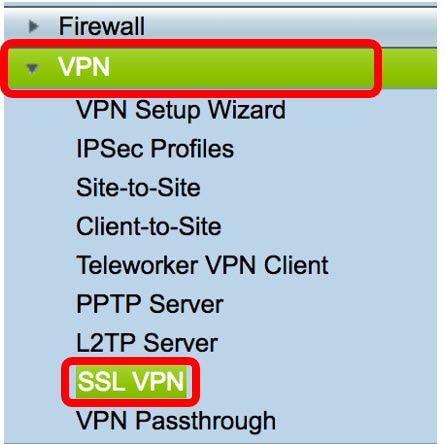
Step 1. In the web-based utility, choose VPN > SSL VPN.
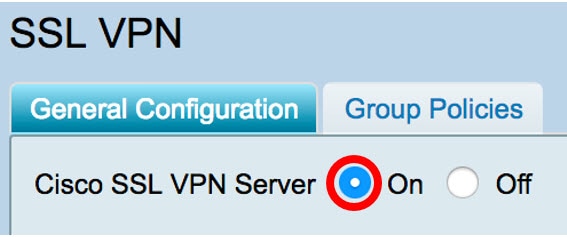
Step 2. Click the On radio button to enable the Cisco SSL VPN Server.
Step 3. Under Mandatory Gateway Settings, click the Certificate File drop-down menu and replace the default certificate by choosing the newly uploaded SSL certificate.
Step 4. Enter the required Client Domain in the field provided.
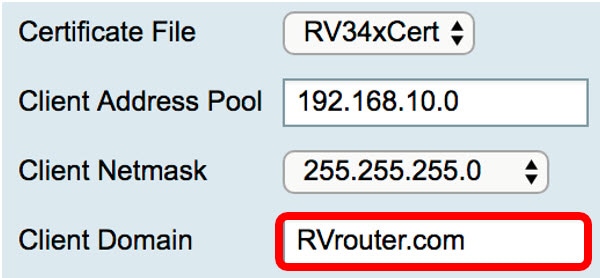
Note: In this example, RVrouter.com is used.
Step 5. Click Apply.

You now have successfully replaced the default self-signed certificate with the 3rd party SSL certificate.
You might find also this article informative: RV34x Series Router Frequently Asked Questions (FAQs)
This site offers several links to other articles you might find interesting: RV34x Series Router Product Page
 Feedback