Troubleshooting on RV160 and RV260 Routers
Available Languages
Objective
Countless issues can come up in a network that can cause connectivity problems. This document will cover some of the areas to analyze when troubleshooting connectivity on an RV160 or RV260 router.
Applicable Devices
- RV160
- RV260
Software Version
- 1.0.00.13
Table of Contents
Check for Physical or Environmental Issues
Run Connectivity Tests from the Web-Based Utility
Edit the IP Address of your LAN
IP Address Changes After Subnet Change
Troubleshooting Ideas
Check for Physical or Environmental Issues
This is the easiest way to troubleshoot but is often overlooked. Even though these may appear to be obvious, it is good to start with the basics.
- Is there power to everything?
- Is it all turned on?
- Are the cables connected correctly?
- Do you have a link light on consistently?
- Could it be a bad cable?
- Is the router overheated?
- Could there be environmental factors such as where it is located?
- If it is a wireless router is there is anything interfering with it such as a microwave, metal, or thick walls between the router and computer?
Run Connectivity Tests from the Web-Based Utility
The router must be able to communicate with other devices in the network and out across the internet in order to conduct business. There are a few ways to check for connectivity.
First, you may verify the IP address settings on the computer connected to the Local Area Network (LAN) port of the router. By default the DHCP feature is enabled on the router so you may keep your Network Interface Card (NIC) settings on your computer as "Obtain IP address automatically". This allows your computer to get an IP address from the router. Please verify the reachability to the router LAN using the ping command.
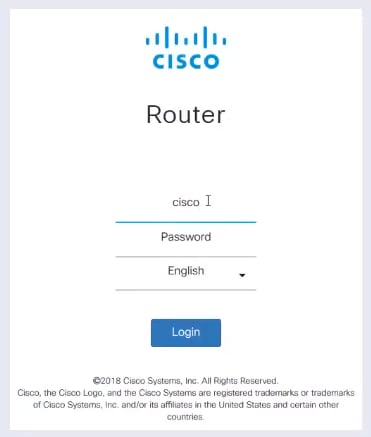
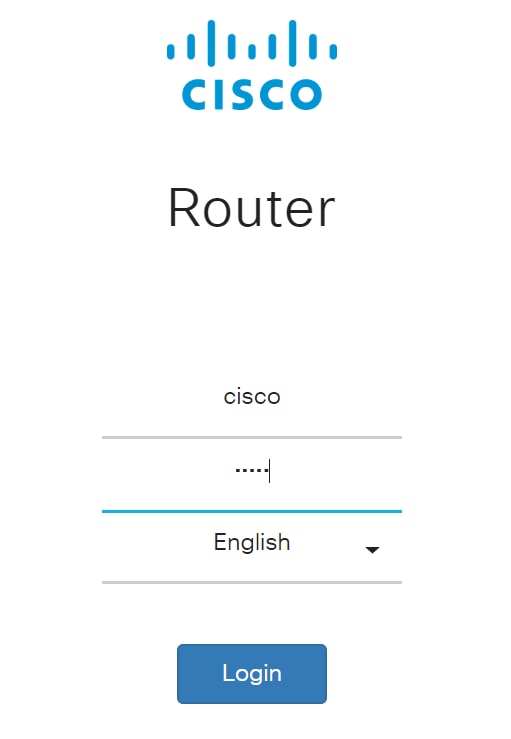
Log into your router directly and use the Graphical User Interface (GUI). In your web browser, enter the IP address of the router. Enter the credentials. If you did a factory reset, or this is the first time you are entering credentials, the default IP address is 192.168.1.1 and the credentials are cisco for both the Username and Password.
Note: If you forgot the IP address of the router and you don't have a specific configuration that you need to keep, you can reset to factory defaults on the physical device. Open a paperclip and insert the end of it into the small recessed reset button. Hold for 10 seconds and you see should see the lights on the device light up. It will take at least a few minutes to boot back up. Your IP address will revert to 192.168.1.1.
To get to the navigation pane, you click on the blue circle icon as shown below.
![]()
On the navigation pane, select Administration > Diagnostic. From here you can do a Ping, Traceroute to an IP Address, or perform a DNS Lookup.
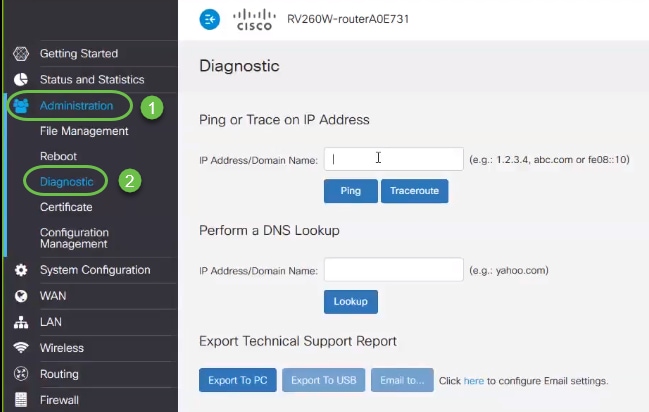
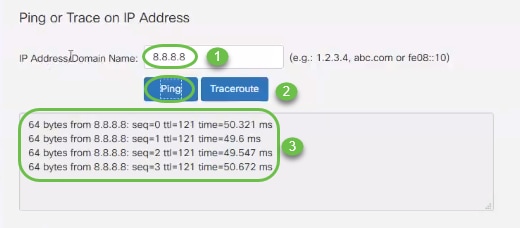
To do a ping using the GUI, type in the IP address that should have the ability to communicate with your router and click Ping. You can enter the IP address of a different connected device within your network, or you can select a reliable one that you know outside of your network.
If your router is able to communicate with the IP address, packets will be returned along with statistics. The picture below shows a successful ping, therefore network connectivity is not the issue in this case.
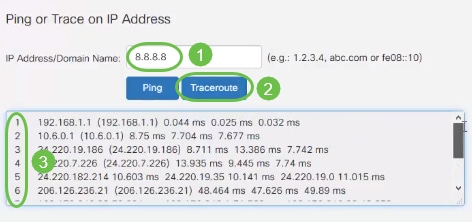
To perform a trace on an IP you would click Traceroute. In the outcome of your traceroute, you will see "hops" from one router to the next. "Hop" 1 starts with your local router, then your Internet Service Provider (ISP) router. It then "hops" to the router on the edge of the network of the ISP, and across more routers to get to the destination. If the first two or three "hops" are successful, the problem is an issue outside of your network. Try another IP address or Domain Name to receive a successful traceroute.
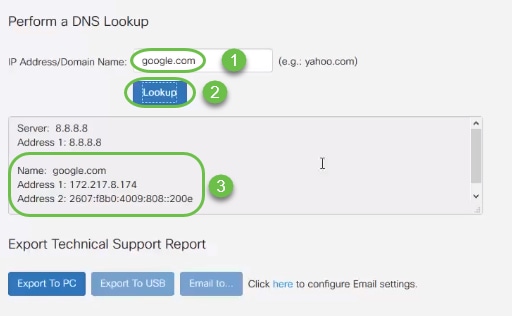
To perform a Domain Name Service (DNS) Lookup you would type in an IP Address or Domain Name and click Lookup. If the DNS returns details about the IP Address or Domain Name, your Server is configured and connected.
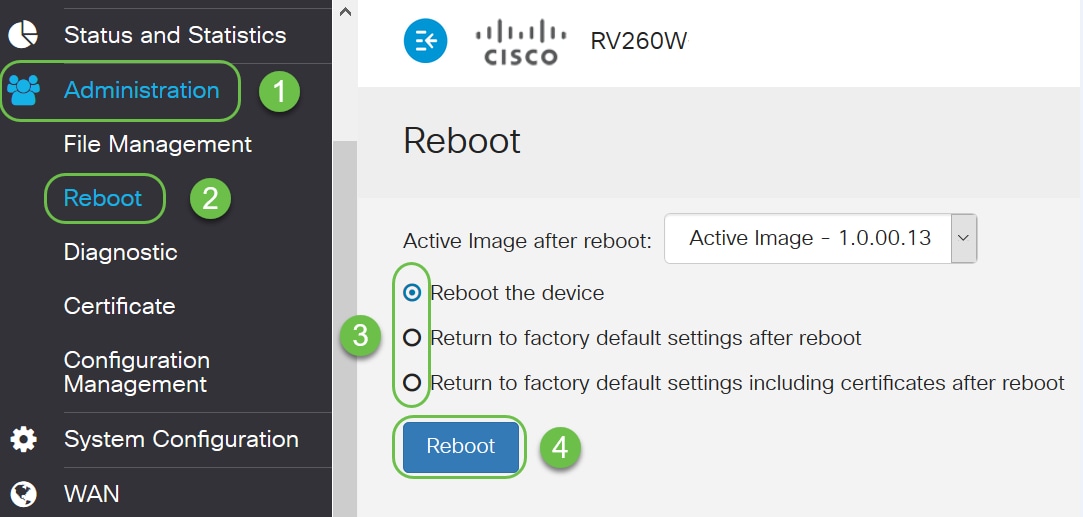
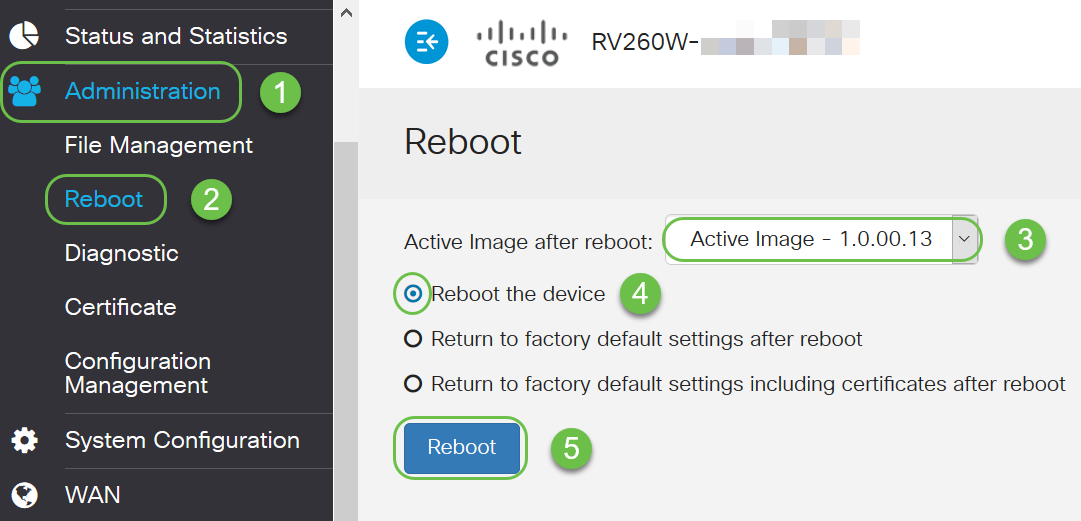
Another option is to Reboot or do a Return to factory default settings after reboot. Keep in mind that if you choose Return to factory default settings, all configurations will be lost. This can sometimes fix the issue if something was changed from the default settings and caused the issue to occur. If you choose Return to factory default settings including certificates after reboot you will need to reload certificates.
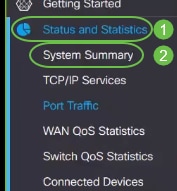
Explore Status and Statistics
Explore each of the other Status and Statistics options on the navigation pane starting with System Summary.
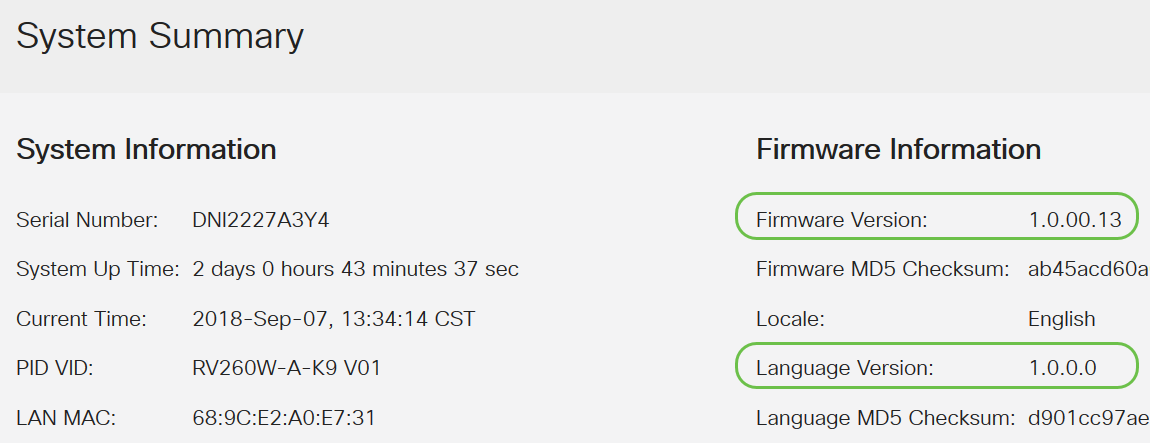
System Summary shows your serial number, the amount of time that your router has been up for, the current time, port status, VPN status, and firewall status. It also lists the current firmware and language version. If either is not the latest version, you should go to Cisco Support and upgrade the firmware or language version. This could potentially solve your issue since upgrades often contain bug fixes. If you would like to be guided through the upgrade firmware process, click here.
Once you have upgraded the firmware image, you would need to activate that image and reboot, which will cause the older firmware image to be inactive.
Return to System Summary to ensure the firmware and language have been upgraded.
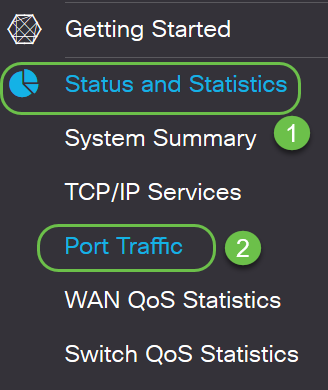
Check out Status and Statistics> Port Traffic for issues.
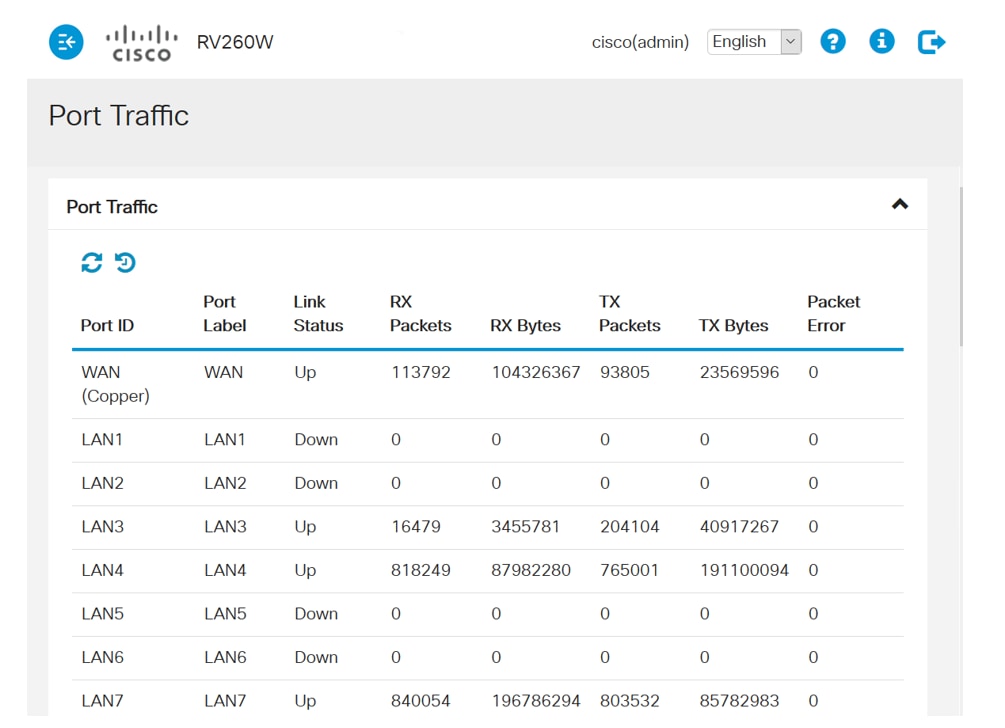
The Port Traffic page includes:
- Port ID – port ID
- Port Label – port label
- Link Status – connection status on each port, if it is up or down
- RX Packets - total number of packets received through the interface
- RX Bytes – total bytes received
- TX Packets – total number of packets transmitted
- TX Bytes – total number of bytes transmitted
- Packet Error – errors that occurred when sending or receiving packets
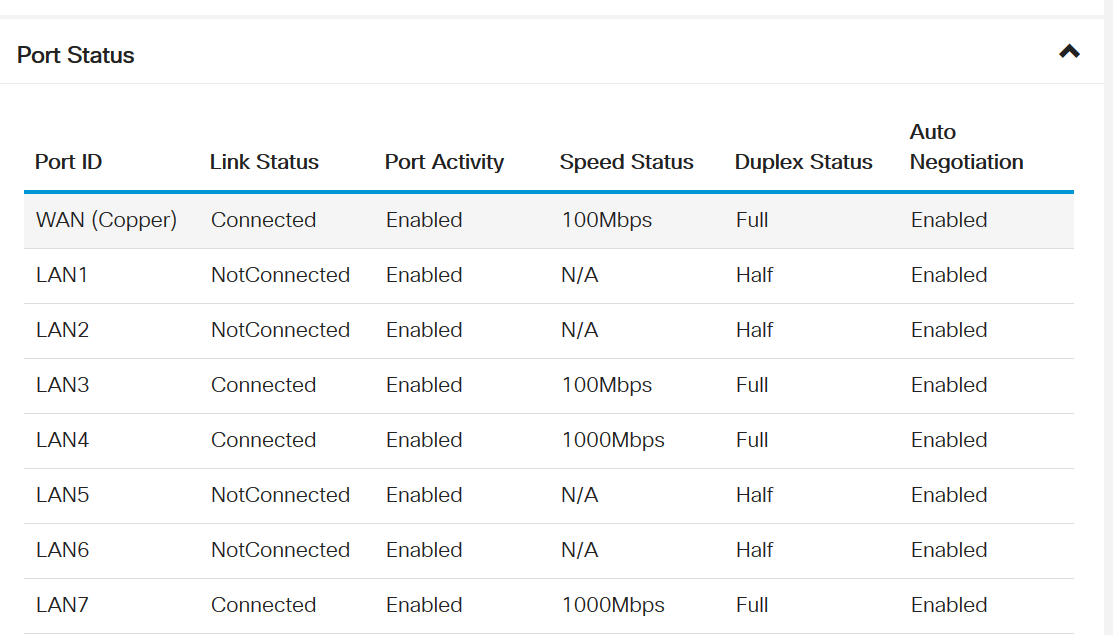
This section of the Port Traffic page, Port Status, includes:
- Link Status - the port is connected or not connected
- Port Activity - enabled or not
- Speed Status - type of speed that port is using
- Duplex Status - set to full or half. This may need to be adjusted if you are using older hardware that can only use half duplex you may have to change the settings to match.
- Auto Negotiation - How two connected devices choose common transmission parameters, including the speed and flow control. It is recommended that this be enabled.
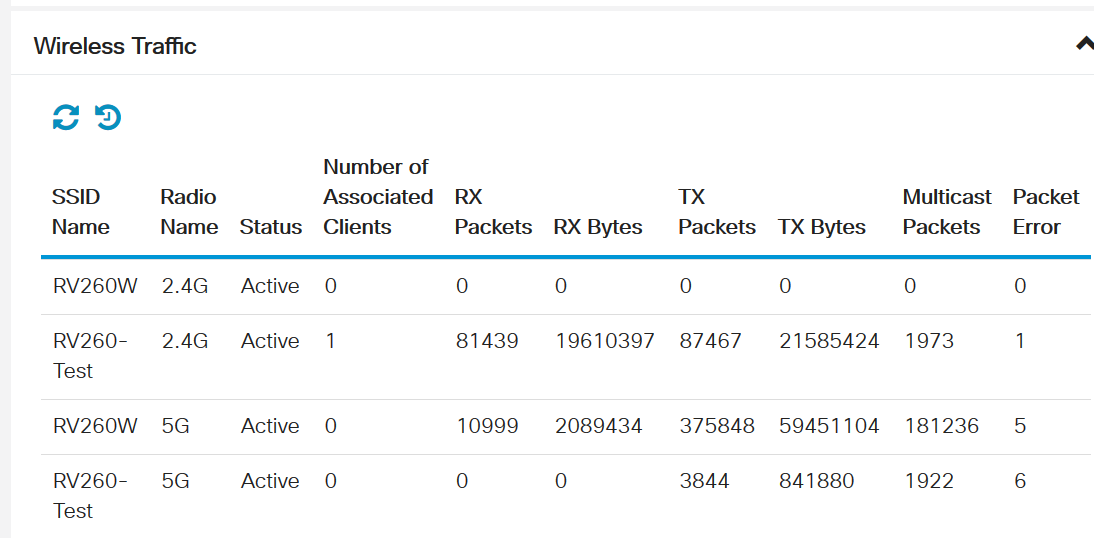
If you are using a wireless router, Wireless Traffic will be part of your Port Traffic page.
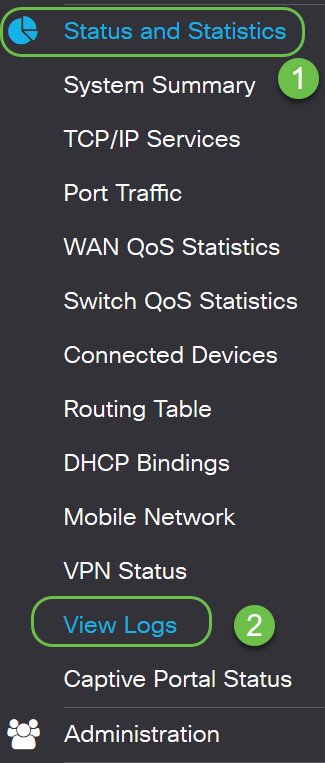
Check out Status and Statistics > View Logs to look for errors and missing connections.
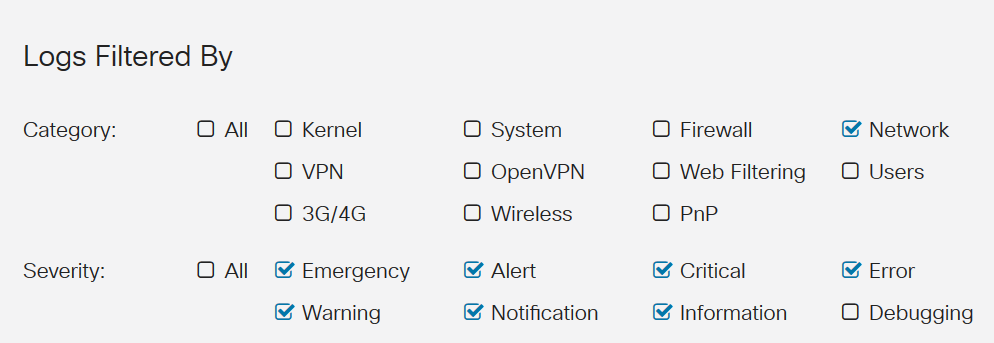
There are several options of what to look through in View Logs. Logs are created often, so it may be hard to sort out the information you need without using the filtering feature.
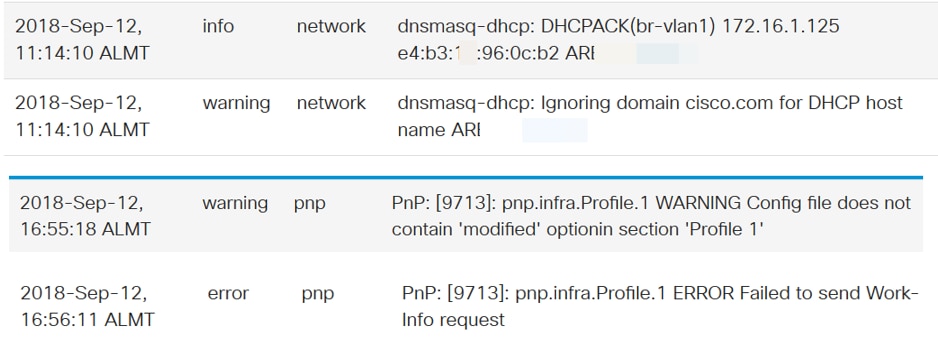
These are some examples of Logs:
Explore Firewall Settings
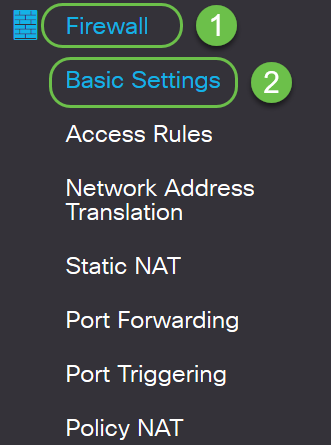
Explore Firewall > Basic Settings to see if you have blocked anything that might be causing the problem.
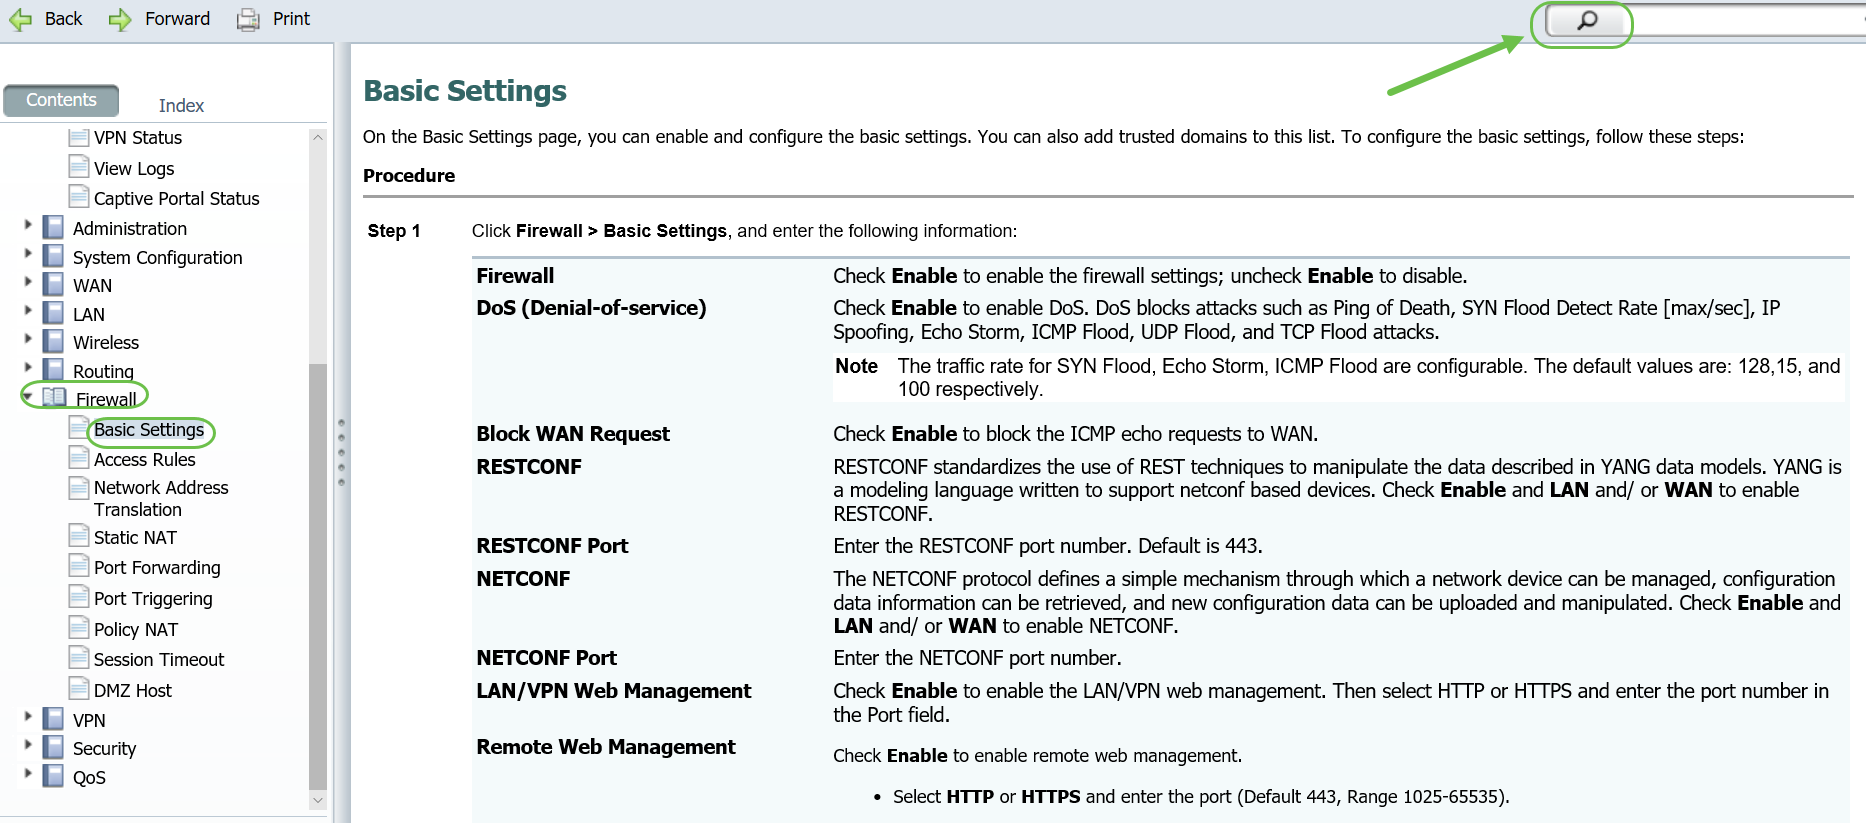
Here is a standard configuration for Basic Settings. If you can't ping the Wide Area Network (WAN) of the router, this is where you can check to see if Block WAN Request is enabled. If you can't remotely access your web configuration page, the problem might be that you didn't enable Remote Web Management.
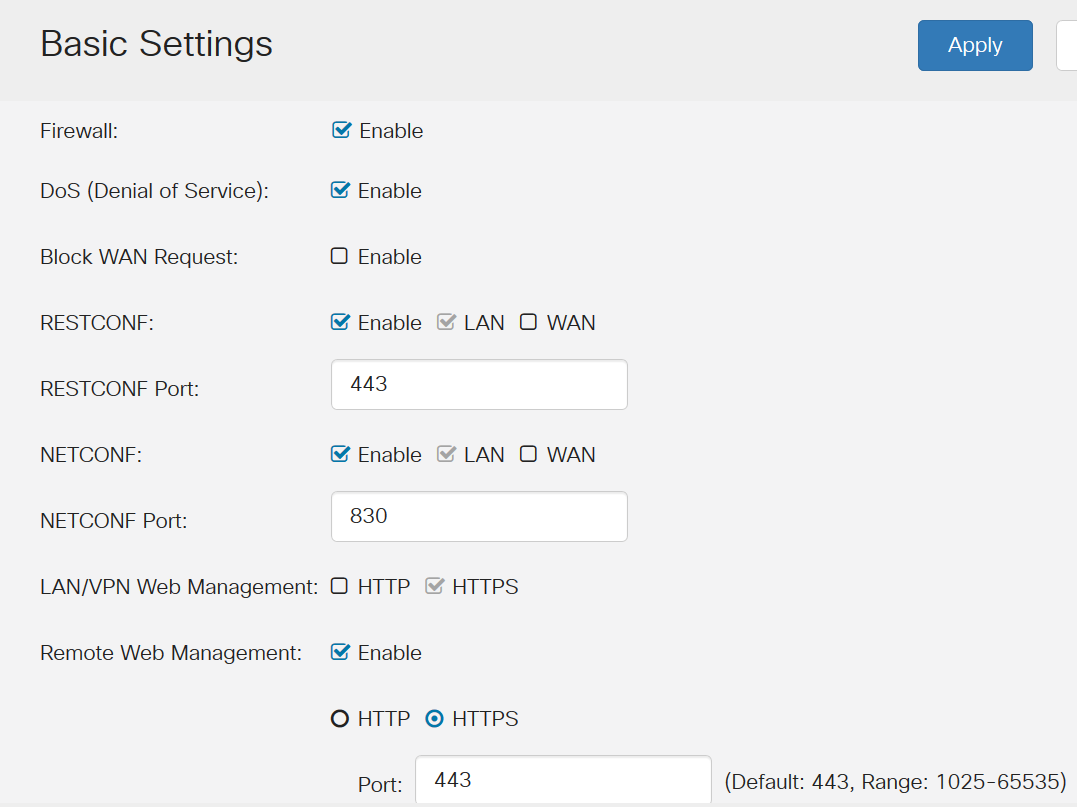
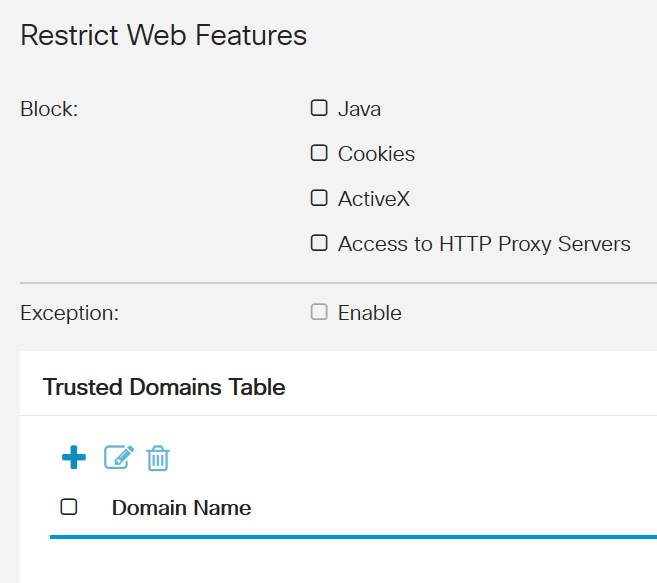
It may be possible that you have one or more of these enabled and that is causing the issue.
Explore Security Settings
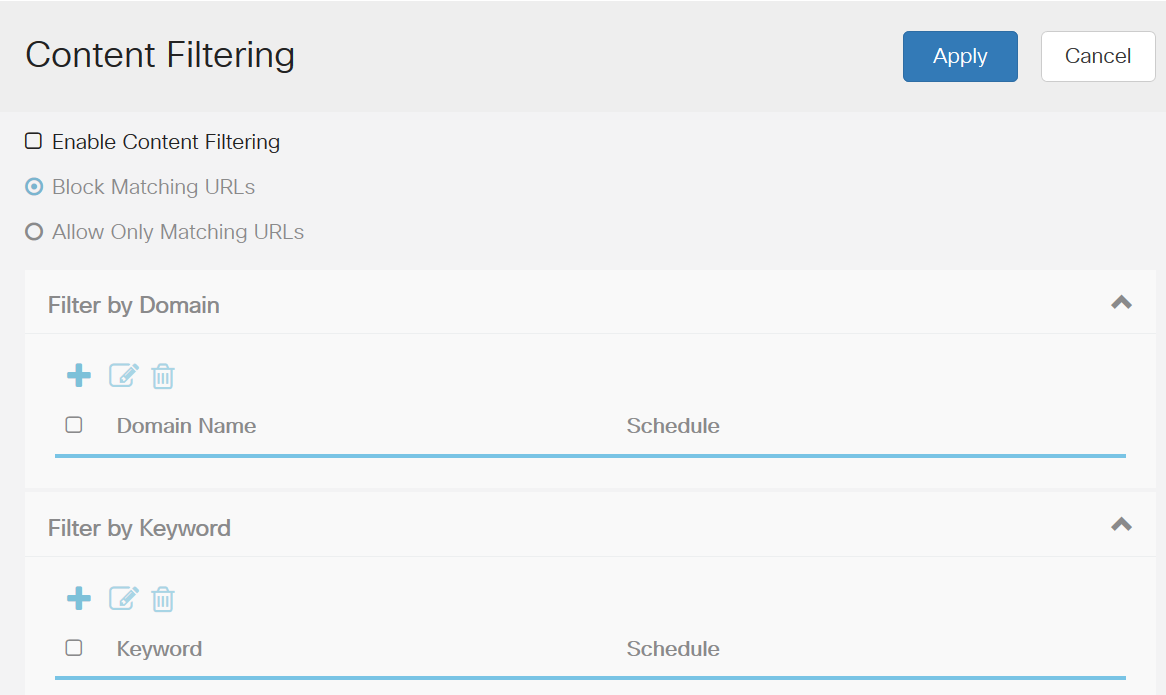
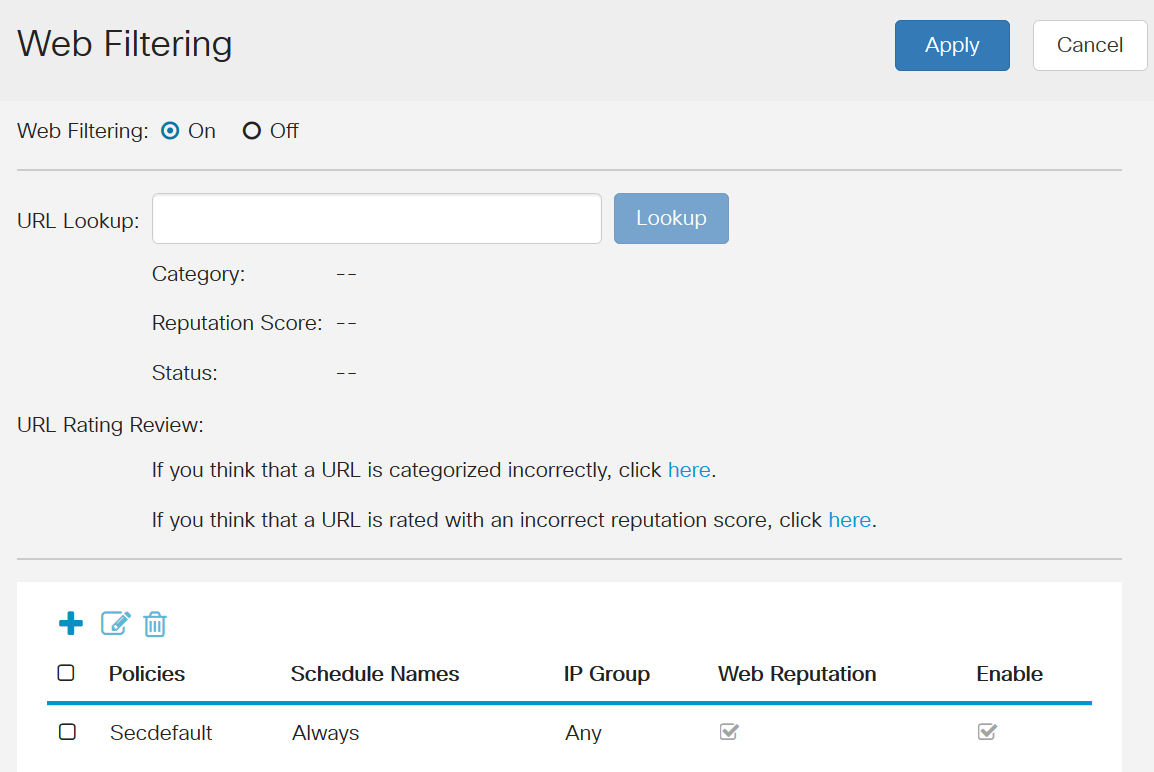
Check the Security Settings for both Content Filtering and Web Filtering. It is possible you configured something there that is preventing network access.
- Content Filtering enables you to restrict access to certain unwanted websites based on the domain names and keywords.
- Web Filtering allows you to manage access to inappropriate websites. It can screen a client's web access request to determine whether to allow or deny that website.
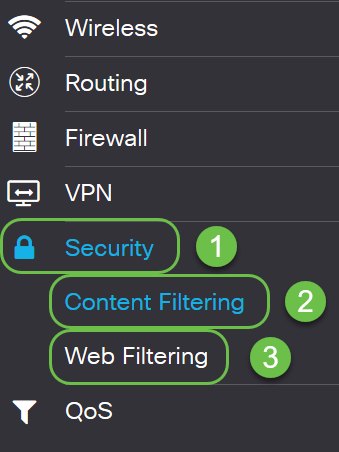
Content Filtering can be checked to see if there is anything preventing network access. If you received a message that you were blocked from a specific page or employees report that a specific site is being blocked, this is the location to check that.
Web Filtering is one more place to see if that might be the issue.
If you would like more details on the navigation pane options, click on the question mark on the top right of your GUI screen.
![]()
Once you have selected the question mark, a new screen will open and an expandable section will appear that is in the same order as the navigation pane.
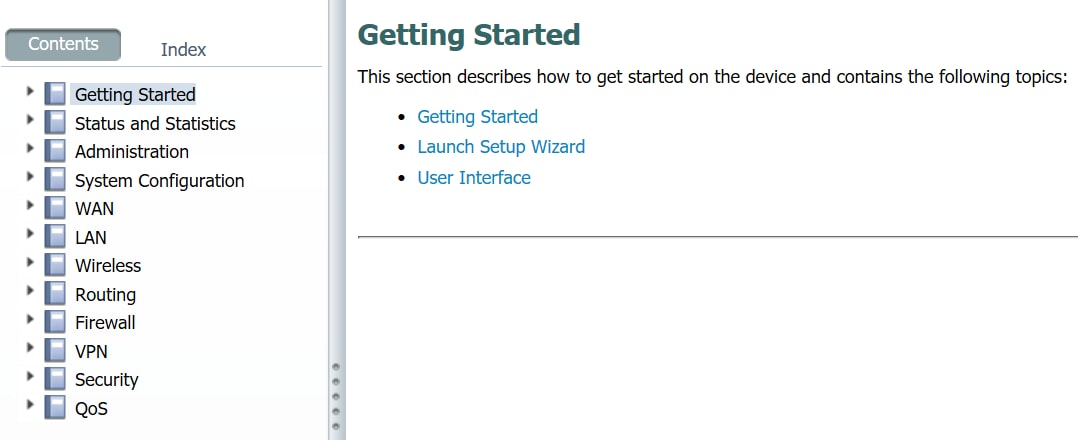
Once you click on one of the sections, a list of topics will expand beneath it. Select the area you want more information on and it will open up. In this example Firewall > Basic Settings was selected. There is also a search feature on the top right of the screen if you are not sure where to look for a certain question.
Check Default WAN Address on Modem or Dongle
Some modems and dongles come with a default Wide Area Network (WAN) address of 192.168.1.1. IP addresses that start with 192.168.x.x are reserved for private IP addresses and cannot be a true WAN address. These modems and dongles translate the IP address to a WAN address before going out over the internet, but 192.168.1.1 is still shown as the WAN IP address in these networks. This causes issues because the default IP address for the Local Area Network (LAN), on the RV160 and RV260 is also 192.168.1.1.
If any two devices on a network have the same IP address they cannot communicate. If you are having issues with connectivity, this could be the problem. You may have even received an IP address conflict notification. You cannot change the IP address in the modem or dongle, so the solution is to set the LAN IP to be on a different subnet. This should fix the issue of connectivity.
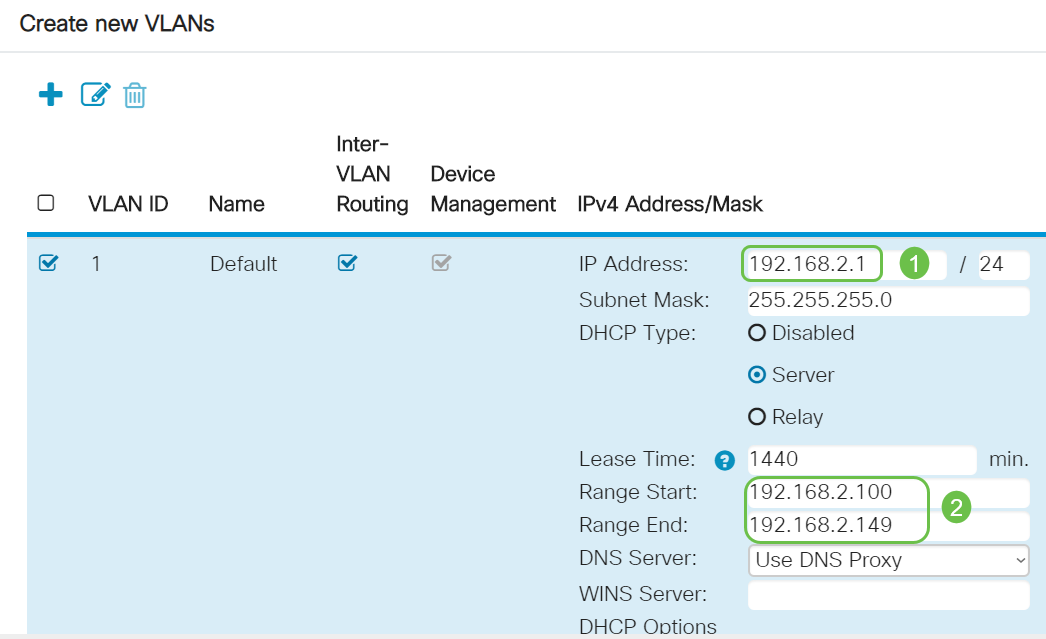
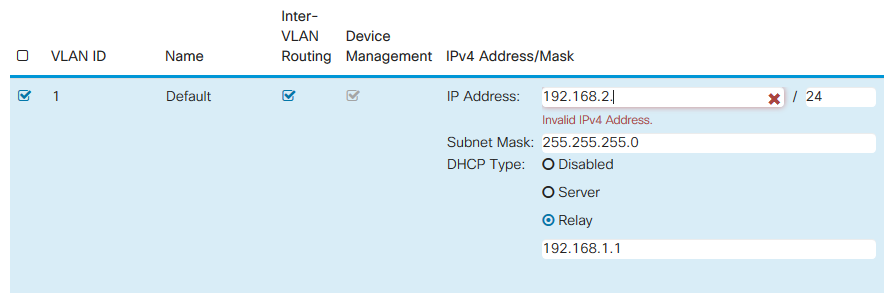
To create a new subnet, the third octet, or the third set of numbers in the IP address, has to be different than a 1. It can be any number between 2 and 254. Therefore, VLAN 1 could be set to 192.168.2.x, with an IP pool range anywhere from 192.168.2.1 – 192.168.2.254. In this example, we will change the LAN address to 192.168.2.1.
Note: If you use a Mac computer, you would select the gray gear icon to get into settings.
Step 1. To find out if this is your issue and you use a Windows operating system, you have two simple options on the Graphical User Interface (GUI).
Note: If you prefer to use the command prompt, you can enter ipconfig /all.
Option 1- right click on the computer icon on the bottom right of your screen.

Select Open Network and Internet settings.
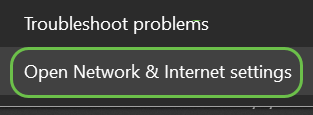
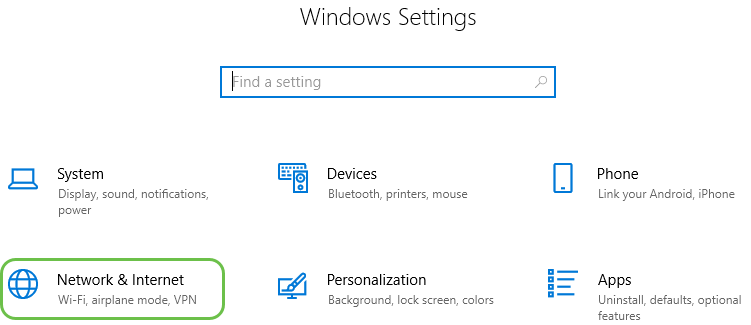
Option 2- Click the window icon and then the gear icon on the bottom left of your screen.

Option 2 continued- Select Network & Internet.
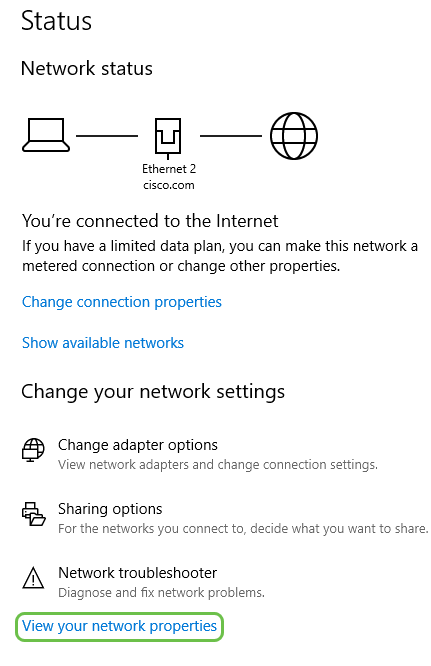
Step 3. Either option brings you to this screen. Select View your network properties.
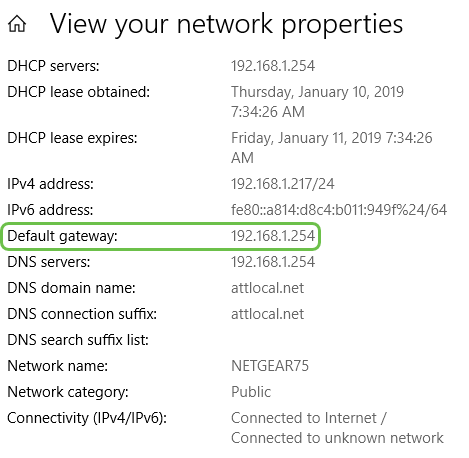
Step 4. You will then see a View your network properties list. The default gateway address is the IP address of the LAN.
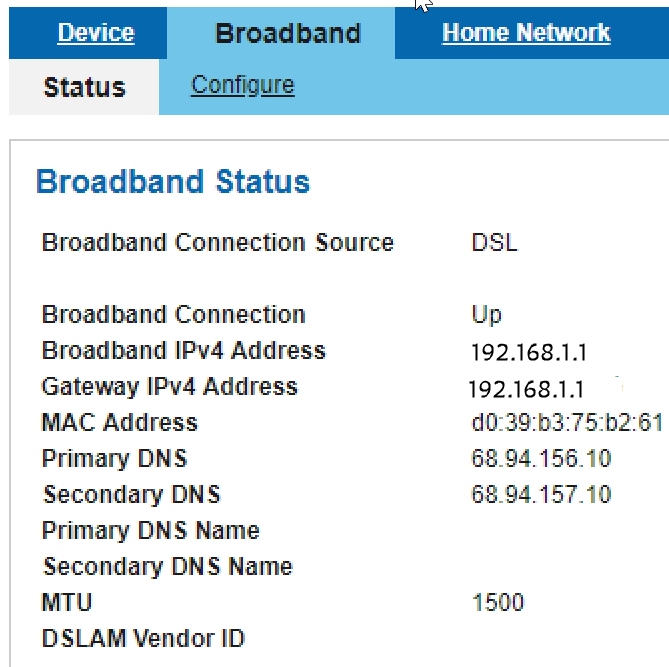
Step 5. To find the WAN IP address, you access the router on your network that connects to the internet. You need to enter the IP address of the router into your web-browser.

Step 6. In this example, the WAN IP is listed as 192.168.1.1. Therefore, the LAN IP address will need to be changed to a different subnet.
Edit the IP Address of your LAN
This section is not generally recommended, but is necessary if your WAN IP address shows as 192.168.1.x.
Step 1. Log into your RV160 or RV260.
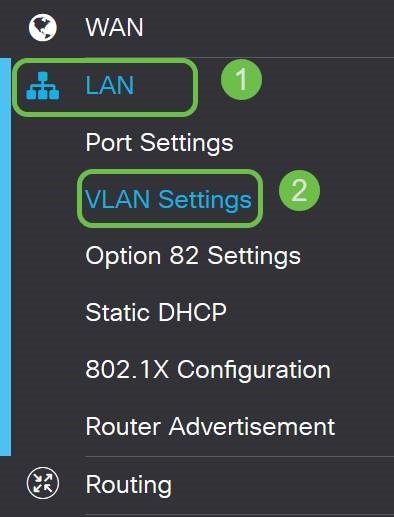
Step 2. In the left-hand menu-bar click the LAN button and then click VLAN Settings.
Step 3. Select the VLAN that contains your routing device, then click the Edit button.

Step 4. Enter your desired static IP Address. Check that the Range Start and Range End have changed to be in the same subnet as the IP Address of the VLAN. If this has not updated, you will have to change it so it is in the same subnet.
Step 5. Click Apply in the upper-right hand corner.

Step 6. Click Save.
 Step 7. (Optional) If your router is not the DHCP server/device assigning IP addresses, you can use the DHCP Relay feature to direct DHCP requests to a specific IP address. The IP address is likely to be the router connected to the WAN/Internet. Be sure to save your changes.
IP Address Changes After Subnet Change
By default, IP addresses are dynamically assigned by a DHCP server. Therefore, your network, by default, receives a dynamically assigned IP address in the subnet of the local LAN address pool. Once you change the change the subnet you may need to restart the devices so they can be assigned a new IP address in the 192.168.2.x subnet.
All devices in the network need to be on the same subnet as the LAN. The DHCP server should do this automatically. If it doesn’t change automatically you should unplug the Ethernet cable and plug it back in the device. If a device in the network still hasn’t switched over to the new subnet of 192.168.2.x, you can turn the device off and then back on again.
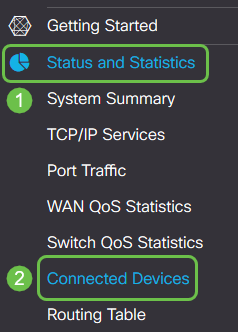
You can see the IP addresses and MAC addresses of connected devices by navigating to Status and Statistics and then Connected Devices.
For more information on configuring WAN Settings for Your Internet Connection:
Configuring WAN Settings for your Internet Connection
Conclusion
You now have some techniques for troubleshooting on your RV160 or RV260 router.
If you are interested in any of the following topics, click the link to view the article:
- How to Reboot and Reset to Factory Default Settings on RV160 and RV260 Routers
- Wireless Performance Tips RV160W RV260W Devices
- Configuring Plug and Play in RV160 and RV260 Routers
- Configuring Initial Setup Wizards on RV160X and RV260X Series Routers
If you need further assistance, some helpful links are provided below:
- Cisco Support and Downloads
- Detailed information on RV160 VPN Routers
- Detailed information on RV260 VPN Routers
- Contact Cisco
- Contact Cisco Small Business Technical Support
- Create a case
Contact Cisco
- Open a Support Case

- (Requires a Cisco Service Contract)
 Feedback