View the Summary Information for VPN on RV016, RV042, RV042G and RV082 VPN Routers
Available Languages
Objective
A Virtual Private Network (VPN) is a private network that is used to connect devices of the remote user through the public network virtually to provide security. The VPN Summary page displays general information of the VPN tunnels, such as how many VPN tunnels are available, how many are enabled, and how many are used. The page also displays Gateway to Gateway, Client to Gateway, and Group VPN status information.
This article explains the information given in the VPN Summary page on a RV0XX Series VPN router.
Applicable Devices
• RV016
• RV042
• RV042G
• RV082
Software Version
• v4.2.2.08
VPN Summary
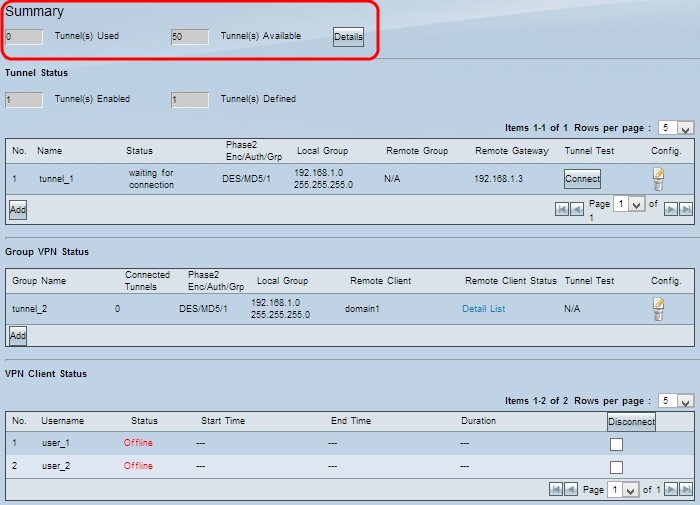
Step 1. Log in to the Router Configuration Utility and choose VPN > Summary. The Summary page opens:

Summary

• Tunnel(s) Used — Displays the number of tunnels which are in use.
• Tunnel(s) Available — Displays the total number of tunnels available for VPN connection.
Step 1. (Optional) If you want to view more information about the tunnel, click Details. A new window appears:

• No. — The tunnel number which is used for VPN connection.
• Name — The tunnel name which is used for VPN connection.
• Status — The current status of the VPN connection.
– Connected — The tunnel is currently used for VPN connection.
– Waiting for Connection — The tunnel is used but waiting for a connection establishment.
• Phase 2 Enc/Auth/Grp — The authentication which is used for the VPN connection.
• Local Group — The IP address and subnet mask of the local group.
• Remote Group — The IP address and subnet mask of the remote group.
• Remote Gateway — The IP address of the remote gateway.
Step 2. (Optional) If you want to refresh the data of the tunnels, click Refresh.
Step 3. Click Close to close the window.
VPN Tunnel Status

• Tunnel(s) Enabled — Displays the number of tunnels which are enabled for VPN connection. This shows how many tunnels are successfully configured for VPN connection.
• Tunnel(s) Defined — Displays the number of tunnels which are defined for VPN connection. This shows how many tunnels are available for the VPN connection which includes enabled and disabled tunnels
Connection Table
Displays Gateway to Gateway and Client to Gateway (Single) VPN connections.

• No. — The tunnel number which is used for VPN connection.
• Name — The tunnel name which is used for VPN connection.
• Status — The current status of the VPN connection.
– Connected — The tunnel is currently used for VPN connection.
– Waiting for Connection — The tunnel is used but waiting for a connection establishment.
• Phase 2 Enc/Auth/Grp — The authentication which is used for the VPN connection.
• Local Group — The IP address and subnet mask of the local group.
• Remote Group — The IP address and subnet mask of the remote group.
• Remote Gateway — The IP address of the remote gateway.
Step 1. (Optional) If you are not currently connected to the tunnel, click Connect to connect with the VPN tunnel.
Step 2. (Optional) If you are currently connected with the VPN tunnel, click Disconnect to discontinue the connection.
Step 3. (Optional) To add a new Gateway to Gateway or Client to Gateway VPN, click Add.
Step 4. (Optional) To edit any information of the installed VPN, click Edit under the configuration column.
Step 5. (Optional) To delete the VPN, click Delete.
Note: If you want to know more on how to add a Gateway to Gateway VPN, refer to the article Configuration of Gateway to Gateway VPN on RV016, RV042, RV042G and RV082 VPN Routers. If you want to know more on how to add Client to Gateway VPN, refer to the article Set Up a Remote Access Tunnel (Client to Gateway) for VPN Clients on RV016, RV042, RV042G and RV082 VPN Routers.
Group VPN Connection Table
The Group VPN connection table displays general information about Client to Gateway Group VPN.

• Group Name — The group name which is used for the VPN connection.
• Connected Tunnels — The number of users who are logged in to the VPN tunnel.
• Phase 2 Enc/Auth/Grp — The authentication which is used for the VPN connection.
• Local Group — The IP address and subnet mask of the local group.
• Remote Client — The domain name of the remote client.
• Remote Client Status — The detail information of the VPN group, IP address, and connection time in seconds for the VPN connection.
• Tunnel Test — The tunnel status whether the VPN tunnel is used for VPN connection or not.
Step 1. (Optional) If you are not currently connected to the tunnel, click Connect to connect with the VPN tunnel.
Step 2. (Optional) If you are currently connected with the VPN tunnel, click Disconnect to discontinue the connection.
Step 3. (Optional) To add a new Group VPN, click Add.
Step 4. (Optional) To edit any information of the installed VPN, click Edit.
Step 5. (Optional) To delete the VPN, click Delete.
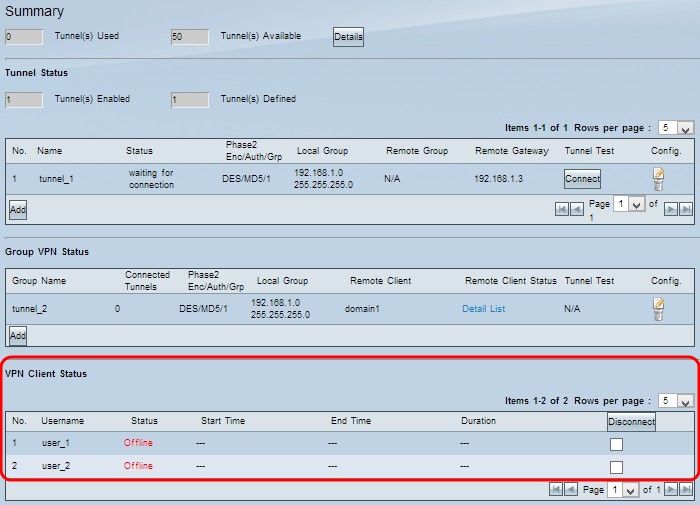
VPN Clients Status
The VPN Client Status table displays detailed information about the VPN client.

• No. — The identification number of the VPN client.
• Username — The unique name used to identify the VPN user.
• Status — The current status of the VPN connection for the client.
– Offline — The tunnel is not used.
– Connected — The tunnel is currently used for VPN connection.
– Waiting for Connection — The tunnel is used but waiting for a connection establishment.
• Start Time — The start time when the VPN client established the VPN connection.
• End Time — The end time when the VPN client stops the VPN connection.
• Duration — The active time duration for the VPN connection.
Step 1. (Optional) If you want to discontinue the connection, check the check box under the Disconnect to specify the specific connection and then click Disconnect.
Revision History
| Revision | Publish Date | Comments |
|---|---|---|
1.0 |
10-Dec-2018 |
Initial Release |
 Feedback