General Firewall Settings on the RV016, RV042, RV042G and RV082 VPN Routers
Available Languages
Objective
A firewall protects an internal network from an external network such as the Internet. Firewalls are vital to network security. Several different settings are available that can enable or disable specific services based on your security needs.
The objective of this article is to show how to enable or disable general firewall settings on RV016, RV042, RV042G, and RV082 VPN Routers.
Applicable Devices
• RV016
• RV042
• RV042G
• RV082
Software Version
• v4.2.1.02
General Firewall Settings
Step 1. Log in the Router configuration utility and choose Firewall > General. The General page opens:
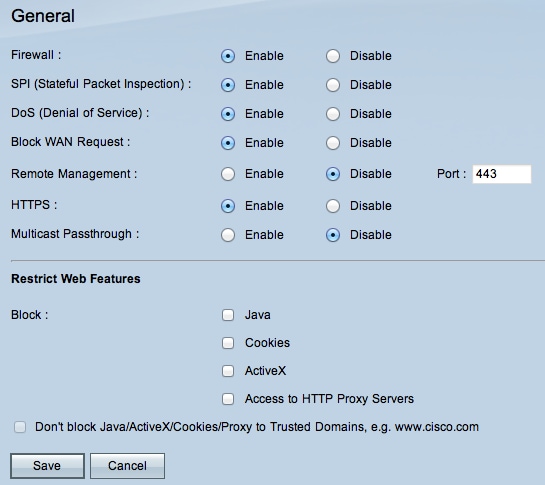
Step 2. Click the Enable or Disable radio button to enable or disable the available settings in the Firewall as per user requirements.
The following fields are described as follows:
• Firewall — When this feature is enabled, the router will perform deep packet inspection on all the traffic that goes through this router and drop the packets that do not follow the predefined protocol behavior.
• SPI (Stateful Packet Inspection) — The Router’s firewall uses Stateful Packet Inspection (SPI) to review the traffic at the firewall. It monitors the state of network connections such as TCP streams and UDP communication. The firewall distinguishes legitimate packets for different types of connections and only packets that match a known active connection are allowed by the firewall, all the others are rejected.
• Dos (Denial of Service) — When this feature is enabled, the router will prevent DOS (Denial of Service) attacks that come from the Internet. DOS attacks cause the CPU of your router to be busy so that it cannot provide services to regular traffic.
• Block WAN Request — When this is enabled, the router will ignore PING requests from the Internet so it will appear to be hidden. This helps to provide security by concealing the network ports so the trespassers do not have the access to the network easily.
• Remote Management — When this feature is enabled, router allows the web configuration utility to be accessed from the Internet. Enter the port number that will be opened to hosts on the WAN side. The default setting is 443. This port must be specified when the user establishes a remote connection.
• HTTPS — When enabled, the web configuration utility can be accessed through an HTTPS session from the WAN side instead of regular HTTP. This will have your remote web session protected by SSL encryption algorithms. If the HTTPS feature is disabled users cannot connect through the use of QuickVPN. If disabled, it uses a less secure HTTP connection.
• Multicast Passthrough — If an IGMP Proxy currently runs on the router, when Multicast Passthrough is enabled the router will allow IP Multicast traffic to come in from Internet.
Note: To disable the firewall, the administrator password must be changed from the default. The SPI (Stateful Packet Inspection), DoS (Denial of Service), Block WAN Request and Remote Management fields are grayed out.
Step 3. In the Restrict Web Features area, check any or all of the check boxes to restrict the corresponding feature.
• Java — Java is a programming language for websites. To block Java, check the Java check box. If you deny Java, then you may not to be able to access Internet sites written in this programming language, so it is safe to go ahead and block Java applets if the device connected to the router does not need to access the websites created with Java. On the other hand, Cyber-criminals use Java as an integral part of their attack, which is to determine the OS and launch an OS-specified attack when you visit websites that are infected by malware. For example, when you visit a hacked website, a JAR (Java Archive) file is triggered which asks you to perform its function but secretly it is used to determine the OS of the computer.
• Cookies — A cookie is data stored on the PC and used by Internet sites when users interact with them. To block cookies, check the Cookies check box. If you wish to block cookies, then the websites cannot save any previous visit information when accessed from the device. The benefit is that malicious cookies (third party tracking cookies) are not saved, which poses a security risk.
• ActiveX — ActiveX is a software component of Microsoft Windows that can be used to develop applications or control small programs like add-ons used on Internet sites. If you allow ActiveX, it can help improve your experience when you browse; it allows websites to run animations and other similar programs. On the other hand, there is a potential risk if you visit web pages that contain malicious ActiveX Software developed by cyber-criminals that can cause damage to the computer. To block ActiveX, check the ActiveX check box. If you block ActiveX, you may have problems if you want to access certain Internet sites that use ActiveX to perform.
• Access to Proxy HTTP Server — If you wish to surf anonymously through a proxy server and deny access to the proxy server, check the Access to Proxy HTTP Server check box. HTTP Proxy Servers hide details of end users from hackers. They work as middlemen and so you do not access the Internet directly. However, if local users have access to WAN proxy servers, they may be able to find a way around the content filters on the router and access Internet sites blocked by the router.
Step 4. Click Save in order to save the settings.
Add Trusted Domains
Even though one of the web features may be blocked, the user can allow these features to be enabled for specified trusted domains.
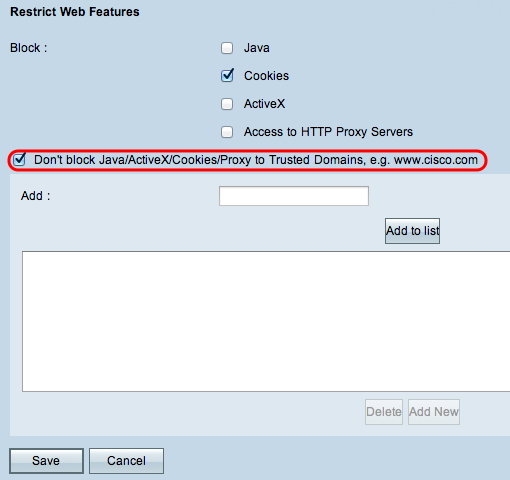
Step 1. Check the Don't block Java/ActiveX/Cookies/Proxy to Trusted Domains button. This will only be available if the user has chosen to block any of the web features in Step 3 of General Firewall Settings.
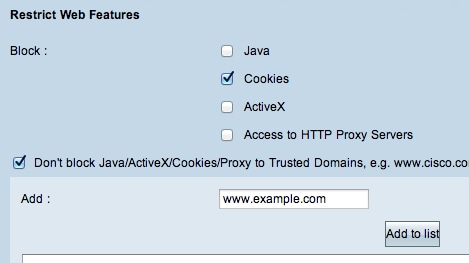
Step 2. In the Add field, enter the domain to be added to the trusted domain list.
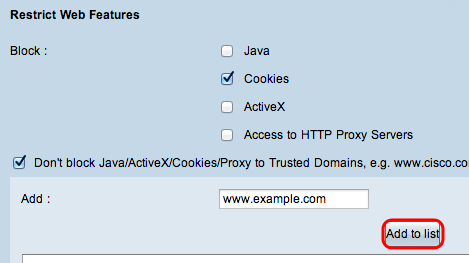
Step 3. Click Add to list. The domain is added to the trusted list.
Step 4. Click Save to save the changes.
Update a Trusted Domain
This section guides the user on how to edit a trusted domain.
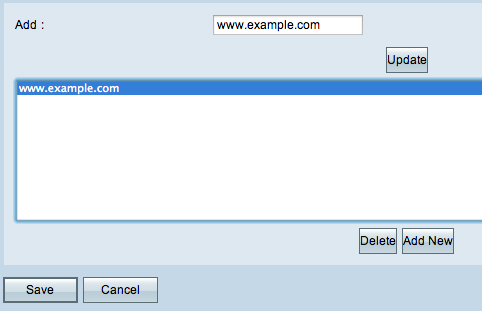
Step 1. Choose the domain that you would like to edit from the trusted domain list.
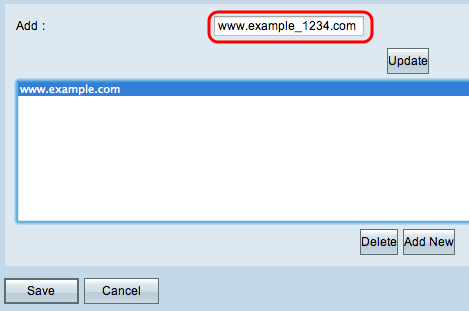
Step 2. In the Add field, enter the updated domain name for the required domain.
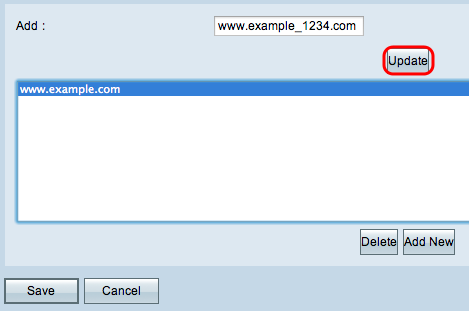
Step 3. Click Update.
Step 4. Click Save to save the changes.
Delete a Trusted Domain
This section guides the user on how to delete a trusted domain.
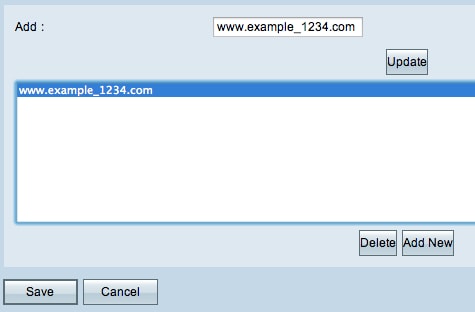
Step 1. Choose the domain that you would like to delete.
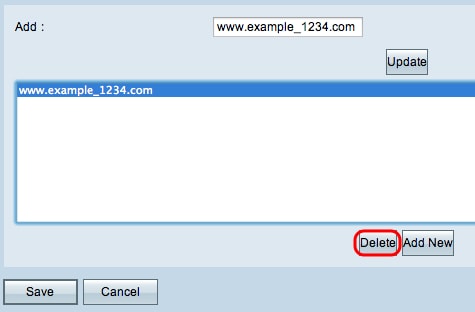
Step 2. Click Delete. The domain is deleted.
Step 3. Click Save to save the changes.
Revision History
| Revision | Publish Date | Comments |
|---|---|---|
1.0 |
12-Dec-2018 |
Initial Release |
 Feedback