Configure 802.1X Port Authentication on the Cisco Sx220 Series Smart Switches
Available Languages
Objective
The objective of this article is to show you how to configure port authentication on the Sx220 Series smart switches.
802.1X Port Authentication enables the configuration of 802.1X parameters for each port on your device. A port that requests authentication is called the supplicant. The authenticator is a switch or an access point that acts as a network guard to supplicants. The authenticator forwards authentication messages to the RADIUS server so that a port can be authenticated and can send and receive information.
Applicable Devices
- Sx220 Series
Software Version
- 1.1.0.14
Configure Port Authentication
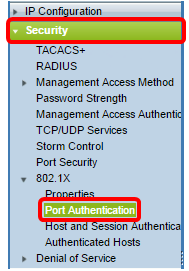
Step 1. Log in to the switch web-based utility and choose Security > 802.1X > Port Authentication.

Step 2. Click on the radio button for the port that you want to configure then click Edit.

Note: In this example, Port GE4 is chosen.
Step 3. The Edit Port Authentication window will then pop up. From the Interface drop-down list, make sure the specified port is the one you chose in Step 2. Otherwise, click the drop-down arrow and choose the right port.

Step 4. Choose a radio button for the Administrative Port Control. This will determine the port authorization state. The options are:
- Disabled — Disables 802.1X. This is the default state.
- Force Unauthorized — Denies the interface access by moving the interface into the unauthorized state. The switch does not provide authentication services to the client through the interface.
- Auto — Enables port-based authentication and authorization on the switch. The interface moves between an authorized or unauthorized state based on the authentication exchange between the switch and the client.
- Force Authorized — Authorizes the interface without authentication.

Note: In this example, Auto is chosen.
Step 5. (Optional) Choose a radio button for the RADIUS VLAN Assignment. This will enable Dynamic VLAN assignment on the specified port. The options are:
- Disabled — Ignores the VLAN authorization result and keeps original VLAN of host. This is the default action.
- Reject — If the specified port receives a VLAN authorized information, it will use the information. However, if there is no VLAN authorized information, it will reject the host and make it unauthorized.
- Static — If the specified port receives a VLAN authorized information, it will use the information. However, if there is no VLAN authorized information, it will keep the original VLAN of the host.
Note: If there is a VLAN authorized information from RADIUS, but the VLAN is not administratively created on Device Under Test (DUT), the VLAN will be created automatically. In this example, Static is chosen.

Quick Tip: For the Dynamic VLAN Assignment feature to work, the switch requires the following VLAN attributes to be sent by the RADIUS server:
- [64] Tunnel-Type = VLAN (type 13)
- [65] Tunnel-Medium-Type = 802 (type 6)
- [81] Tunnel-Private-Group-Id = VLAN ID
Step 6. (Optional) Check the Enable check box for the Guest VLAN to use a guest VLAN for unauthorized ports.

Step 7. Check the Enable check box for Periodic Reauthentication. This will enable port re-authentication attempts after the specified Reauthentication Period.

Note: This feature is enabled by default.
Step 8. Enter a value in the Reauthentication Period field. This is the time in seconds to reauthenticate the port.

Note: In this example, the default value 3600 is used.
Step 9. (Optional) Check the Reauthenticate Now check box to enable immediate port re-authentication.
Note: The Authenticator State field displays the current state of authentication.

Note: If the port is not in Force Authorized or Force Unauthorized state, it is in Auto Mode and the authenticator displays the state of the authentication in progress. After the port is authenticated, the state is shown as Authenticated.
Step 10. In the Max Hosts field, enter the maximum number of authenticated hosts allowed on the specific port. This value only takes effect on multi-sessions mode.

Note: In this example, the default value 256 is used.
Step 11. In the Quiet Period field, enter the number of seconds that the switch remains in the quiet state following a failed authentication exchange. When the switch is in quiet state, it means the switch is not listening for new authentication requests from the client.

Note: In this example, the default value 60 is used.
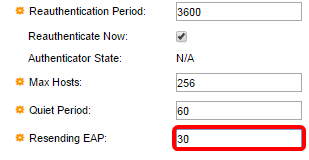
Step 12. In the Resending EAP field, enter the number of seconds that the switch waits for a response to an Extensible Authentication Protocol (EAP) request or identity frame from the supplicant (client) before resending the request.

Note: In this example, the default value 30 is used.
Step 13. In the Max EAP Requests field, enter the maximum number of EAP requests that can be sent. If a response is not received after the defined period (supplicant timeout), the authentication process is restarted.

Note: In this example, the default value 2 is used.
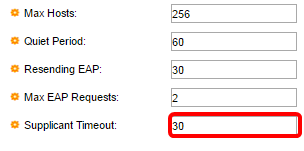
Step 14. In the Supplicant Timeout field, enter the number of seconds that lapses before EAP requests are resent to the supplicant.

Note: In this example, the default value 30 is used.
Step 15. In the Server Timeout field, enter the number of seconds that lapses before the switch resends a request to the authentication server.

Note: In this example, the default value 30 is used.
Step 16. Click Apply.
You should now have successfully configured Port Authentication on your switch.
Revision History
| Revision | Publish Date | Comments |
|---|---|---|
1.0 |
13-Dec-2018 |
Initial Release |
 Feedback