Configure Time-Based PoE on the Cisco 220 Series Smart Plus Switches
Available Languages
Objective
Power over Ethernet (PoE) allows the device to supply power to the connected devices through the same Ethernet cable that transmits data. This eliminates the need for a separate power cord to power on the devices such as the IP Phones and Access Points. The Time Range feature on the Cisco 220 Series Smart Switches allows you to specify the exact time as to when PoE will be enabled to the ports on the switch.
This article aims to show how to configure time-based PoE settings on your switch to enable PoE at a specified time and to monitor the current power usage and maximum power limit per port.
Applicable Devices
- Sx220 Series
Software Version
- 1.1.0.14
Configure Time-Based PoE
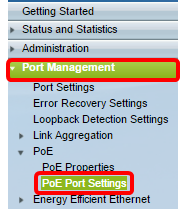
Step 1. Log in to the switch web-based utility and choose Port Management > PoE > PoE Port Settings.

Step 2. Under the PoE Port Setting Table, click on the radio button of the port that you want to configure then click on Edit.

Note: In this example, Port GE18 is chosen.
Step 3. The Edit PoE Settings window will then appear. From the Interface drop-down list, make sure the specified port is the one you chose in Step 2. Otherwise, click the drop-down arrow and choose the right port.

Note: In this example, Port GE18 is chosen.
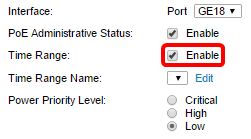
Step 4. Check the Enable check box for the PoE Administrative Status to enable PoE on the specified port. This box is checked by default.

Step 5. Check the Enable check box for the Time Range. This would allow you to configure your preferred time settings for the PoE to be enabled on the specified port.

Step 6. Click on the Edit link to go to the Time Range page and to specify the settings for the Time Range.

Note: If there is already a pre-defined name that you want to use, click on the drop-down arrow and choose the name then skip to Step 16.
Step 7. A pop-up window will then appear to inform you that the navigation to the Time Range page will close the current window. Click OK to continue.

You will then be directed to the Time Range page.
Time Range
Step 8. Under the Time Range Table, click the Add button.

The Add Time Range window will appear.
Step 9. Enter a name in the Time Range Name field. This will help you easily identify the Time Range you have set.
Note: In this example, PortOn is used.

Step 10. Click on a radio button for the Absolute Starting Time. The options are:
- Immediate — This option will apply the time range set right away.
- Date — This option allows you to set a specific time for the time range to start by choosing the year, month, and day as well as the exact hour and minute.

Note: In this example, Date is chosen and the year, month, day, and time are specified.
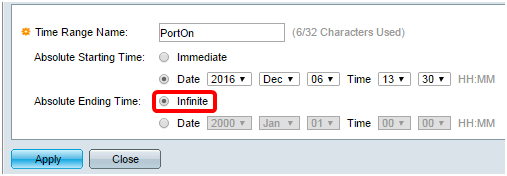
Step 11. Click on a radio button for the Absolute Ending Time. The options are:
- Infinite — This option will set the time range to apply at all times and to never end.
- Date — This option allows you to set a specific time for the time range to end by choosing the year, month, and day as well as the exact hour and minute.

Note: In this example, Infinite is chosen. This is the default setting.
Step 12. Click Apply.
Step 13. To save the configuration permanently, go to the Copy/Save Configuration page or click the  icon at the upper portion of the page.
Step 14. Go back to Port Management > PoE > PoE Port Settings.

Step 15. Click on the port that you have chosen previously and click the Edit button to return to the Edit PoE Settings window.

Step 16. Click on a radio button to choose the Power Priority Level. The options are:
- Critical — This option allows the port to receive power at all times. If there is not enough power to provide to all of the ports, the ports that are set to this priority level are prioritized.
- High — This option allows the port to receive power only if all Critical-priority ports are receiving power.
- Low — This option allows the port to receive power only if all Critical-priority and High-priority ports are receiving power. If there is not enough power for all ports, the power to ports that are set to this priority level may be cut off.

Note: In this example, High is chosen.
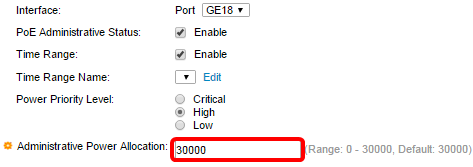
Step 17. Enter a value in the Administrative Power Allocation field in order to set the maximum power limit to the port.
Note: The Administrative Power Allocation can only be configured if the PoE Power Mode is set to Port Limit in the PoE Properties window.

Note: In this example, 30000 is used. This is the default value.
The following counters will be displayed:
- Max Power Allocation — Displays the maximum amount of power in milliwatts assigned to the device connected to the selected port.
- Power Consumption — Displays the amount of power in milliwatts assigned to the powered device connected to the selected port.
- Class — Displays the class information of the device connected if the power mode is Class Limit.
- Overload Counter — Displays the total number of power overload occurrences.
- Short Counter — Displays the total number of power shortage occurrences.
- Denied Counter—Displays the number of times that the powered device was denied power.
- Absent Counter—Displays the number of times that the power was stopped to the powered device because the powered device was no longer detected.
- Invalid Signature Counter—Displays the times that an invalid signature was received. Signatures are the means by which the powered device identifies itself to the Power Sourcing Equipment (PSE). Signatures are generated during powered device detection, classification, or maintenance.

Step 18. Click Apply.
Step 19. To save the configuration permanently, go to the Copy/Save Configuration page or click the  icon at the upper portion of the page.
You should now have successfully configured the Time-Based PoE on your 220 Series Smart Plus Switch.
Revision History
| Revision | Publish Date | Comments |
|---|---|---|
1.0 |
13-Dec-2018 |
Initial Release |
 Feedback