Configure Time-Based Port Management in the 220 Series Smart Plus Switches
Available Languages
Objective
The Time-Based Port Management feature on the Cisco 220 Series Smart Plus Switches allows you to configure and manage the behavior of the ports on your switch depending on the scheduled time you have set. This includes the flow of Jumbo Frames, the behavior of the port LEDs, and the port operations.
Note: The Disable Port LEDs feature saves power consumed by device LEDs. Because the devices are often in an unoccupied room, having these LEDs lit is a waste of energy. The feature enables you to disable the port LEDs for link, speed, and PoE when they are not required, and to enable the LEDs if they are needed in debugging, connecting additional devices, and so on. On the System Summary page, the LEDs that are displayed on the device board pictures are not affected by disabling the LEDs.
This article aims to show you how to configure time-based port settings on your 220 Series Smart Plus Switch.
Applicable Devices
- Sx220 Series
Software Version
- 1.1.0.14
Configure Time-Based Port Management
Port Settings
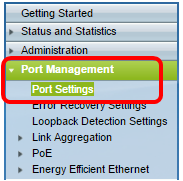
Step 1. Log in to the switch web-based utility and choose Port Management > Port Settings.

Step 2. (Optional) Under the Port Settings area, check the Enable check box for Jumbo Frames. This would allow the ports to support packets of up to 10,000 bytes in size, much bigger compared to the default packet size of 1,522 bytes.

Step 3. (Optional) Check the Enable check box for Port LEDs in order to save power consumed by device LEDs. This feature allows you to disable the LEDs when they are not required, and to enable them if they are needed such as in situations like debugging and connecting devices. This feature is enabled by default.
Note: When port LEDs are disabled, they do not display the link status, activity, and so on.
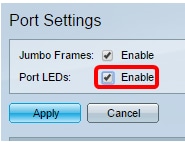
Step 4. Click Apply.

Step 5. To save the configuration permanently, go to the Copy/Save Configuration page or click the  icon at the upper portion of the page.
Step 6. Under the Port Setting Table, click the radio button of the specific port you want to modify then click Edit. In this example, Port GE12 is chosen.

Step 7. The Edit Port Settings window will then appear. From the Interface drop-down list, make sure the specified port is the one you chose in Step 6. Otherwise, click the drop-down arrow and choose the right port.

Step 8. Enter any port name you prefer in the Port Description field. In this example, 1stPort is used.

Step 9. Click on a radio button to choose whether the port should be operational (Up) or non-operational (Down) when the switch is rebooted. The Operational Status area displays whether the port is currently operational or shut down. In this example, Up is chosen.

Step 10. Check the Enable check box in Time Range to set the time for the port to be in the Up state. If a time range is configured, it is effective only when the port is administratively Up.

Step 11. Click the Edit link to go to the Time Range page in order to define a Time Range profile that will apply to the port.

Note: The Operational Time-Range State area displays whether the time range is currently active or inactive.
Step 12. A pop-up window will appear informing you that the navigation to the Time Range page will close the current window. Click OK.

You will then be directed to the Time Range Page.
Time Range
Step 13. Under the Time Range Table, click the Add button.

The Add Time Range window will appear.
Step 14. Enter a name in the Time Range Name field. This will help you easily identify the Time Range you have set. In this example, PortUp is used.

Step 15. Click on a radio button for the Absolute Starting Time. The options are:
- Immediate — This option will apply the time range set right away.
- Date — This option allows you to set a specific time for the time range to start by choosing the year, month, and day as well as the exact hour and minute.

Note: In this example, Immediate is chosen. This is the default setting.
Step 16. Click on a radio button for the Absolute Ending Time. The options are:
- Infinite — This option will set the time range to apply at all times.
- Date — This option allows you to set a specific time for the time range to end by choosing the year, month, and day as well as the exact hour and minute.
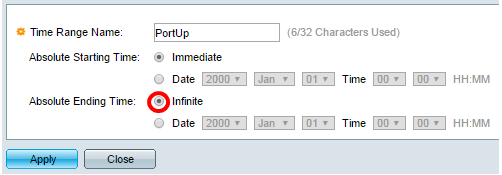
Note: In this example, Infinite is chosen. This is the default setting.
Step 17. Click Apply.
Step 18. To save the configuration permanently, go to the Copy/Save Configuration page or click the  icon at the upper portion of the page.
Step 19. Go back to the Port Settings window under Port Management.
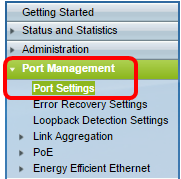
Step 20. Click on the port that you have chosen previously and click the Edit button to go back to the Edit Port Settings window.

Step 21. (Optional) Check the Enable check box for the Auto Negotiation. This would enable the port to advertise its transmission rate, duplex mode, and flow control abilities to other devices.

Note: The Operational Auto Negotiation area displays the current auto negotiation status on the port.
Step 22. (Optional) Click on a radio button for the Administrative Port Speed to choose the speed setting of the port based on the port type. The options are:
- 10M
- 100M
- 1000M
Note: The Administrative Port Speed can only be configured when Auto Negotiation is not enabled. In this example, 100M is chosen.

Note: The Operational Port Speed area displays the current port speed that is the result of the negotiation.
Step 23. Click on a radio button for the Administrative Duplex Mode. The options are:
- Full — This will enable the interface to support transmission between the switch and the client in both directions at the same time.
- Half — This will enable the interface to support transmission between the switch and the client in one direction at a time.
Note: The Administrative Port Speed can only be configured when Auto Negotiation is not enabled. In this example, Full is chosen.

Note: The Operational Duplex Mode area displays the current duplex mode that is the result of the negotiation.
Step 24. Click on a radio button for the Auto Advertisement speed to choose the advertisement capability to be advertised by the port. The options are:
- All Speed
- 10M
- 100M
- 10M/100M
- 1000M

Note: In this example, All Speed is chosen. This is the default setting.
Step 25. Click on a radio button for the Auto Advertisement Duplex to choose the duplex mode to be advertised by the port. The options are:
- All Duplex — All Duplex mode can be accepted.
- Full — This will enable the interface to support transmission between the switch and the client in both directions at the same time.
- Half — This will enable the interface to support transmission between the switch and the client in one direction at a time.
Note: In this example, Full is chosen.

Note: The Operational Advertisement area displays the capabilities currently published to neighbor of the port to start the negotiation process.
Step 26. (Optional) Click either the Enable or Disable radio button for Back Pressure. Enabling Back Pressure mode allows the port to slow down the packet reception speed when the switch is congested. It disables the remote port, preventing it from sending packets by jamming the signal. This mode is used together with Half Duplex mode.
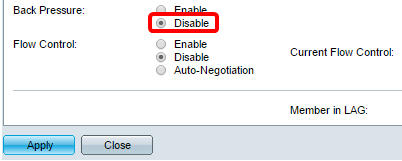
Note: In this example, Disable is chosen.
Step 27. (Optional) Click on a radio button for the Flow Control on the port. The options are:
- Enable — This would enable the flow control on 802.3X.
- Disable — This would disable the flow control on 802.3X.
- Auto-Negotiation — This would enable the auto-negotiation of flow control on the port (only when in Full Duplex mode).
Note: The Current Flow Control area displays the current status of 802.3X flow control.

Note: In this example, Auto Negotiation is chosen.
Step 28. Click Apply.
Step 29. To save the configuration permanently, go to the Copy/Save Configuration page or click the  icon at the upper portion of the page.
Verify the settings
Step 1. Go to Port Management > Port Settings.
Step 2. Under the Port Setting Table, check the configuration on the port you have modified to verify your settings.

You should now have successfully configured Time-Based Port Management on your switch.
Revision History
| Revision | Publish Date | Comments |
|---|---|---|
1.0 |
13-Dec-2018 |
Initial Release |
 Feedback