Enable Loopback Detection on the Cisco 220 Series Smart Plus Switches
Available Languages
Objective
Loopback Detection (LBD) is a feature on the switch that provides protection against loops by transmitting loop protocol packets out of ports where loop protection has been enabled. When the switch sends out a loop protocol packet and then receives the same packet, it shuts down the port that received the packet.
LBD operates independently of Spanning Tree Protocol (STP). After a loop is discovered, the port that received the loops is placed in the Shut Down state. A trap is sent and the event is logged. Network administrators can define a Detection Interval that sets the time interval between LBD packets.
- The following conditions must be set in order for LBD to be active on a specified port:
- LBD is globally enabled.
- LBD is enabled on the specific port.
- Port Operational status is up.
- Port is in STP Forwarding or Disabled state.
This article aims to show how to enable Loopback Detection on the Cisco 220 Series Smart Plus Switches.
Applicable Devices
- Sx220 Series
Software Version
- 1.1.0.14
Enable Loopback Detection
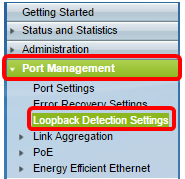
Step 1. Log in to the switch web-based utility and choose Port Management > Loopback Detection Settings.
Step 2. Check the Enable check box for Loopback Detection.
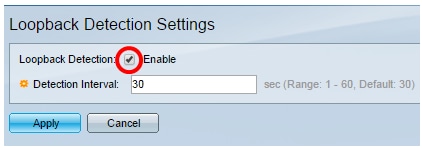
Step 3. Enter a value in the Detection Interval field. This would set the time interval in seconds between LBD packets.

Note: In this example, 25 is used.
Step 4. Click Apply.
Step 5. To save the configuration permanently, go to the Copy/Save Configuration page or click the  icon at the upper portion of the page.
Enable Loopback Detection on the Port
Step 1. Under the Loopback Detection Port Setting Table, click on the radio button of the port that you want to configure then click Edit.
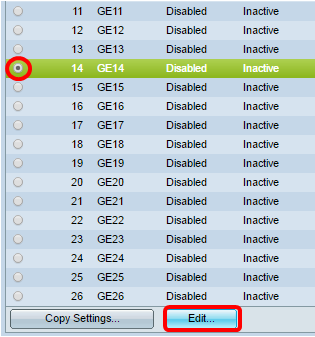
Note: In this example, Port GE14 is chosen.
Step 2. The Edit Loopback Detection Interface Settings window will then appear. From the Interface drop-down list, make sure the specified port is the one you chose in Step 1. Otherwise, click the drop-down arrow and choose the right port.
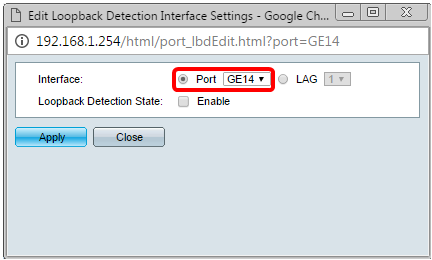
Step 3. Check the Enable check box for Loopback Detection State.
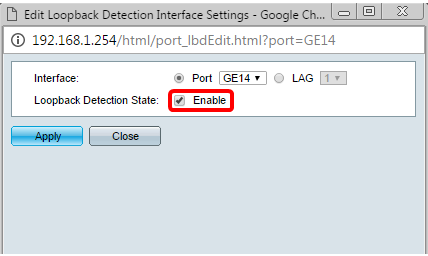
Step 4. Click Apply.
Step 5. To save the configuration permanently, go to the Copy/Save Configuration page or click the  icon at the upper portion of the page.
Step 6. Return to Port Management > Loopback Detection Settings window to verify your configuration. The Loopback Detection Administrative State should now show Enabled and the Operational State should now be Active.

Step 7. Repeat Steps 1 to 4 for each port that you want LBD to be enabled.
You should now have successfully enabled Loopback Detection on specific ports on your switch.
Revision History
| Revision | Publish Date | Comments |
|---|---|---|
1.0 |
12-Dec-2018 |
Initial Release |
 Feedback