Configure Initial Settings on a Switch using the Getting Started Wizard
Available Languages
Objective
The Cisco Sx250, Sx350, SG350X, and Sx550X Series Switches are designed to be easy to configure, manage, and troubleshoot, allowing you to focus on your business priorities. These switches are equipped with new generation of highly-integrated, cost-effective packet processors targeted for Carrier Ethernet and Small-Medium Enterprise (SME) applications with full wire-speed performance Fast Ethernet (FE) or Gigabit Ethernet (GE) ports, and GE Combo platforms.
The Sx250, Sx350, SG350X, and Sx550X Series Switches include a configuration wizard that will help you quickly set them up for use. Running the wizard allows you to easily configure settings on the switch, such as adding an IP interface, changing the management account credentials, and setting up the system time. It is recommended that you run this wizard when setting up the switch for the first time.
This article provides instructions on how to use the Getting Started Wizard to configure the initial settings of your switch.
Applicable Devices | Firmware Version
- Sx250 Series | V 2.2.5.68 (Download latest)
- Sx350 Series | V 2.2.5.68 (Download latest)
- SG350X Series | V 2.2.5.68 (Download latest)
- Sx550X Series | V 2.2.5.68 (Download latest)
Configure Initial Settings on the Switch
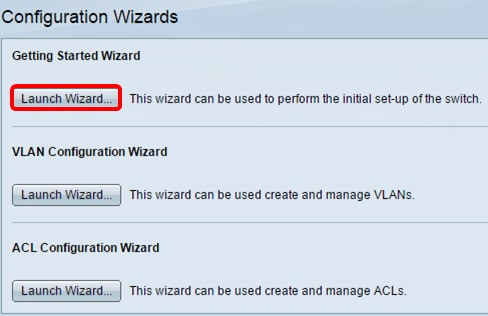
Step 1. Log in to the web-based utility and choose Configuration Wizards.

Note: In this example, SG350X-48MP is used.
Step 2. Click Launch Wizard under the Getting Started Wizard area.
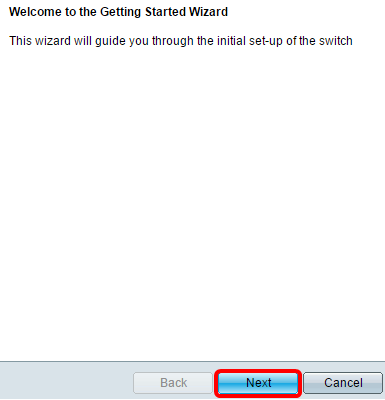
Step 3. Once the wizard is launched, click Next.
Step 4. Enter the physical location of the device in the System Location field.

Note: In this example, Switch Room is used.
Step 5. Enter the name of the contact person in the System Contact field.

Note: In this example, John is used.
Step 6. Choose the host name of the device. This is also used in the prompt of the Command Line Interface (CLI) commands:
- Use Default — The default host or system name of the switch is switchXXXXXX, where XXXXXX represents the last three bytes Media Access Control (MAC) address of the switch in hex format.
- User Defined — If this option is chosen, enter the host name. Use only letters and numbers. No other symbols such as punctuation characters, hyphens, or blank spaces are allowed.

Note: In this example, User Defined is chosen and MainSwitch is used as the host name.
Step 7. Click Next.

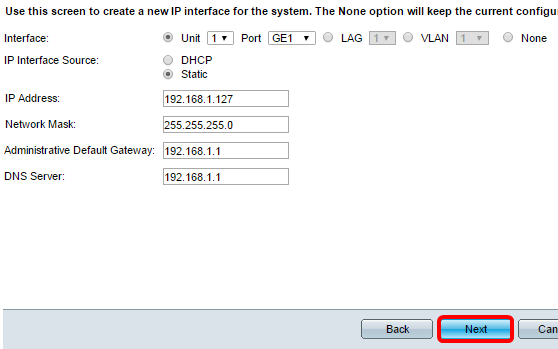
Step 8. Choose an interface for the system. Use the radio buttons in the Interface area to create a new IP interface on the switch. Changing the settings of the interface that you are currently connected to may cause you to lose connectivity.
The options may vary depending on the model of the switch that you have. The possible options are:
- Unit/Port — Use the Unit and Port drop-down lists to choose a unit that is part of the stack, and a port that is on the chosen unit.
- LAG — Use the LAG drop-down list to choose a Link Aggregation Group (LAG) to configure.
- VLAN — Use the VLAN drop-down list to select a VLAN ID to configure.
- OOB — Choose this to configure the Out-of-Band (OOB) port on the switch. The OOB port is primarily used for management purposes, as it is not connected to any other port on the switch. This option is only available to Sx350XG and Sx550XG switches.
- None — Select this to not configure an IP interface and keep the current configuration. The default is set to None. If you continue with this option, skip to Step 14.
Note: If you have an Sx250 switch, the available options are VLAN and None.

Note: In this example, Port GE1 of Unit 1 is chosen.
Step 9. Choose an IP Interface Source from the following options:
- DHCP — Choose for the device to receive its IP address from a Dynamic Host Configuration Protocol (DHCP) server. If you choose this option, skip to Step 14.
- Static — Choose this option if you want to enter the IP address of the device manually.

Note: In this example, Static is chosen.
Step 10. (Optional) If you chose Static as the IP address type, enter the IP address of the interface in the IP Address field.

Note: In this example, 192.168.1.127 is used.
Step 11. (Optional) Enter the subnet mask of the IP address in the Network Mask field.

Note: In this example, 255.255.255.0 is used.
Step 12. (Optional) Enter the default gateway IP address in the Administrative Default Gateway field.

Note: In this example, 192.168.1.1 is used.
Step 13. (Optional) Enter the IP address of the Domain Name Server (DNS) in the DNS Server field.

Step 14. Click Next.
Step 15. (Optional) If you opt to keep your current username and password, click Next then skip to Step 20.
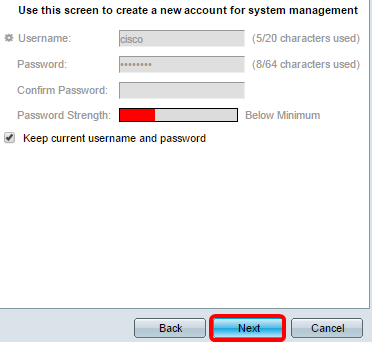
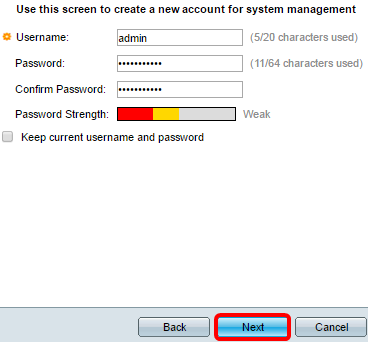
Step 16. Uncheck the Keep current username and password check box to create a new account for system management.

Step 17. Enter a new user name between 0 and 20 characters in the Username field. UTF-8 characters are not allowed.

Note: In this example, admin is used.
Step 18. Enter a password in the Password and Confirm Password fields. UTF-8 characters are not allowed.

Note: The Password Strength displays the strength of password. The policy for password strength and complexity are configured in the Password Strength page. To learn how configure the
Step 19. Click Next.
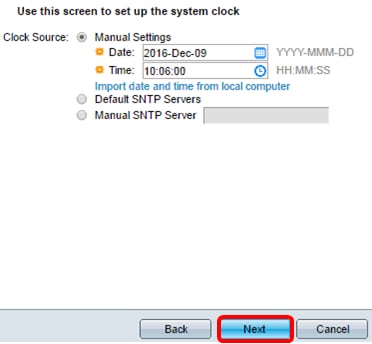
Step 20. In the Clock Source area, choose from the following options to set up the system clock:
- Manual Settings — Choose this option to enter the device system time in the Date and Time fields, respectively. The date must be entered in the format YYYY-MMM-DD, and time in the HH:MM:SS format. You can also click the icons in the text field to choose a date and time from a calendar and drop-down list. Alternatively, you can click Import date and time from local computer to copy the date and time of your computer.
- Default SNTP Servers — Choose this option to use the default Simple Network Time Protocol (SNTP) servers. This option is chosen by default. The default SNTP servers are defined by name, thus DNS must be configured and operational, and DNS server configured and reachable. This is done in DNS Settings.
- Manual SNTP Server — If you choose this option, enter the IP address of an SNTP server.

Note: In this example, Manual Settings is chosen and configured.
Step 21. Click Next to view a summary of configuration that you set.
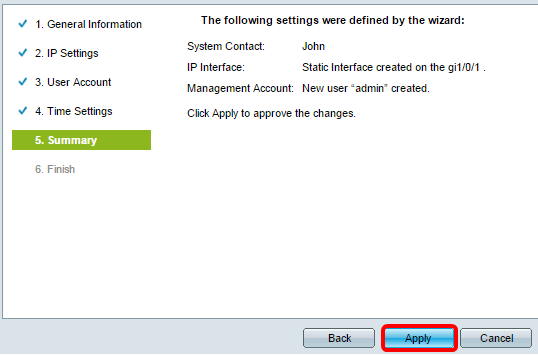
Step 22. Review the configured settings then click Apply to approve.
Step 23. Once prompted by the popup message below, click OK.

Step 24. Click Finish.

Step 25. (Optional) Click Save to save settings to the startup configuration file.

You should now have configured the initial settings of your switch through the Getting Started Wizard.
 Feedback