Configure Log Aggregation Settings on an Sx250 Series Smart Switch
Available Languages
Objective
A Syslog service accepts messages, and stores them in files or prints them according to a simple configuration file. This form of logging is the best available for Cisco devices because it can provide protected long-term storage for logs. This is useful both in routine troubleshooting and in incident handling.
Logging Aggregation means several syslog messages of the same type will not appear on the screen every time an instance occurs. Enabling logging aggregation allows you to filter the system messages that you will receive for a specific period of time. It collects a few syslog messages of the same type so they won’t appear when they occur, but would rather appear on a specified interval.
This article provides instructions on how to configure the Log Aggregation Settings on your Sx250 Series Smart Switch.
Applicable Devices
- SG250 Series
- SF250 Series
Software Version
- 2.1.0.63
Configure Log Aggregation Settings
Enable Log Aggregation Settings
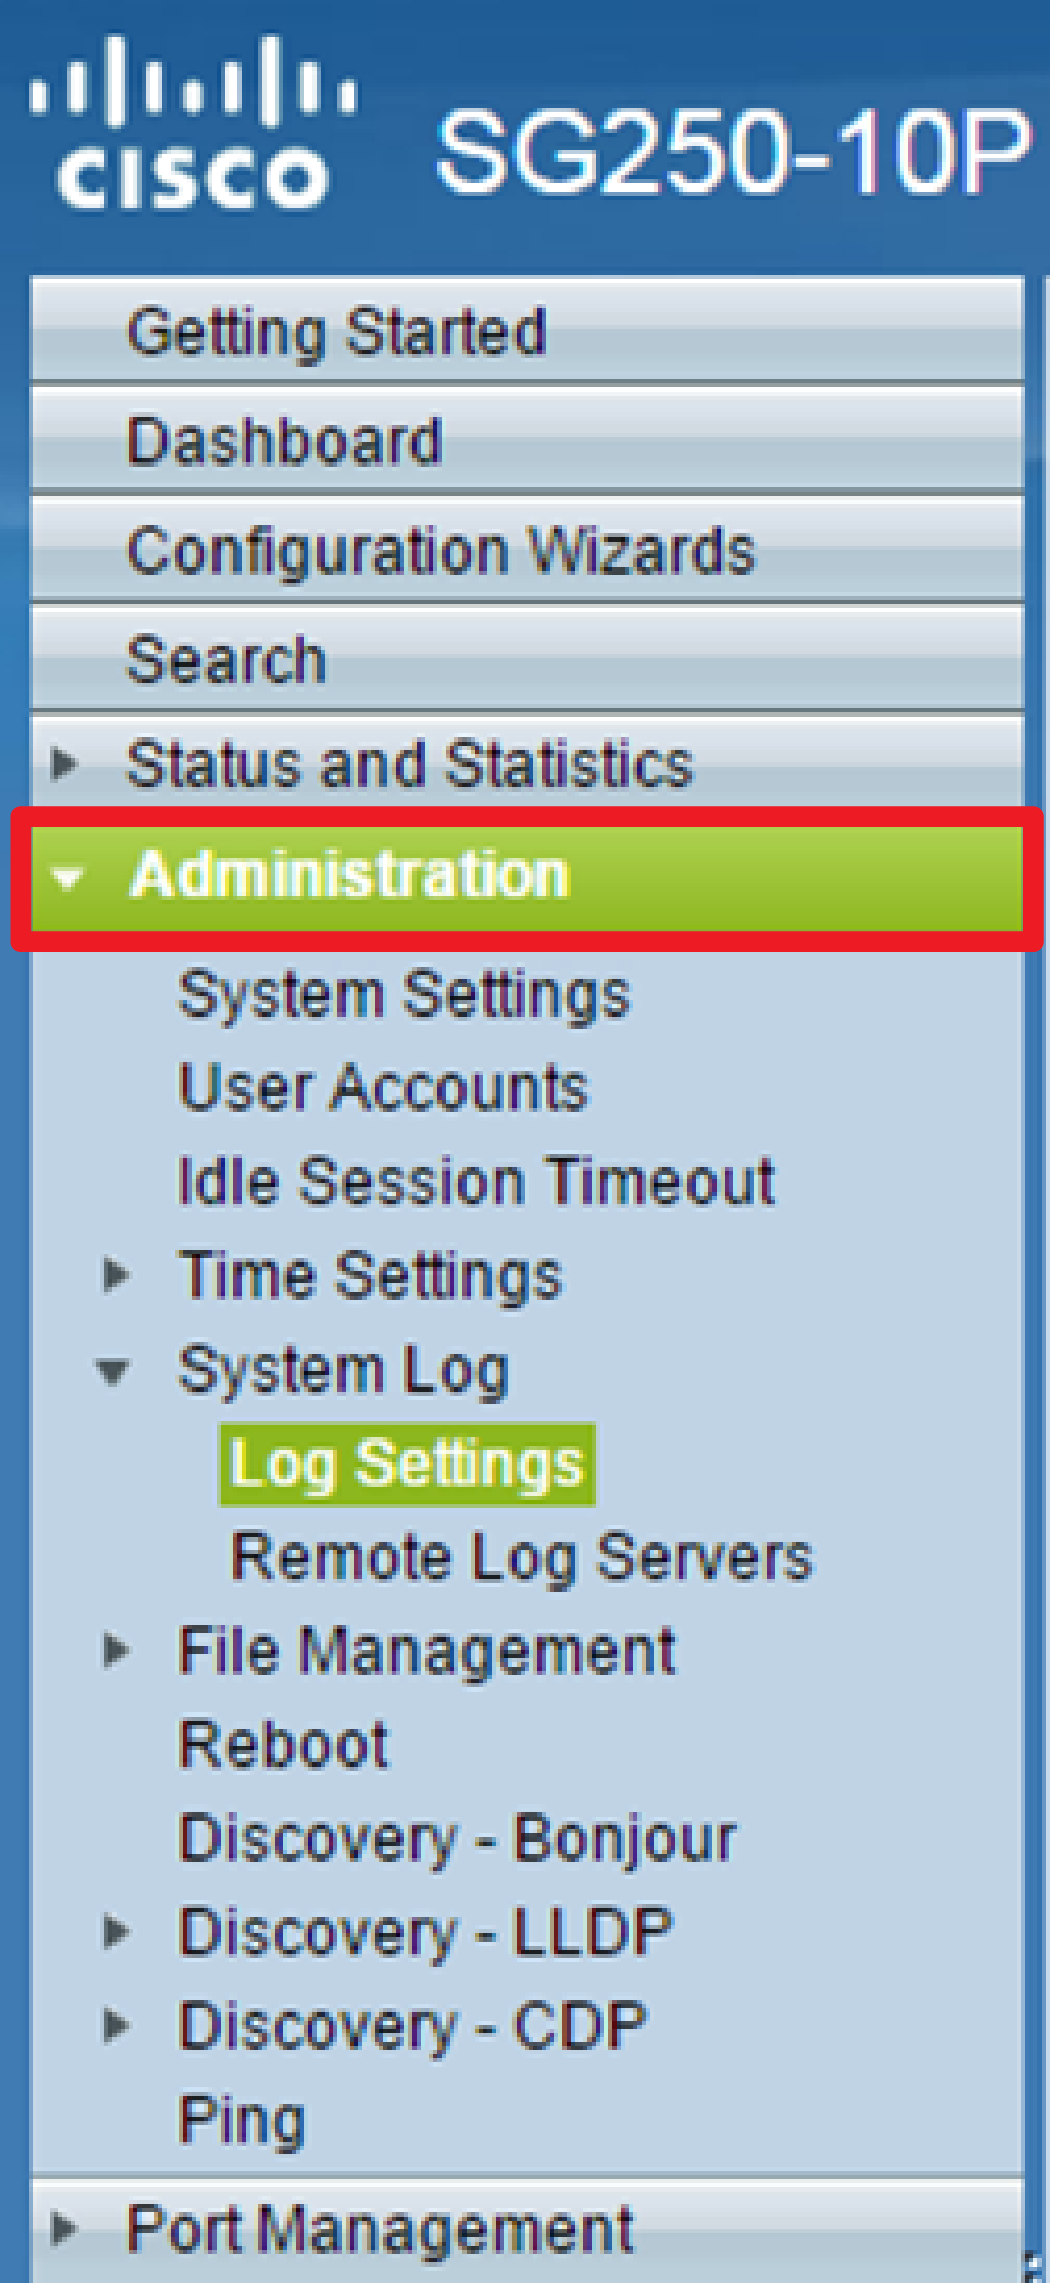
Step 1. Log in to the web-based utility of the switch then choose Administration > System Log > Log Settings.
Note: In this scenario, the SG250-10P switch is used.
Step 2. Check the Enable Syslog Aggregator check box to enable the aggregation of Syslog messages and traps. If enabled, identical and contiguous Syslog messages and traps are aggregated over the specified Max. Aggregation Time and sent in a single message. The aggregated messages are sent in the order of their arrival. Each message states the number of times it was aggregated.
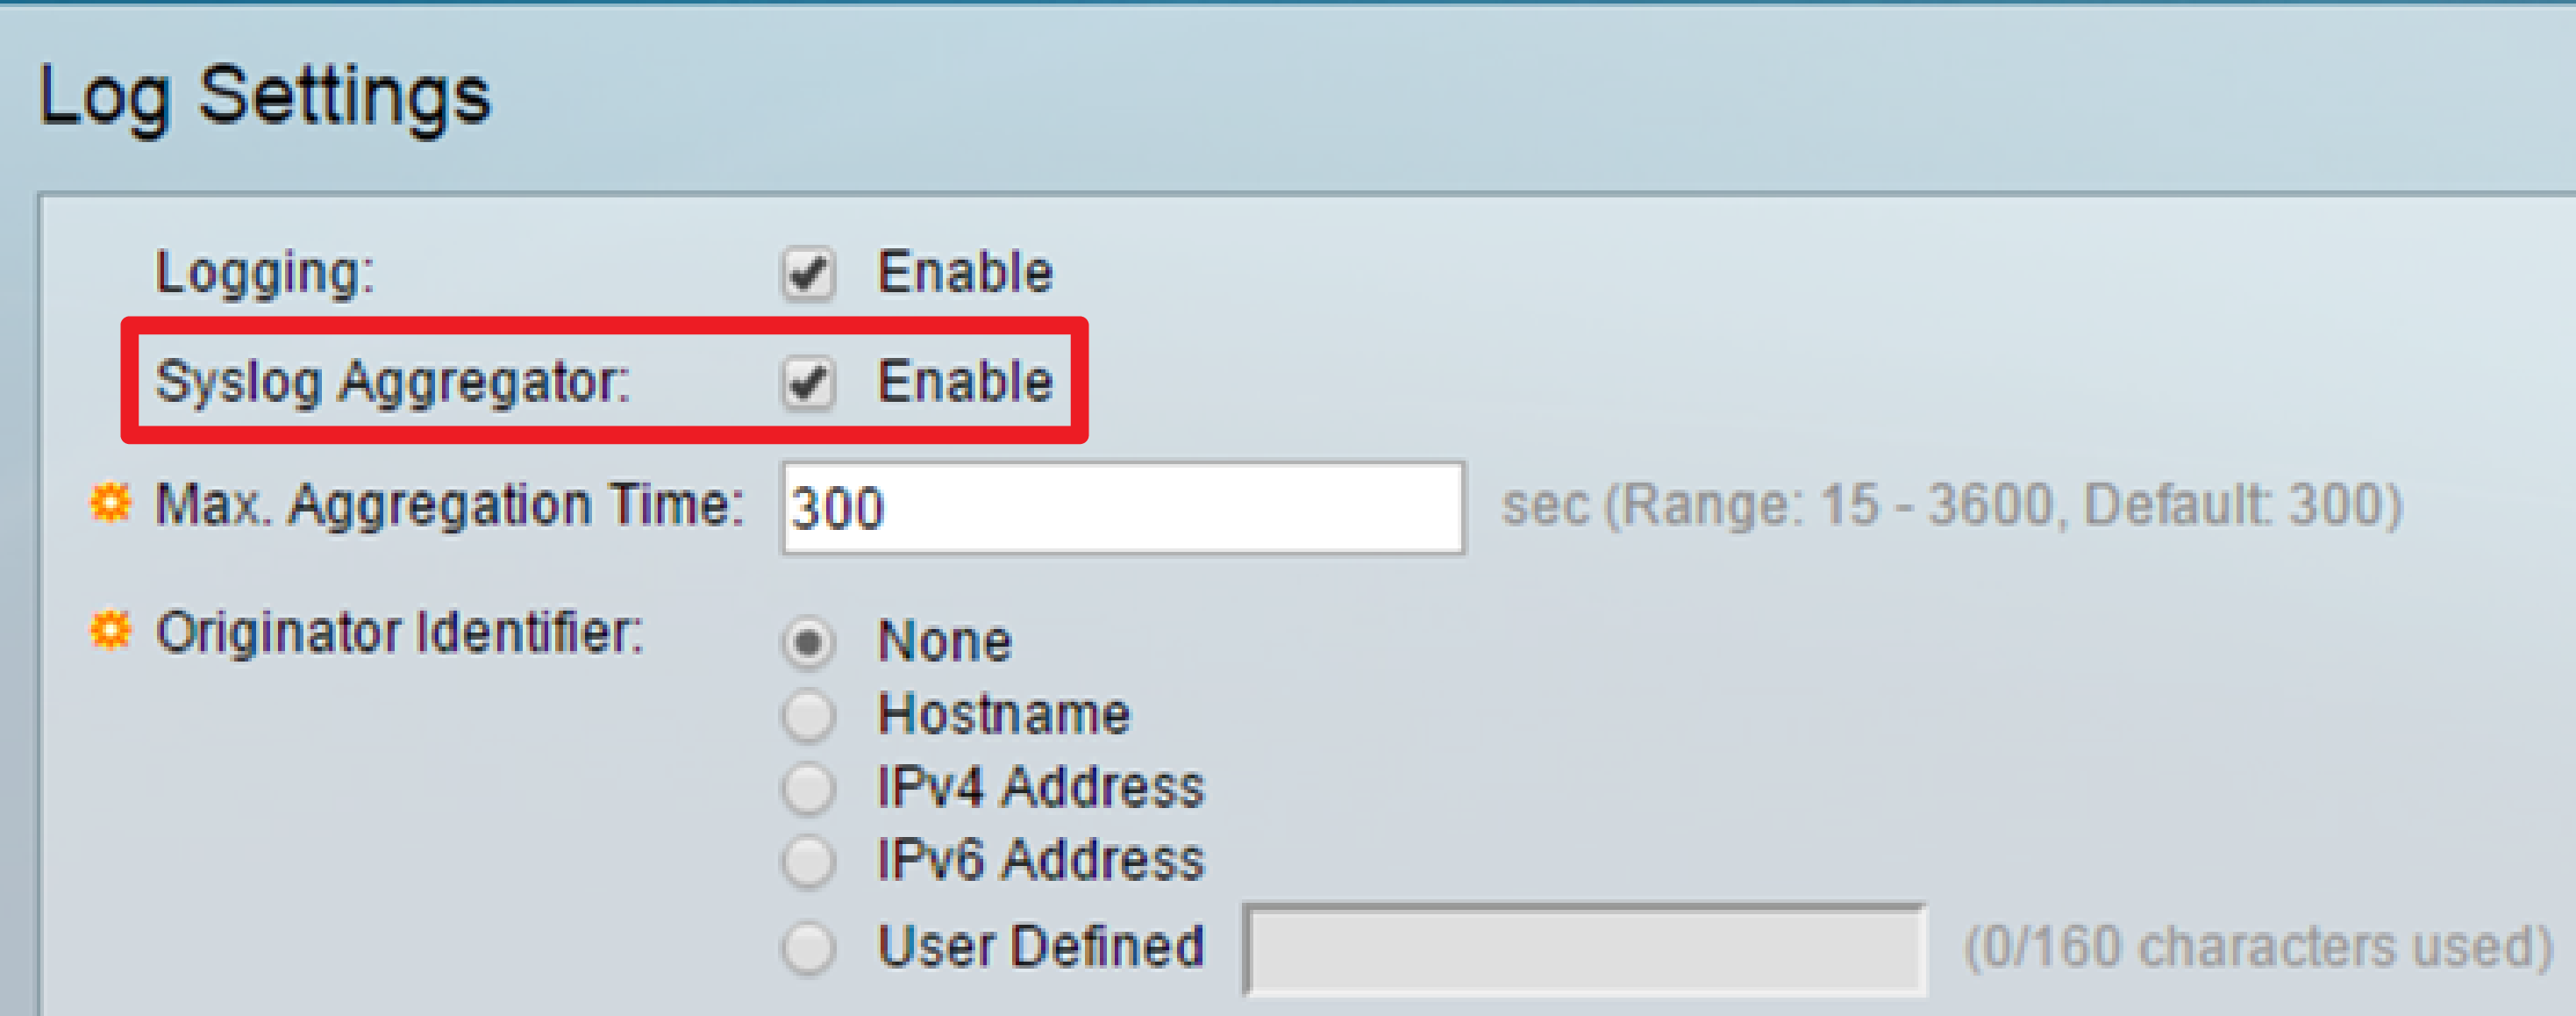
Note: The Syslog Aggregator is disabled by default.
Step 3. (Optional) Enter a value in seconds in the Max. Aggregation Time field to specify an interval of when messages would appear. The default value is 300 seconds.

Step 4. (Optional) To add an origin identifier to Syslog messages, choose an Originator Identifier from the following options:

- None — Do not include the origin identifier in Syslog messages
- IPv4 Address — Include the IPv4 address of the sending interface in Syslog messages
- IPv6 Address — Include the IPv6 address of the sending interface in Syslog messages
- User Defined — Enter a description to be included in Syslog messages
Note: In this example, IPv4 Address is chosen. The default Originator Identifier is set to None.
Step 5. (Optional) In the RAM Memory Logging area, check or uncheck to choose the severity levels of messages to be logged to the Random Access Memory (RAM).
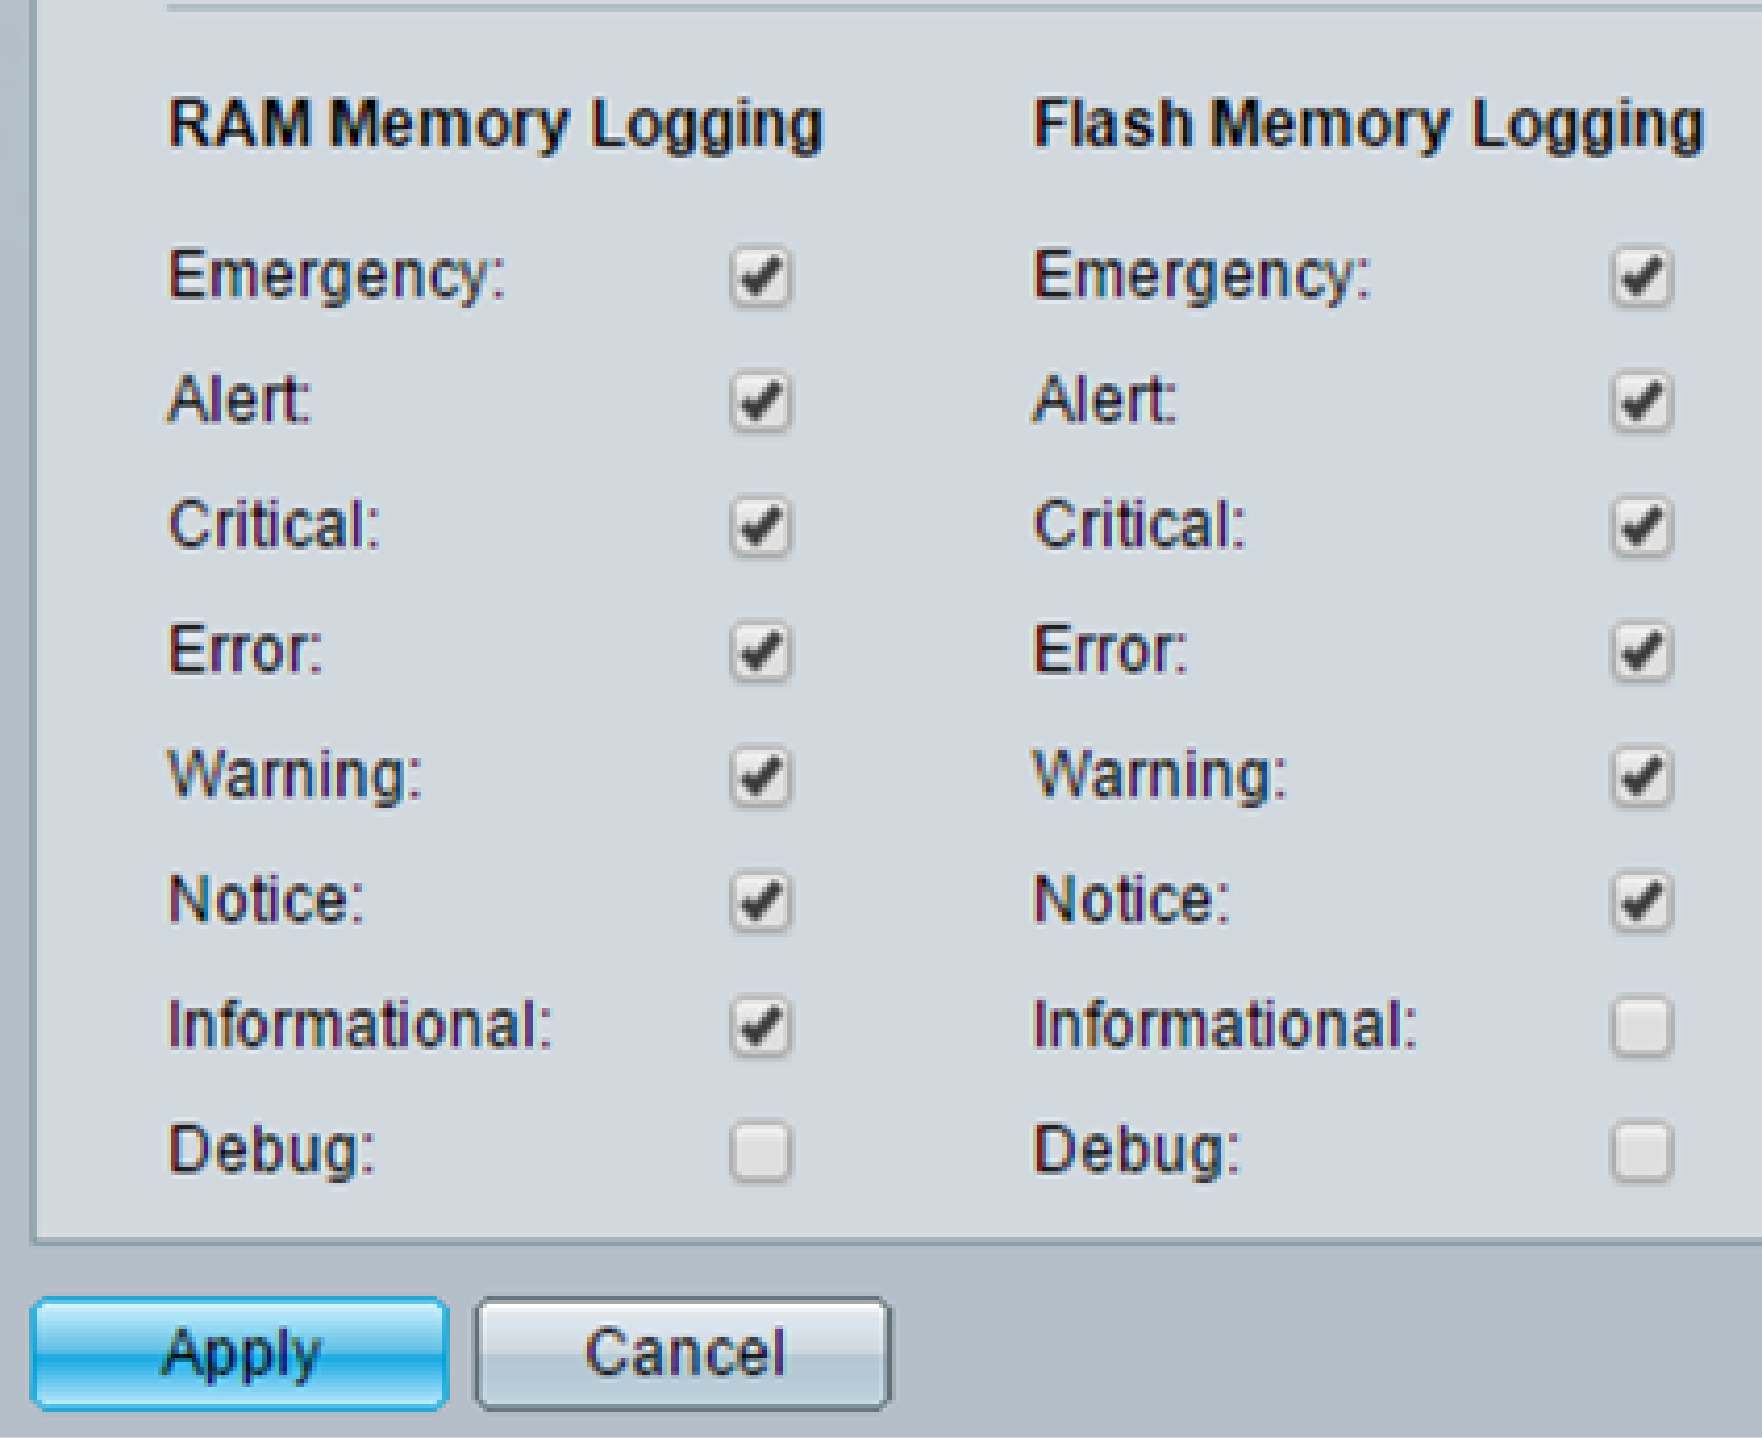
The values for the severity level are as follows:
- 0 — Emergency
- 1 — Alert
- 2 — Critical
- 3 — Error
- 4 — Warning
- 5 — Notice
- 6 — Informational
- 7 — Debug
Step 6. (Optional) In the Flash Memory Logging area, check or uncheck to choose the severity levels of messages to be logged to the Flash memory. Refer to the same values defined in Step 5 above.
Step 7. Click Apply to save changes to the running configuration file.
Step 8. Click Save to update the startup configuration file.
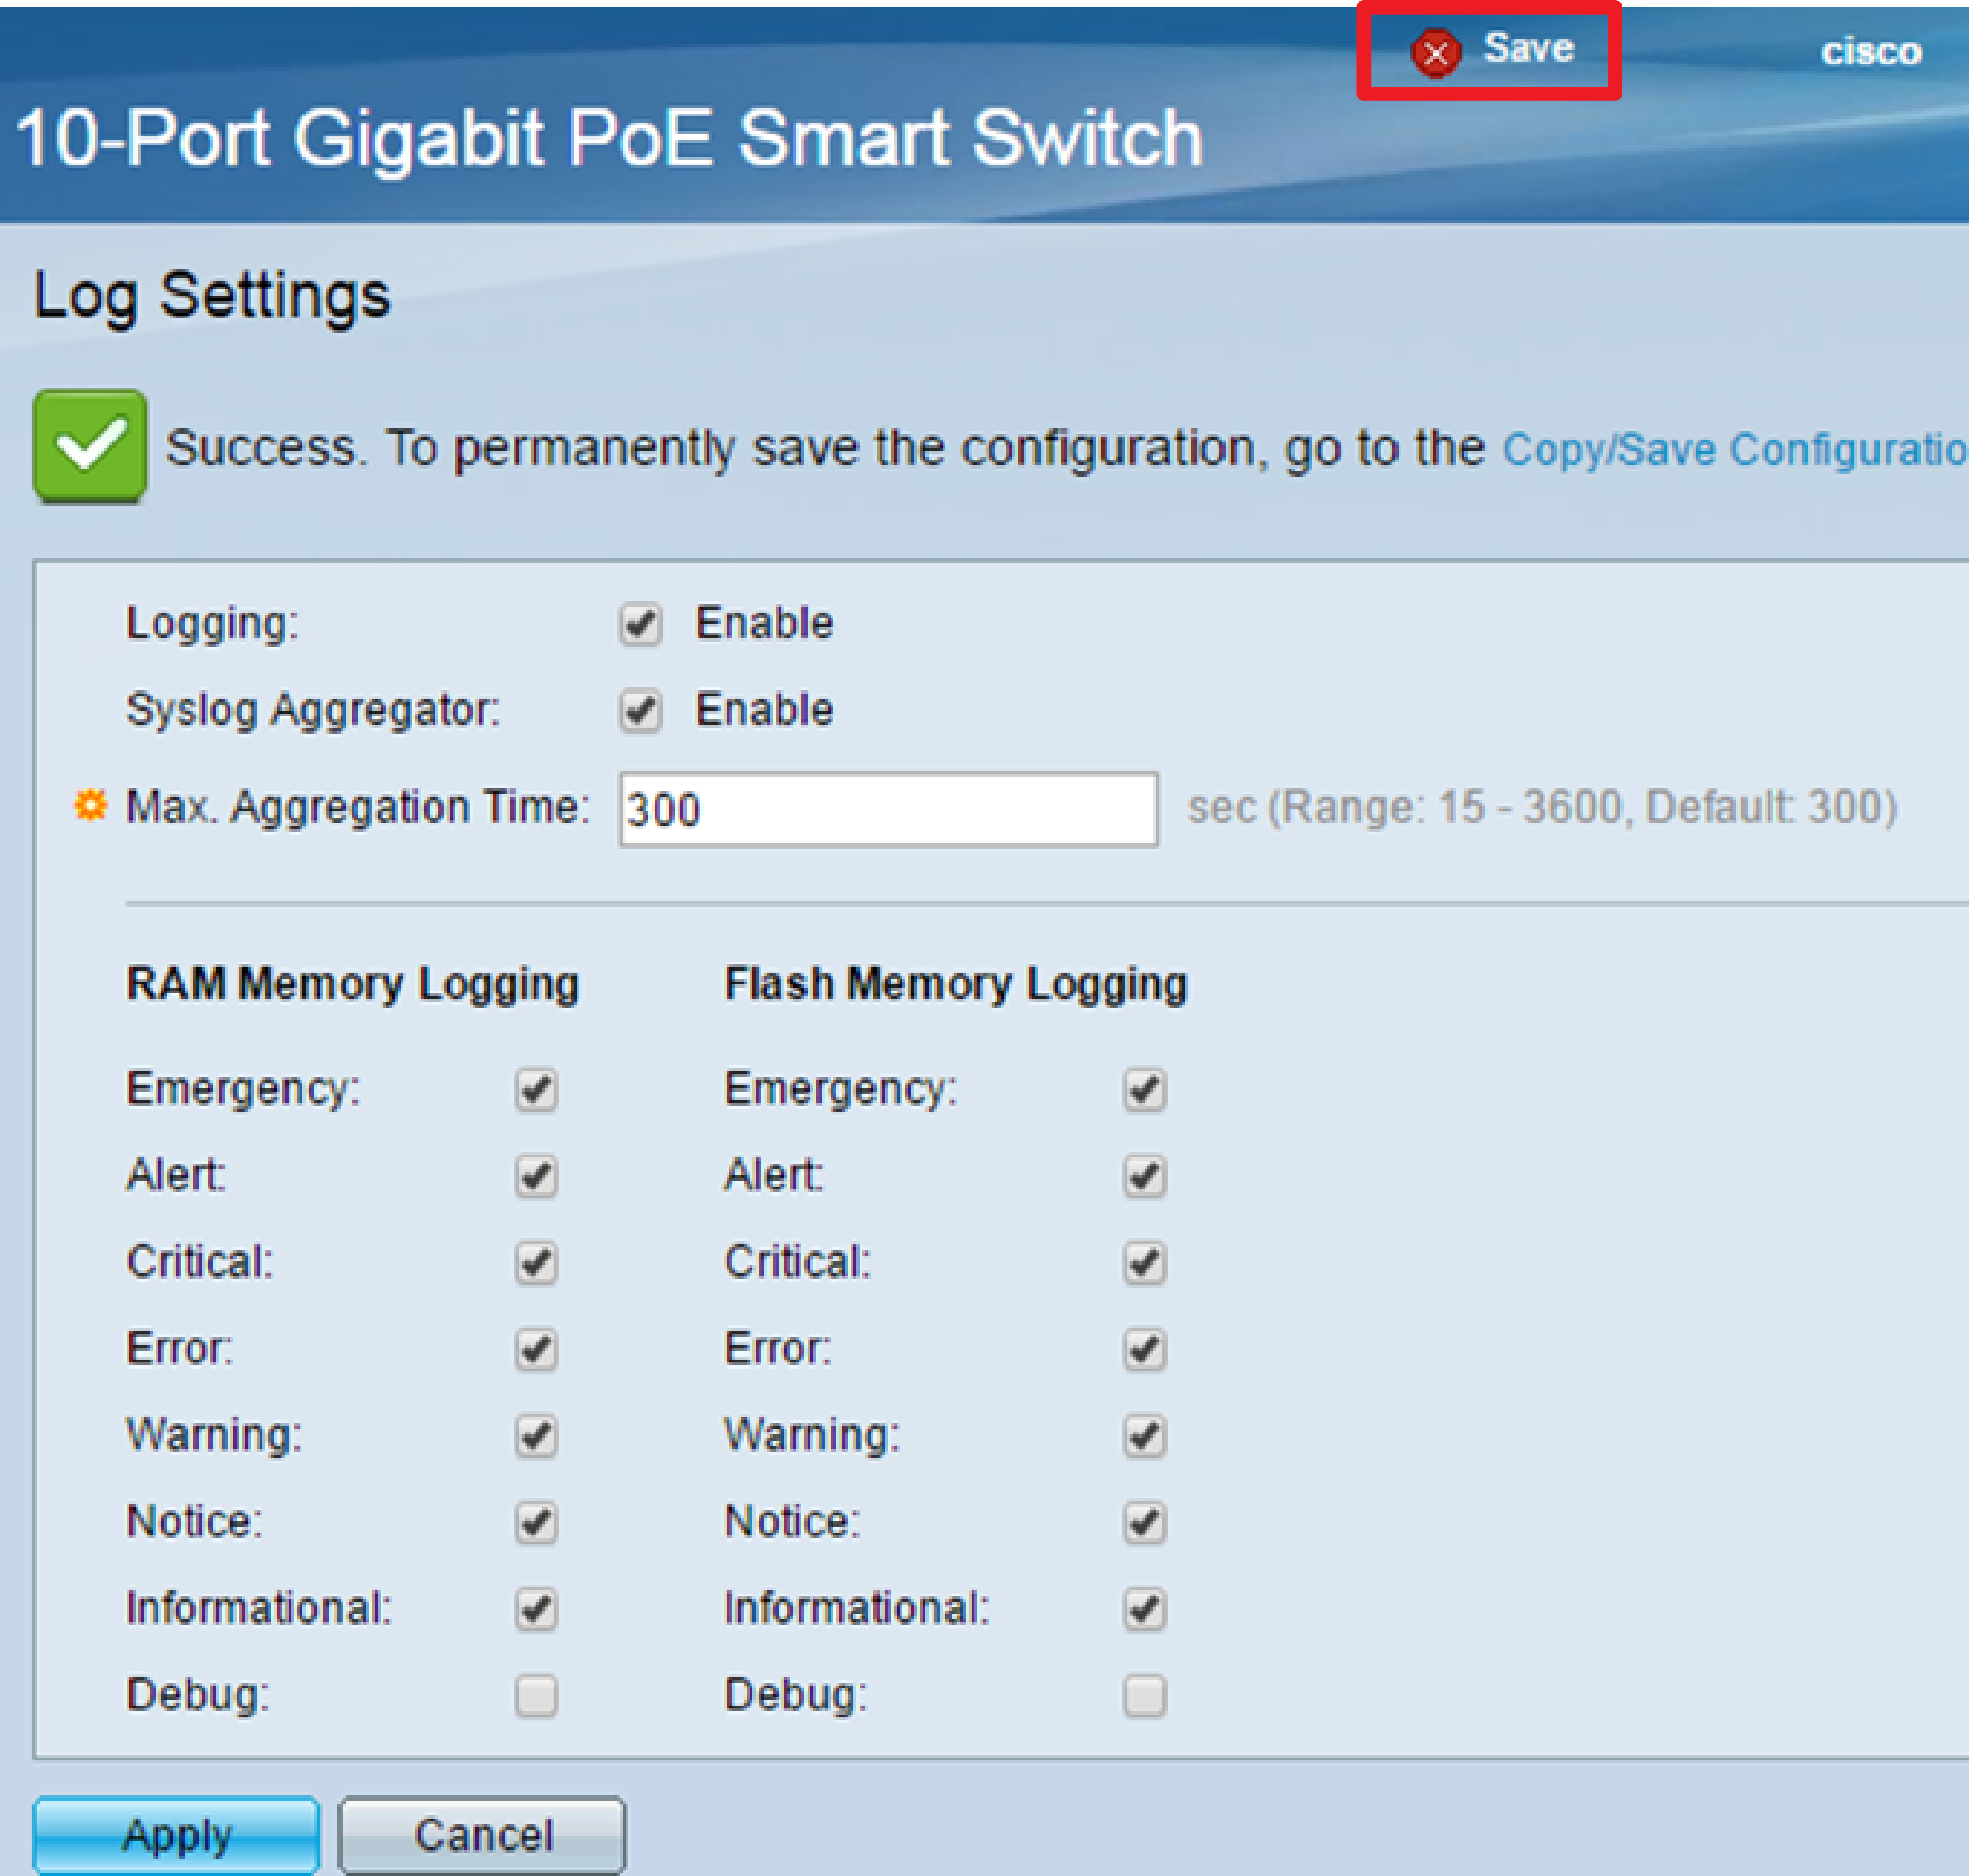
You should now have configured the Log Aggregation Settings on your Sx250 Series Smart Switch.
View or Clear Logs from RAM
The RAM Memory page displays all messages that were saved in the RAM (cache) in chronological order. Entries are stored in the RAM log according to the configuration in the Log Settings page.
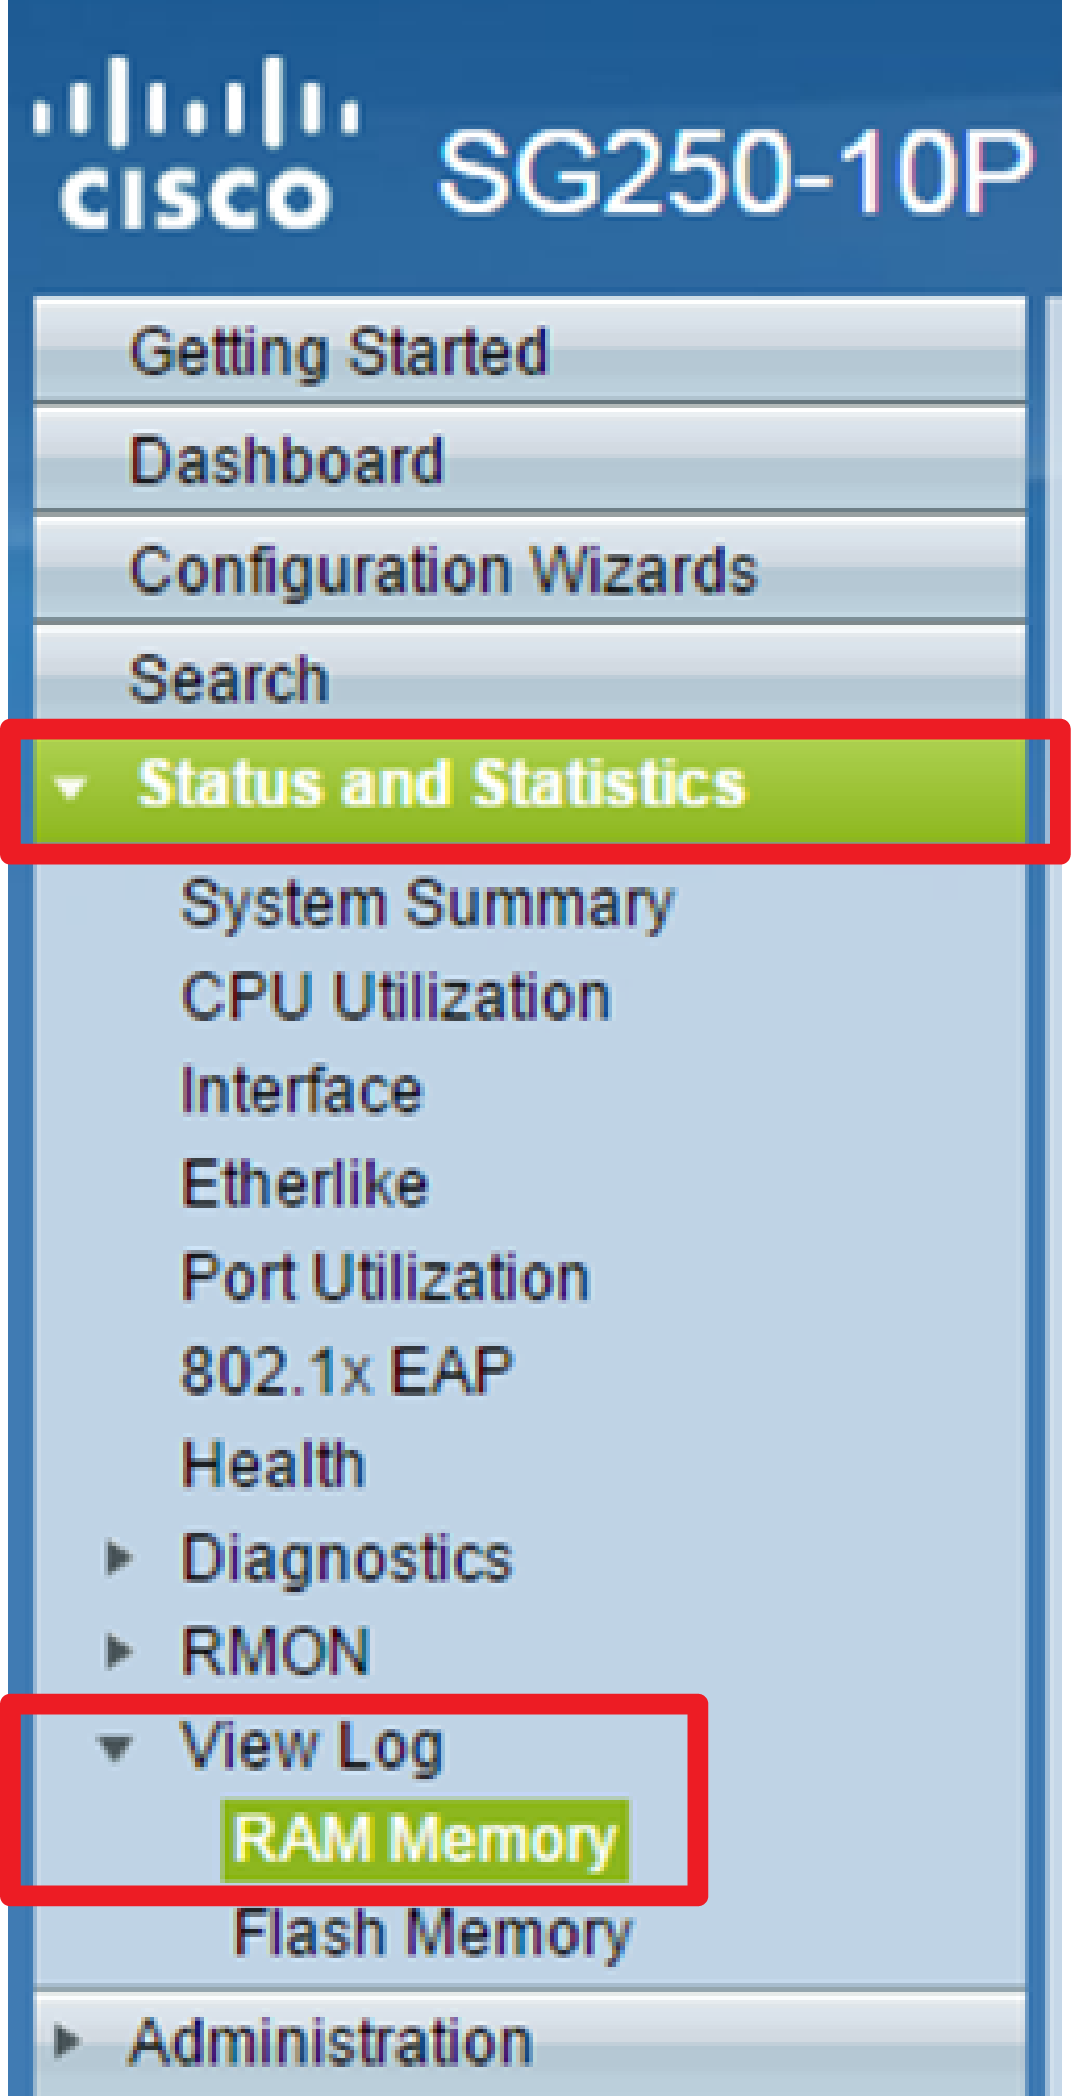
Step 1. To view logs from RAM Memory, choose Status and Statistics > View Log > RAM Memory.
Step 2. (Optional) To enable or disable the blinking of the alert icon, click the Alert Icon Blinking button. The default setting is Enabled and the button displays Disable Alert Icon Blinking.
Note: In the image below, Alert Icon Blinking is enabled.
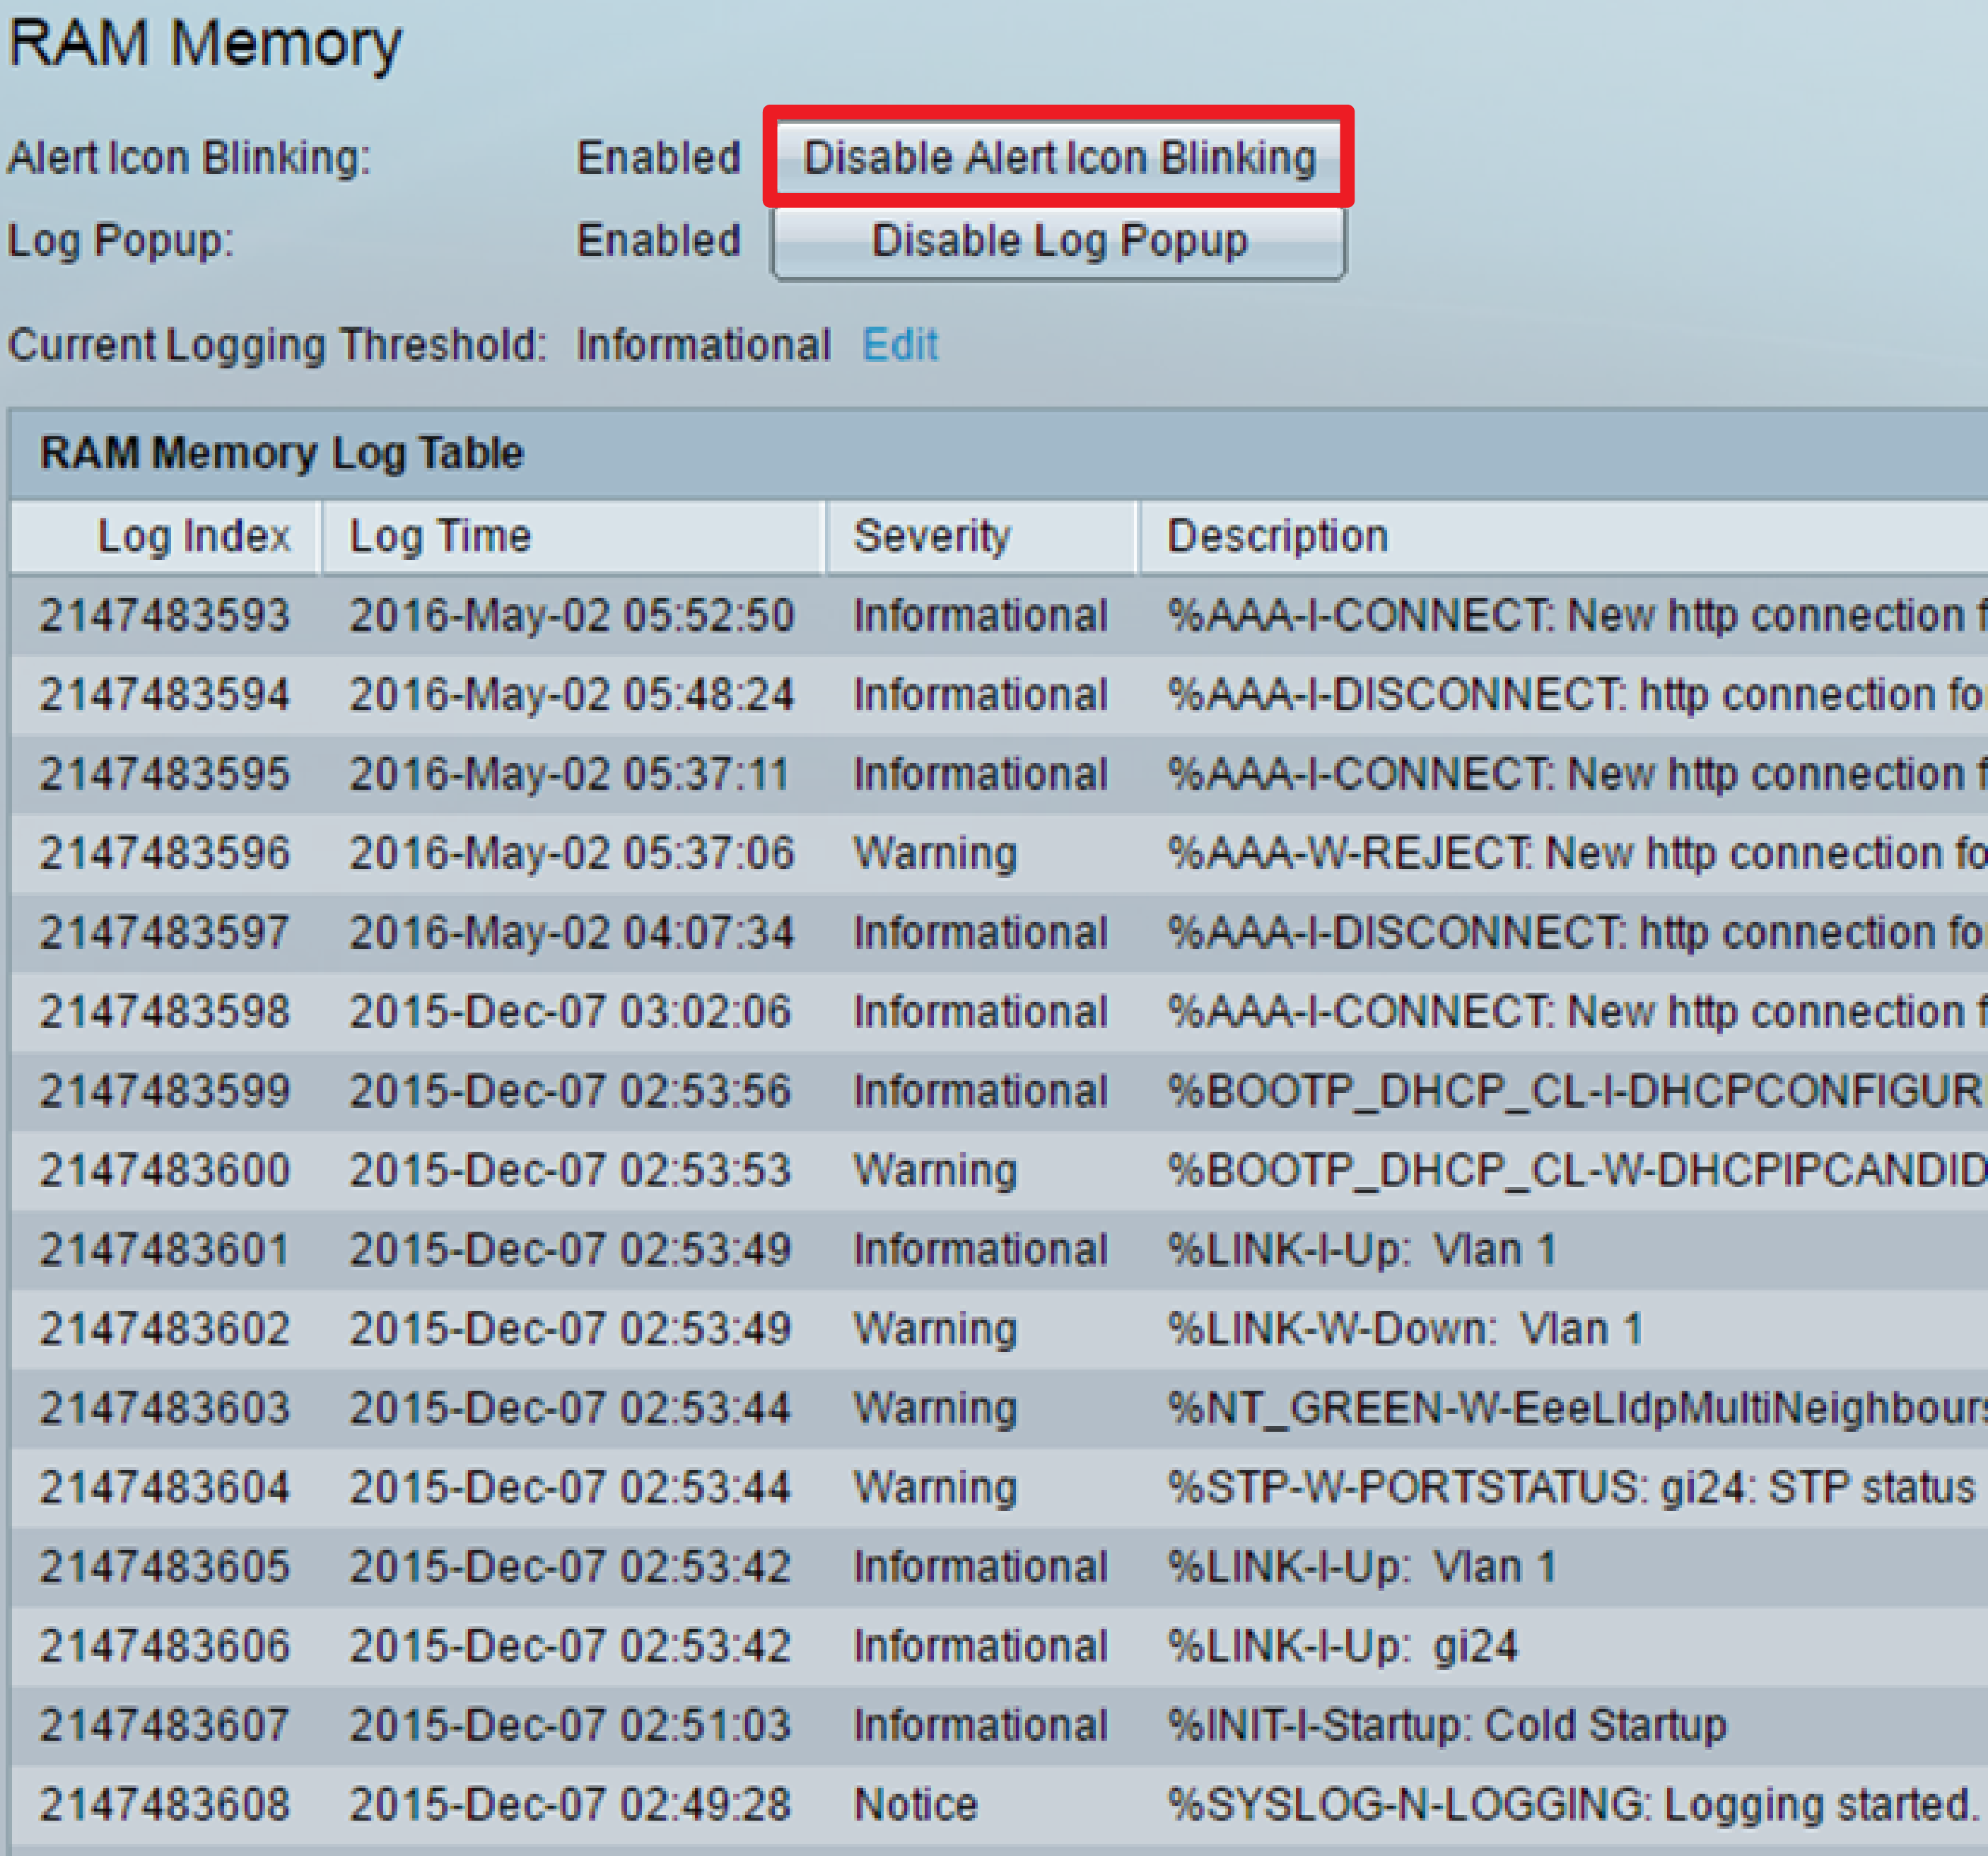
Step 3. (Optional) To enable or disable the Log Popup, click the Log Popup button. The default setting is Enabled and the button displays Disable Log Popup.

Note: The Current Logging Threshold displays the current RAM Logging settings. Clicking the Edit link will bring you to the Log Settings page.
The RAM Memory page contains the following fields:
- Log Index — Log entry number
- Log Time — Time when message was generated
- Severity — Event severity
- Description — Message text describing the event
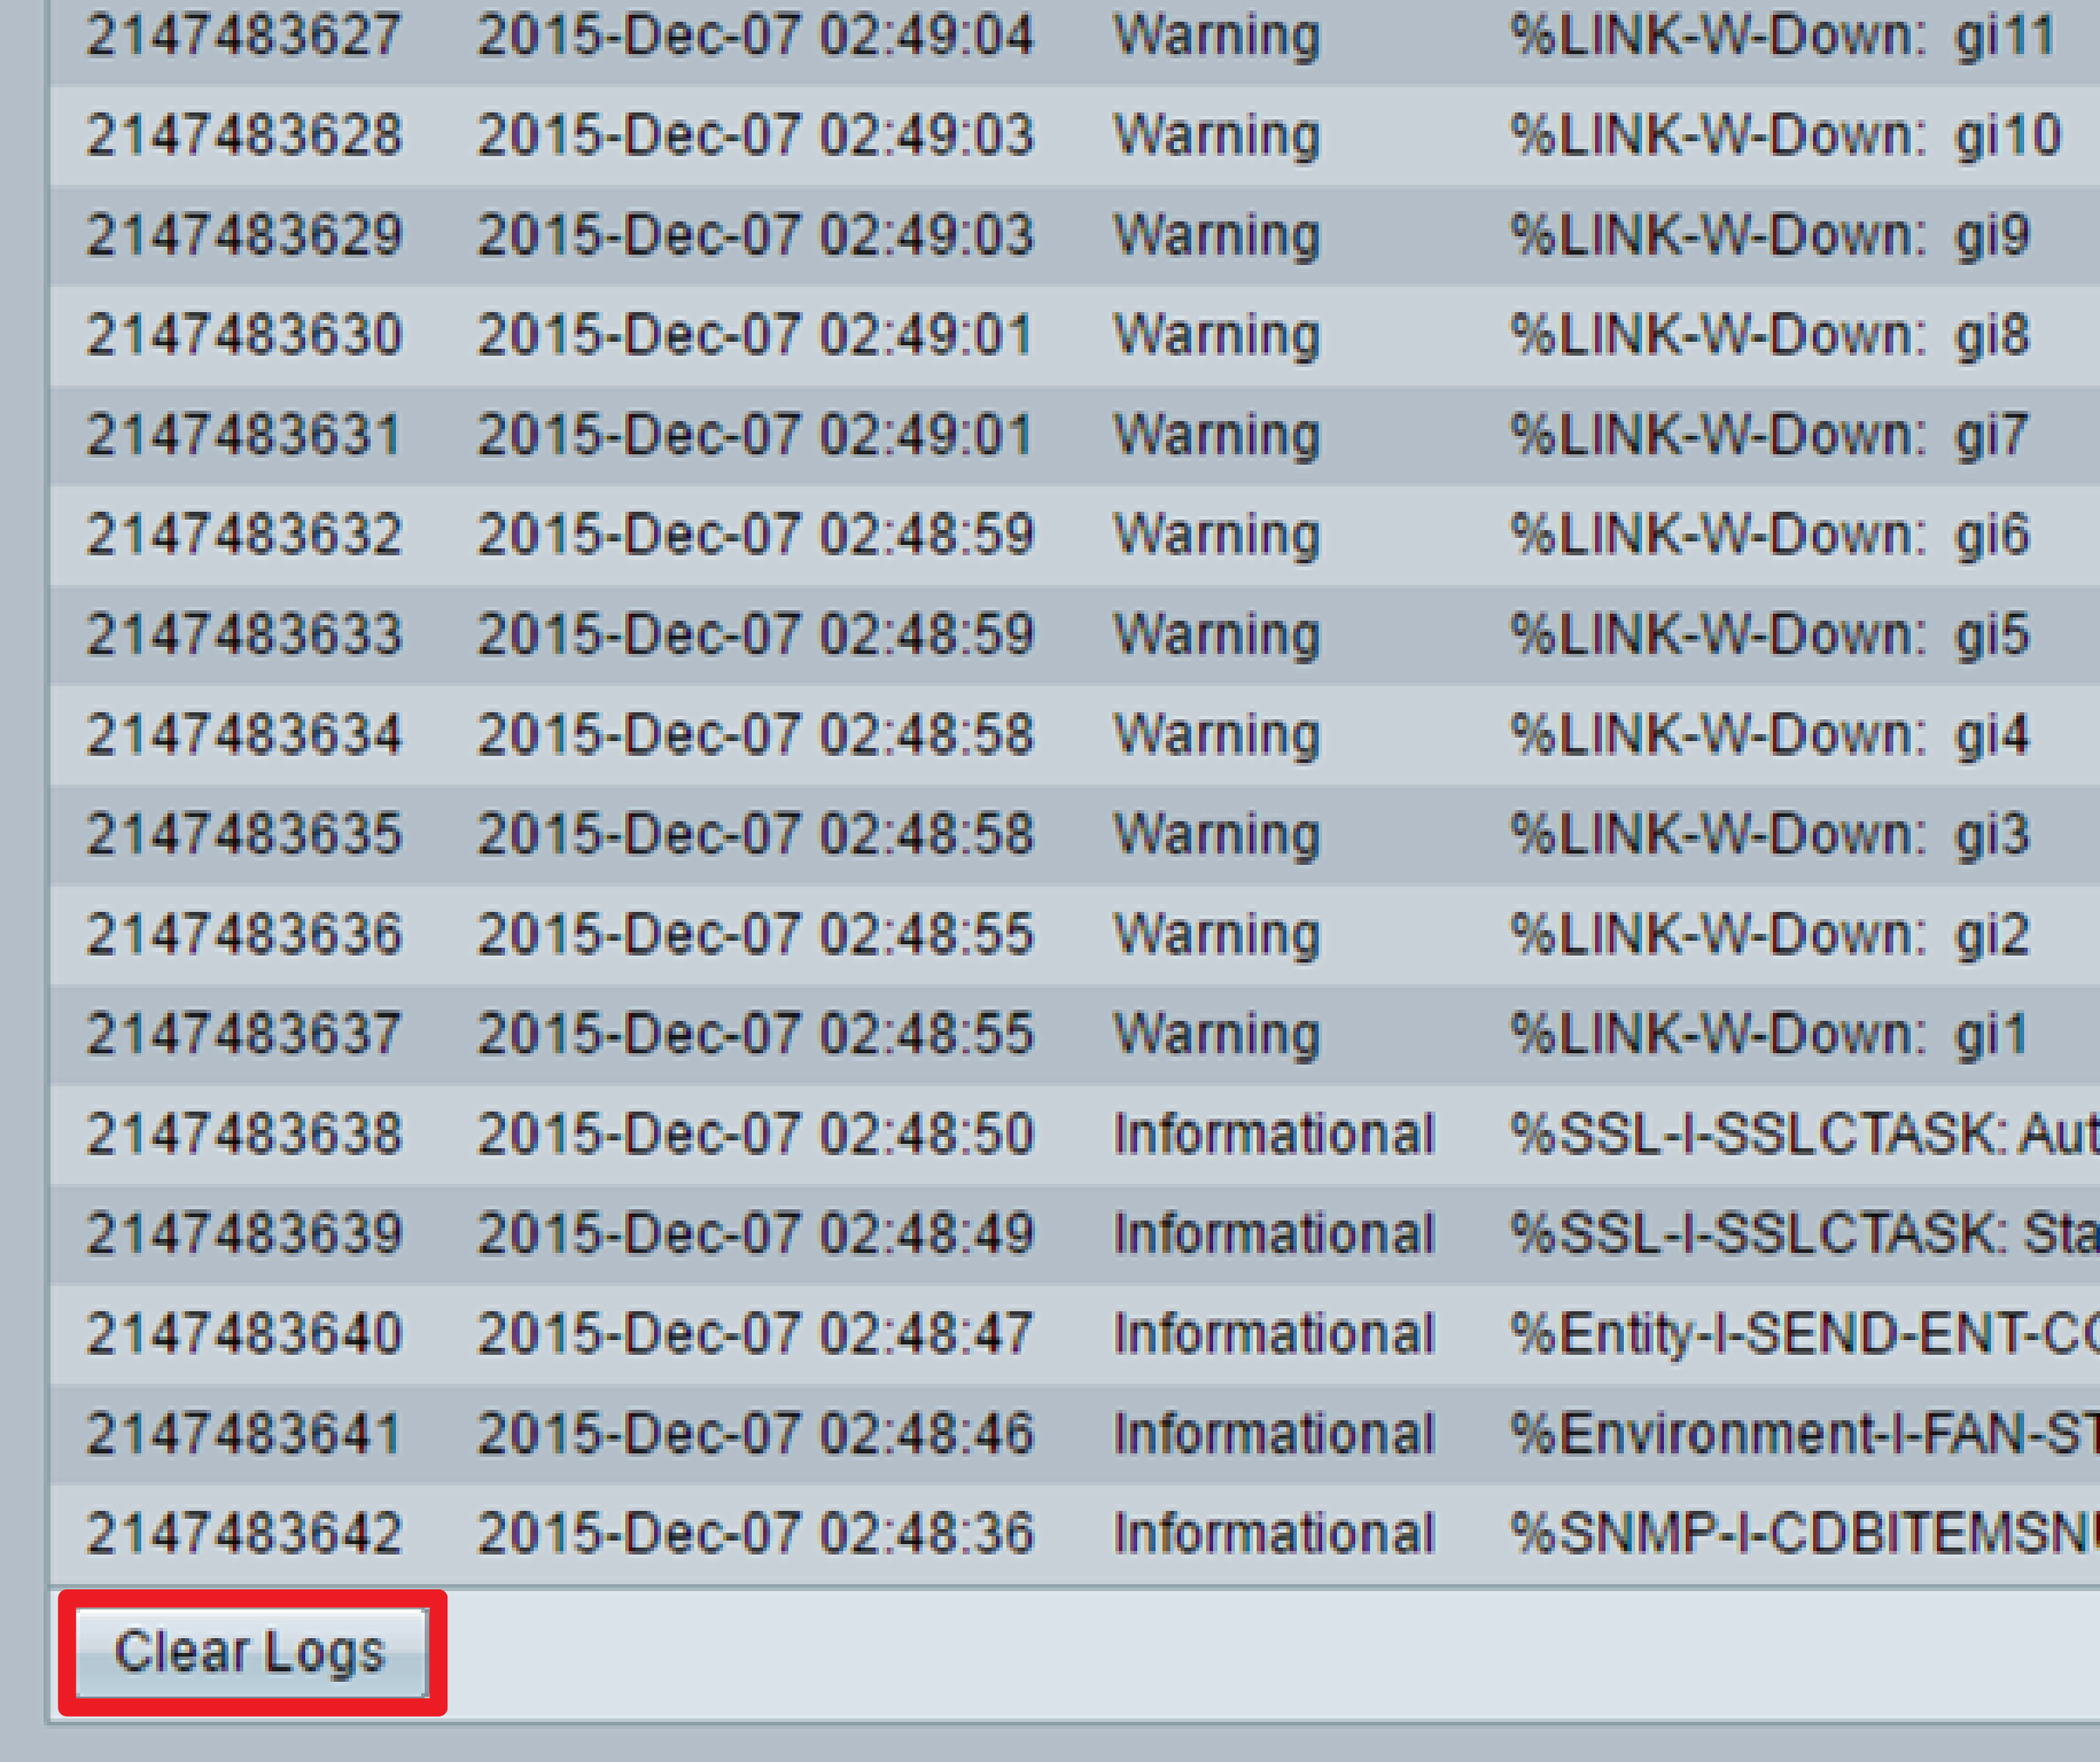
Step 4. (Optional) To clear the log messages, scroll down the page then click Clear Logs. The messages are cleared.
You should now have viewed or cleared the log messages on the RAM Memory of your Sx250 Series Smart Switch.
View or Clear Logs from Flash Memory
The Flash Memory page displays the messages that were stored in the Flash memory, in chronological order. The minimum severity for logging is configured in the Log Settings page. Flash logs remain when the device is rebooted. You can clear the logs manually.
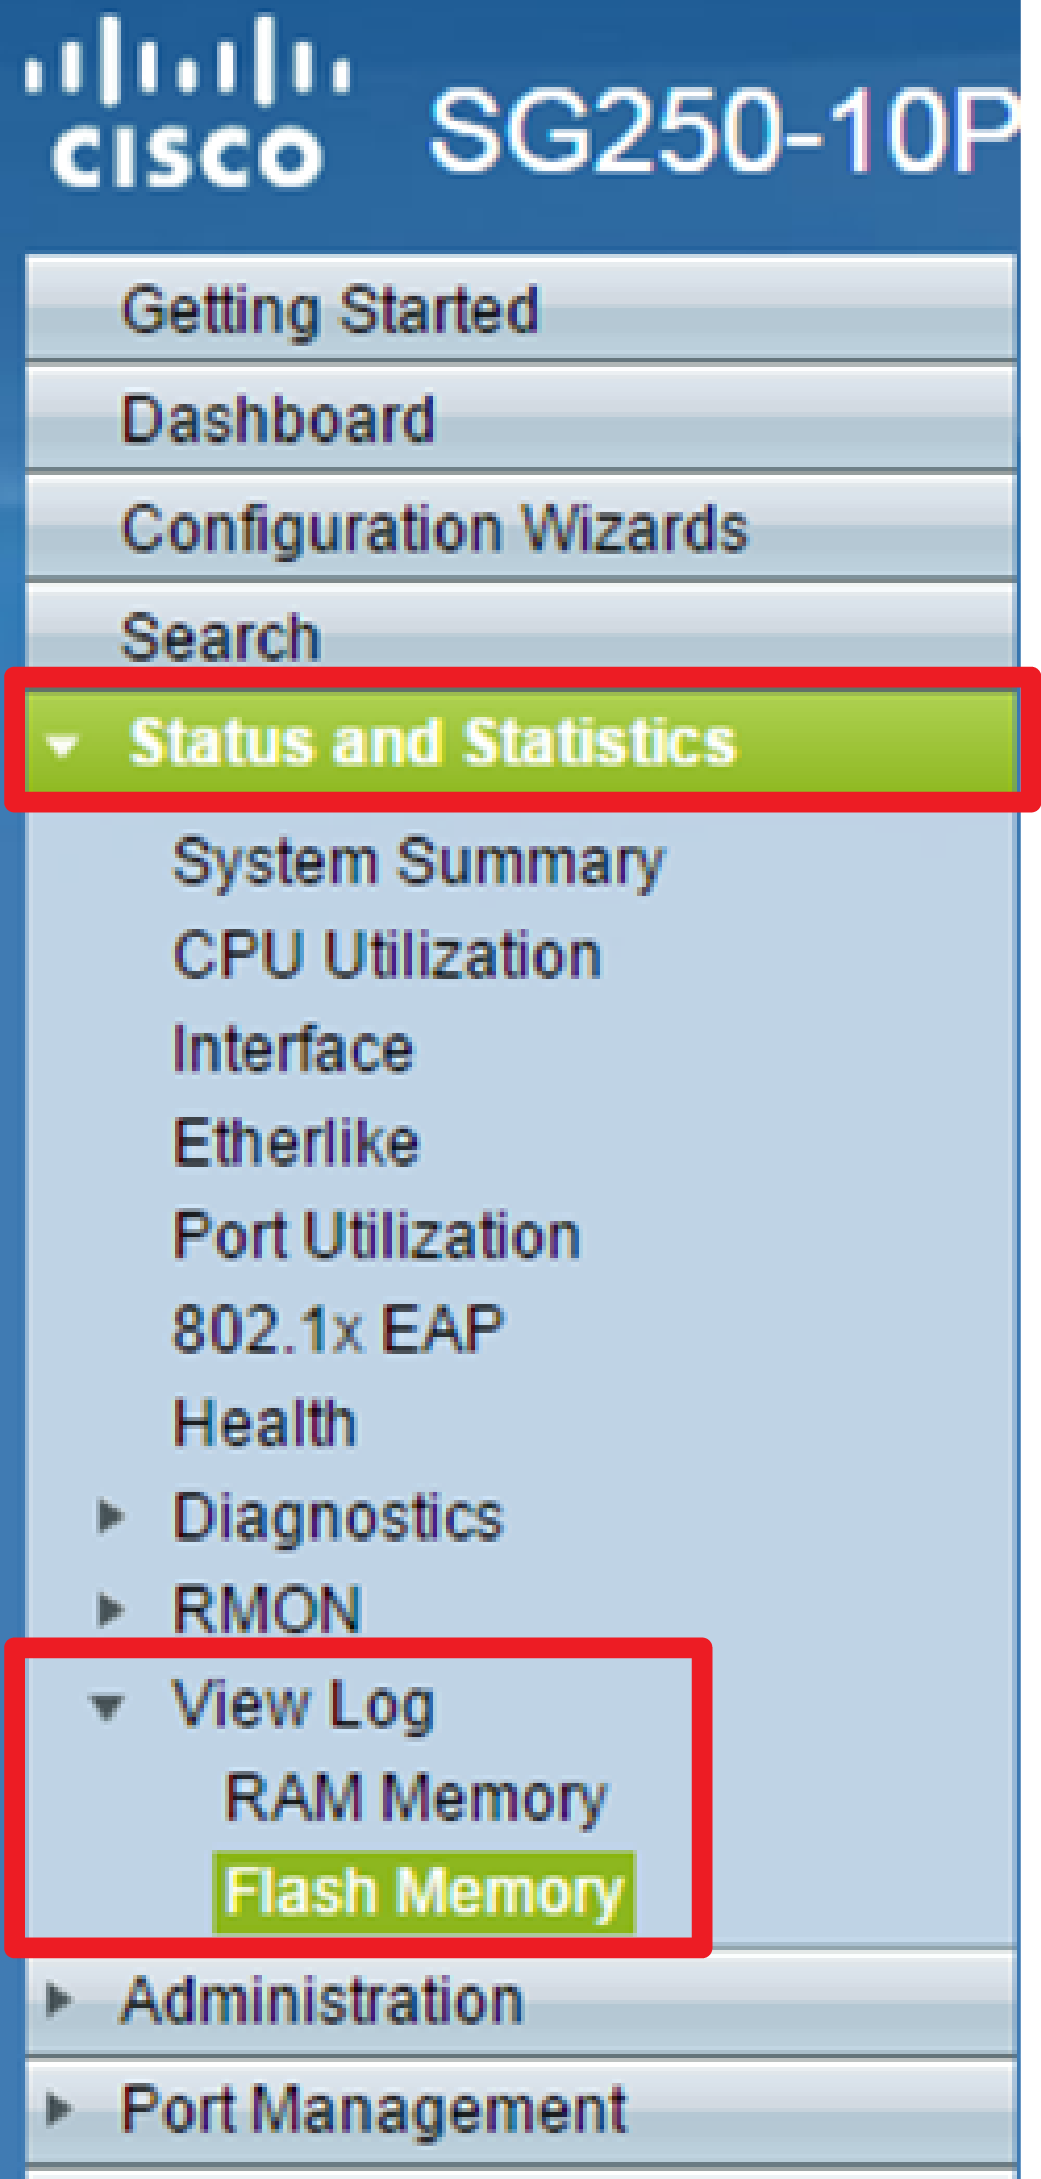
Step 1. To view logs from Flash Memory, choose Status and Statistics > View Log > Flash Memory.
Note: The Current Logging Threshold displays the current Flash Memory Logging settings. Clicking the Edit link will bring you to the Log Settings page.
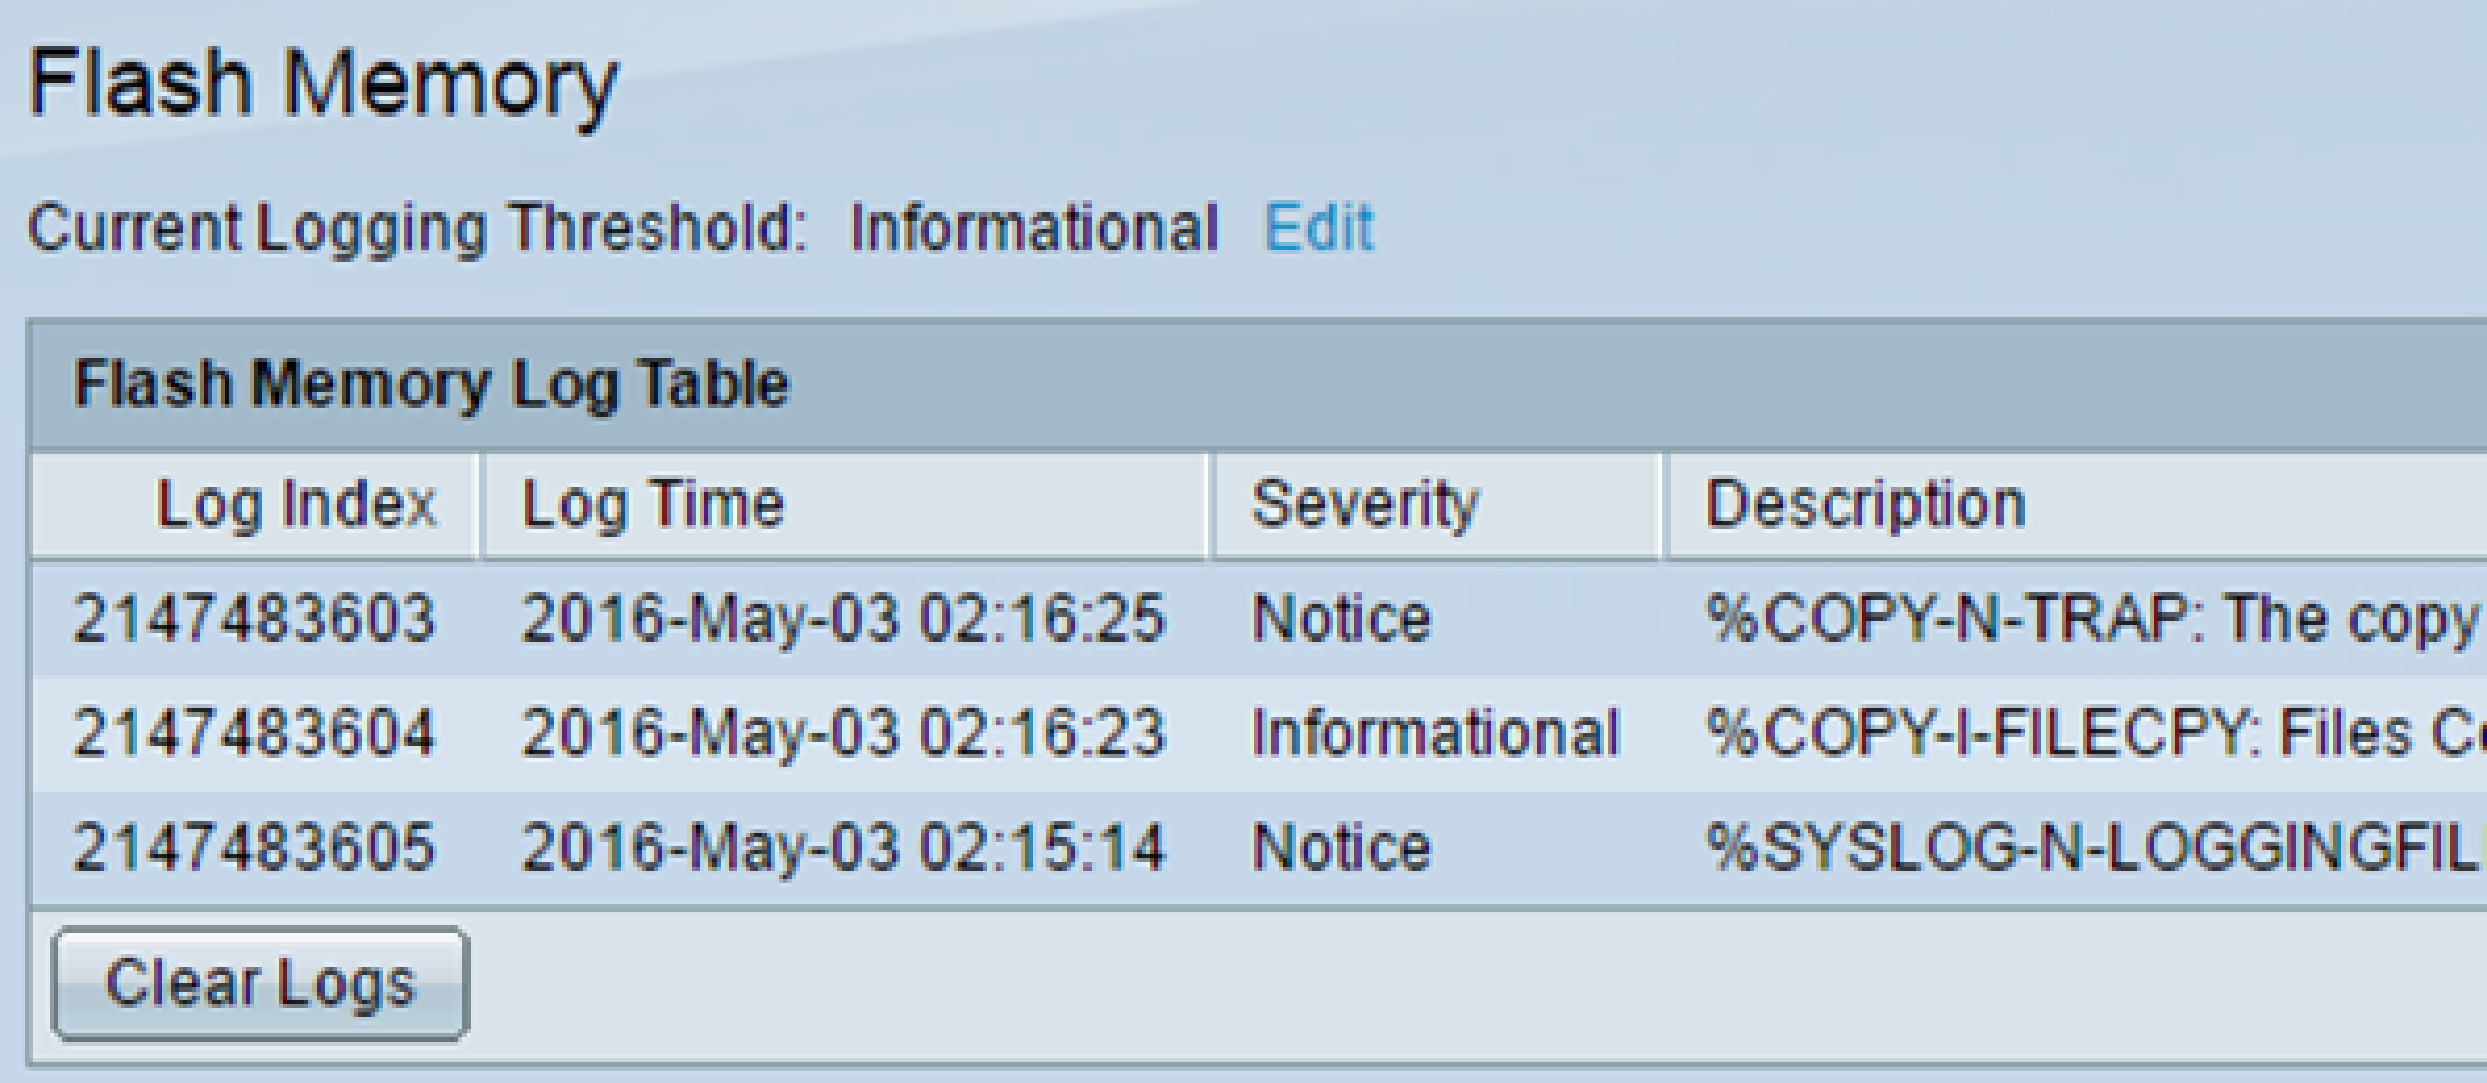
This page contains the following fields:
- Log Index — Log entry number
- Log Time — Time when message was generated
- Severity — Event severity
- Description — Message text describing the event
Step 2. (Optional) To clear the log messages, scroll down the page then click Clear Logs. The messages are cleared.
You should now have viewed or cleared the log messages on the Flash Memory of your Sx250 Series Smart Switch.
Contact Cisco
- Open a Support Case

- (Requires a Cisco Service Contract)
 Feedback