Configure Virtual Local Area Network (VLAN) Settings on a Switch via VLAN Configuration Wizard
Available Languages
Objective
A Virtual Local Area Network (VLAN) allows you to logically segment a Local Area Network (LAN) into different broadcast domains. In scenarios where sensitive data may be broadcast on a network, VLANs can be created to enhance security by designating a broadcast to a specific VLAN. Only users that belong to a VLAN are able to access and manipulate the data on that VLAN. VLANs can also be used to enhance performance by reducing the need to send broadcasts and multicasts to unnecessary destinations.
The Sx250, Sx350, SG350X, and Sx550X Series Switches include a configuration wizard that will help you in configuring VLANs. Each time you run this wizard, you can create or configure an existing VLAN, and configure ports membership in a single VLAN. You can configure the ports and specify whether the port should be in access or trunk mode.
The port modes are defined as follows:
- Access Port — The frames received on the interface are assumed to not have a VLAN tag and are assigned to the specified VLAN. Access ports are used primarily for hosts and can only carry traffic for a single VLAN.
- Trunk Port — The frames received on the interface are assumed to have VLAN tags. Trunk ports are for links between switches or other network devices and are capable of carrying traffic for multiple VLANs.
Note: By default, all interfaces are in trunk mode, which means they can carry traffic for all VLANs.
This article provides instructions on how to configure your VLAN on your Sx250, Sx350, SG350X, and Sx550X Series Switch for the first time.
Applicable Devices
- Sx250 Series
- Sx350 Series
- SG350X Series
- Sx550X Series
Software Version
- 2.2.5.68
Configure VLAN Settings on the Switch
Each VLAN is configured with a unique VLAN ID (VID) with a value from 1 to 4094. A port on a device in a bridged network is a member of a VLAN if it can send data to and receive data from the VLAN. A port is an untagged member of a VLAN if all packets destined for that port into the VLAN have no VLAN tag. A port is a tagged member of a VLAN if all packets destined for that port into the VLAN have a VLAN tag. A port can be a member of only one untagged VLAN but can be a member of multiple tagged VLANs. A port in VLAN Access mode can be part of only one VLAN. If it is in General or Trunk mode, the port can be part of one or more VLANs.
Follow these steps to configure a VLAN and assign ports using the VLAN Configuration Wizard.
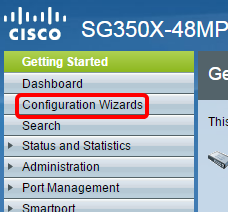
Step 1. Log in to the web-based utility and choose Configuration Wizards.
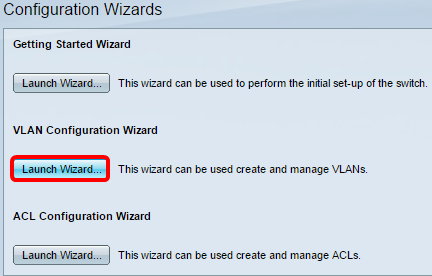
Step 2. Click Launch Wizard under the VLAN Configuration Wizard area.
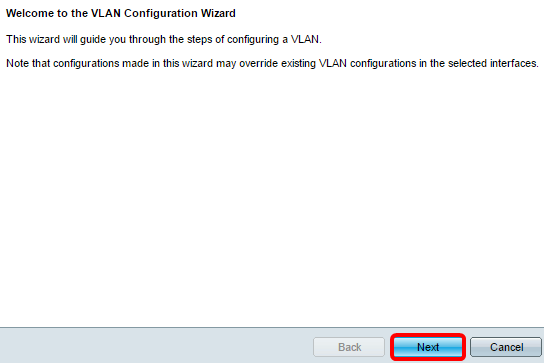
Step 3. Click Next.
Step 4. Click the ports that you want to be configured as trunk ports. Ports that are already configured as Trunk ports are pre-selected.
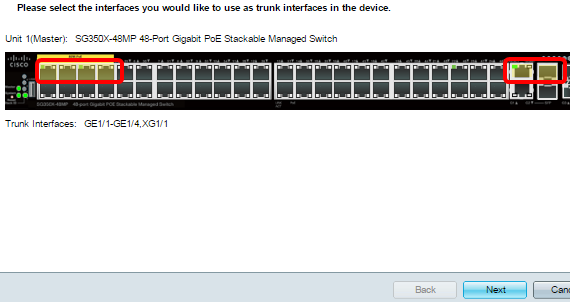
Note: In this example, GE1/1 to GE1/4 and XG1/1 ports are chosen.
Step 5. Click Next.
Step 6. To create a new VLAN, make sure [New VLAN] is chosen.

Note: Alternatively, if you want to configure an existing VLAN, choose the VLAN ID then skip to Step 9.

Step 7. Enter the VLAN ID of a new VLAN in the New VLAN ID field.

Note: In this example, VLAN 20 is used.
Step 8. (Optional) Enter the VLAN name in the VLAN Name field.
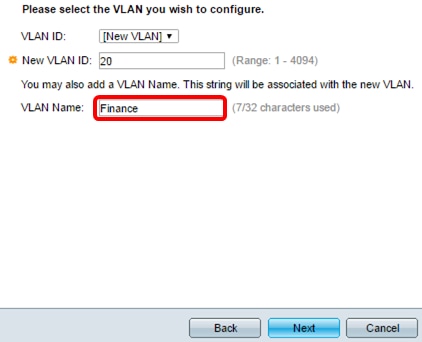
Note: In this example, Finance is used.
Step 9. Click Next.
Step 10. Click the trunk ports that you want to be configured as untagged members of the VLAN. The trunk ports that are not selected in this step becomes tagged members of the VLAN.
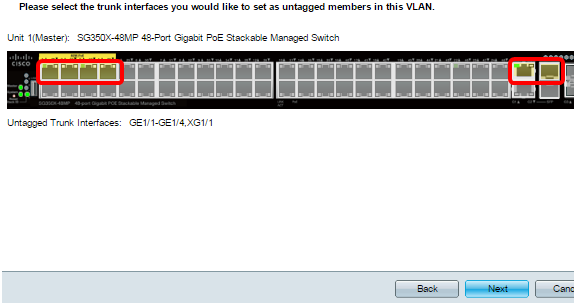
Note: In this example, GE1/1 to GE1/4 and XG1/1 ports are chosen.
Step 11. Click Next.
Step 12. Click the ports that you want to be access ports of the VLAN. Access ports are used primarily for hosts and can only carry traffic for a single VLAN.
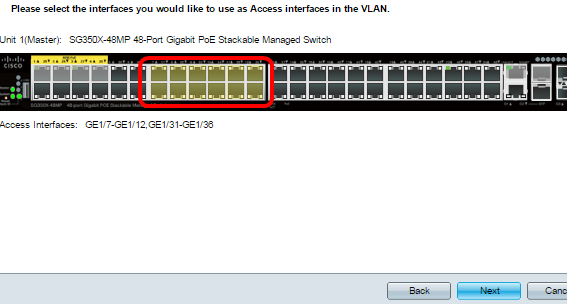
Note: In this example, GE1/7 to GE1/12 and GE1/31 to GE1/36 ports are chosen.
Step 13. Click Next.
Step 14. Review the configured settings then click Apply.
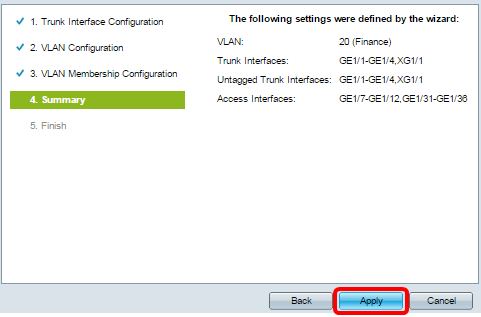
Step 15. Click Finish to complete the configuration.
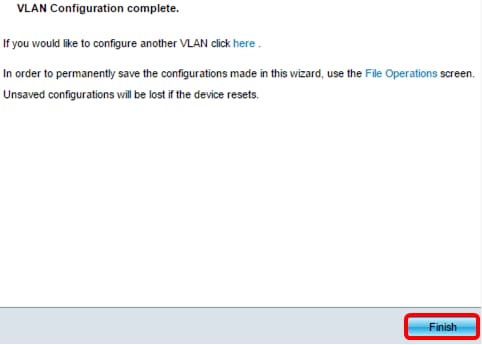
Step 16. (Optional) To configure another VLAN, click the here link.

Step 17. (Optional) Click Save to save settings to the startup configuration file.

You should now have configured the VLAN settings of your switch through the VLAN Configuration Wizard.
 Feedback