Tips to Keep the ARP Table Available for DHCP IP Addressing
Available Languages
Objective
This article explains how to set the Address Resolution Protocol (ARP) table of a switch to frequently clear the expired Media Access Control (MAC) addresses from the ARP table. In addition, this article illustrates how to clear the ARP table manually. These options are solutions to bug CSCvn36700.
Introduction
ARP performs a required function in IP routing. ARP finds the MAC address, also known as the hardware address, of a host from its known IP address. ARP maintains a cache (table) in which MAC addresses are mapped to IP addresses. ARP is part of all Cisco devices that run IP.
Some Cisco Small Business switches can run at layer 3 and are able to implement Dynamic Host Configuration Protocol (DHCP) server support. DHCP is commonly used to automatically assign IP addresses to devices. When a switch is configured as a DHCP server with appropriate DHCP pools, no intervention is typically needed to allocate IP addresses to clients.
When an IP address is assigned, it is also given a DHCP lease time. If the lease is renewed before expiration, the same IP address is usually kept on the device, and it is given a new lease time. This typically happens when a device is consistently connected to a network.
If a device is shut down, moved between networks, or there has been a restart of the network, that IP address reservation can expire. These expired addresses are typically retained for a while, matched with the MAC address it was assigned. This is kept within the DHCP server database as a holding place so that if a client joins the network again, it can be assigned the same IP address it had before. This can be convenient, but if there are a lot of devices joining and leaving a network, the expired list can get long very quickly.
Every time a new device connects, it needs to be assigned an IP address. If you run a network where there are a lot of expired IP addresses that haven’t been cleared quickly enough, the DHCP pool can run out of IP addresses and not have any to give out to new clients. There are a few options for avoiding this potential issue.
Read on to first verify your settings within the Graphical User Interface (GUI) of the switch.
Applicable Devices
-
SF200
-
SG200
-
SF300
-
SG300
-
SG350X
-
SG500X
-
SG500XG
-
SG550
-
SG550X
-
SG550XG
Software Version
-
Applicable to all versions
Verify Settings on the GUI
Step 1. Log in to the Cisco switch by entering the Username and Password. Click Log In. By default the username and password are cisco, but since you are working on an existing network, you should have your own username and password. Enter those credentials instead.

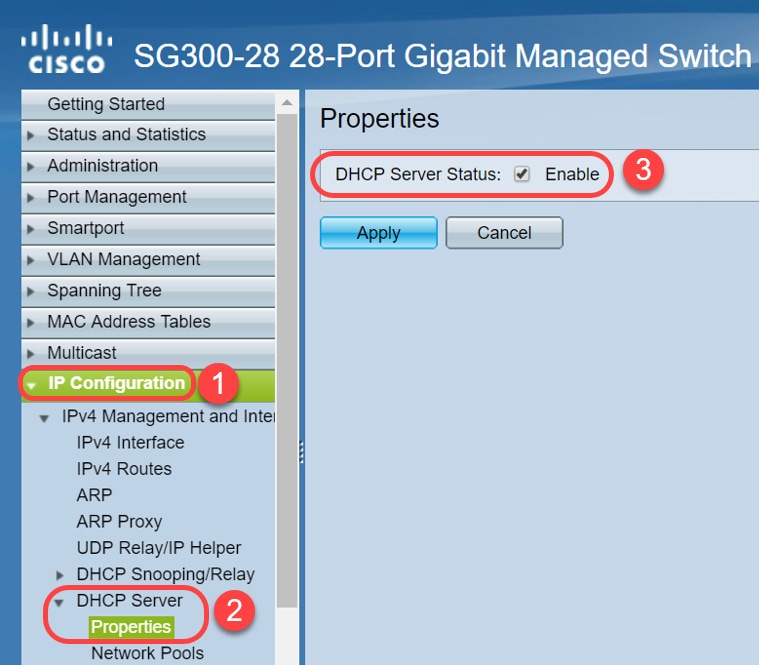
Step 2. Navigate to IP Configuration > DHCP Server > Properties and verify the DHCP Server Status is Enabled.
Step 3. Navigate to IP Configuration > DHCP Server > Network Pools. Under Network Pool Table, verify the details including the Number of Leased Addresses.
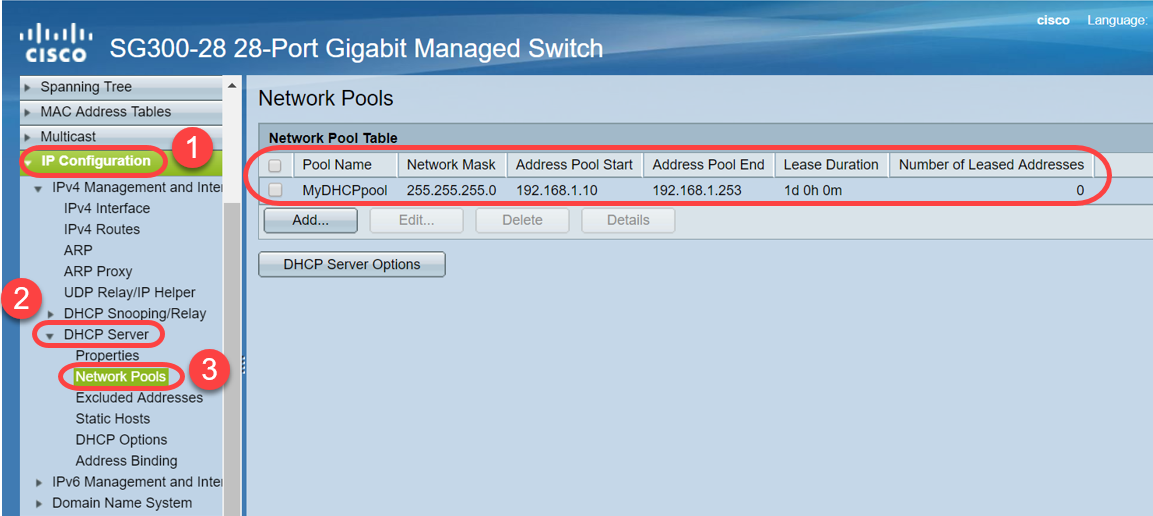
Note: In this example, Number of Leased Addresses displays zero, as there are no clients connected.
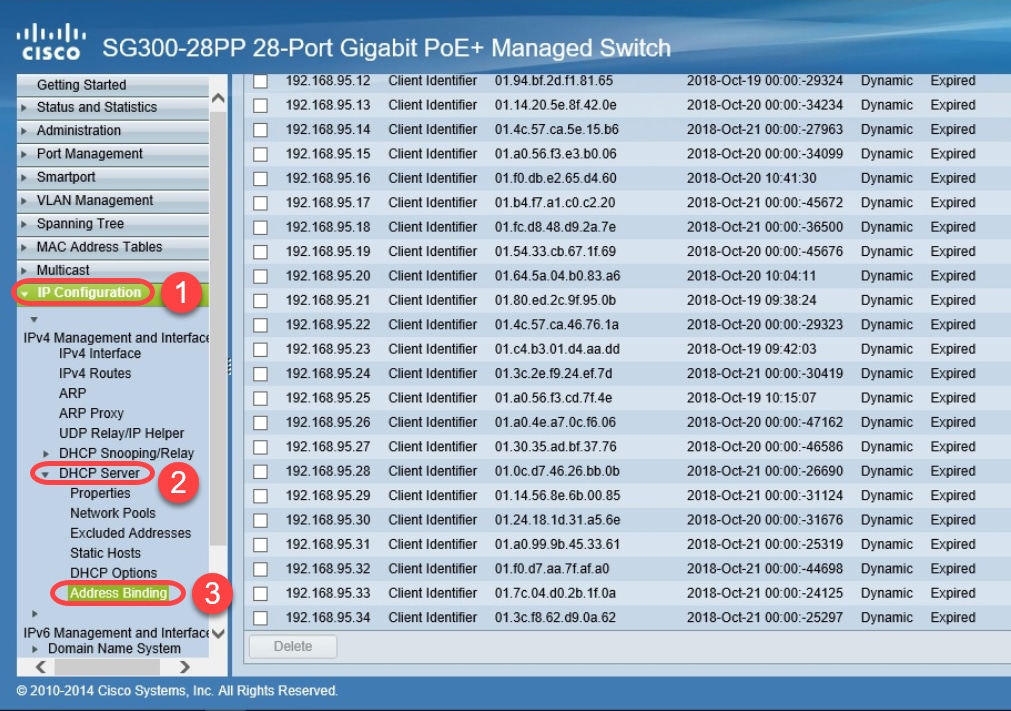
Step 4. Navigate to IP Configuration > DHCP Server > Address Binding to see the expired client details. By default, DHCP leased time is configured for one day. Once the leased time has expired for a DHCP client and the client is disconnected from the network, the switch will still hold that entry as Expired status for a period of time.
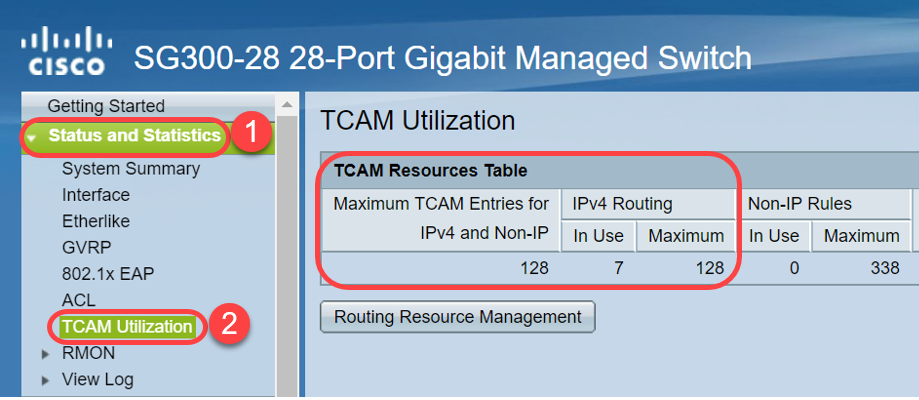
Step 5. Navigate to Status and Statistics > TCAM Utilization and verify the Maximum TCAM Entries for IPv4 and Non-IP. Ternary Content-Addressable Memory (TCAM) is the memory in a switch that builds and looks up MAC address tables. By default, the Maximum ARP table size is 128 entries. When the switch is in Layer 3 mode, ARP timeout is set to 60000 seconds by default as well. When the ARP table reaches its maximum capacity, the switch will stop learning new MAC addresses until inactive (expired) MAC addresses are cleared.
Option 1: Configure the Switch to Clear the ARP Table More Often
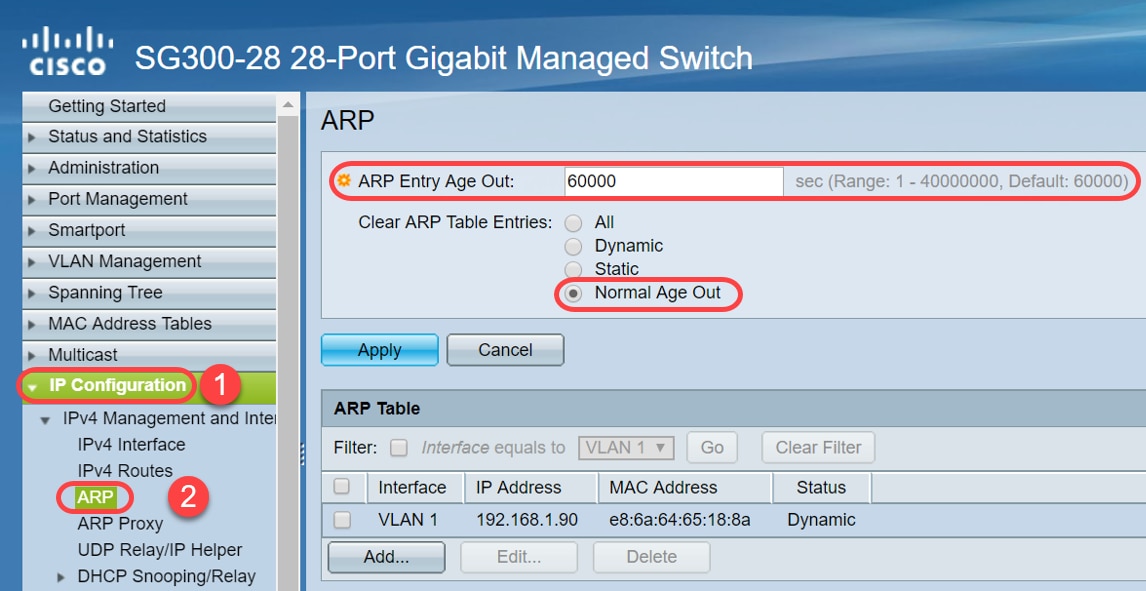
Clearing ARP table will allow new DHCP clients to get an IP address from the DHCP pool. To do this you can reduce the ARP timeout settings to 300 seconds from the default of 60,000 seconds. This will clear expired MAC addresses from the ARP table more frequently on a regular basis.
Step 1. Navigate to IP Configuration > ARP to verify the default ARP Entry Age Out is configured as 60000 and Normal Age Out option is enabled.
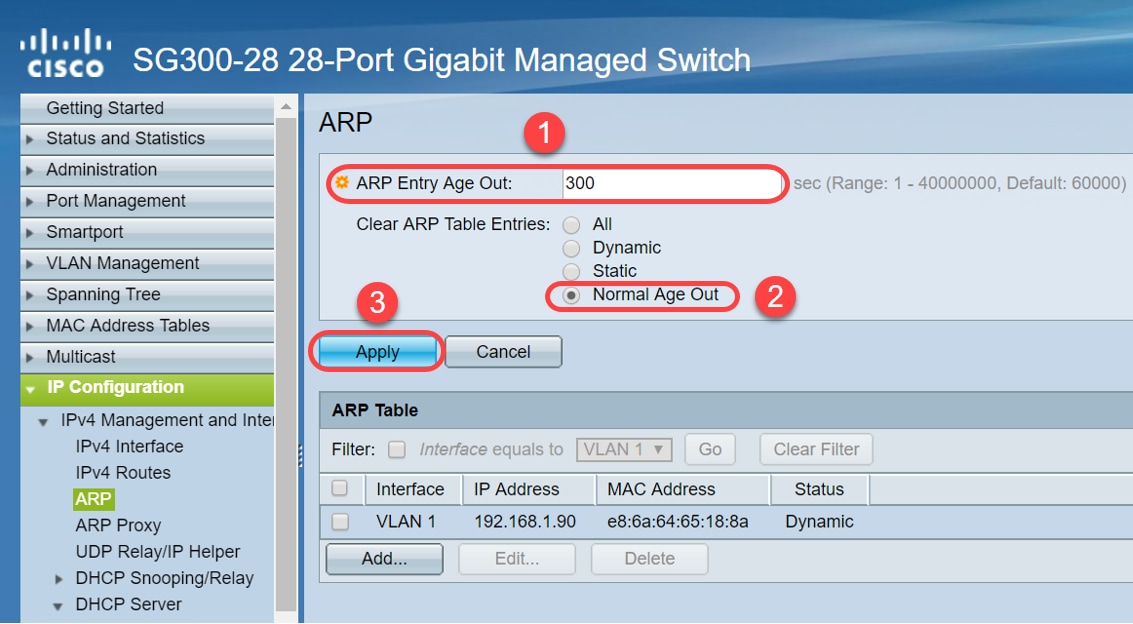
Step 2. Edit the ARP Entry Age Out value to 300 seconds, leave the Normal Age Out radio button selected by default. Click Apply.
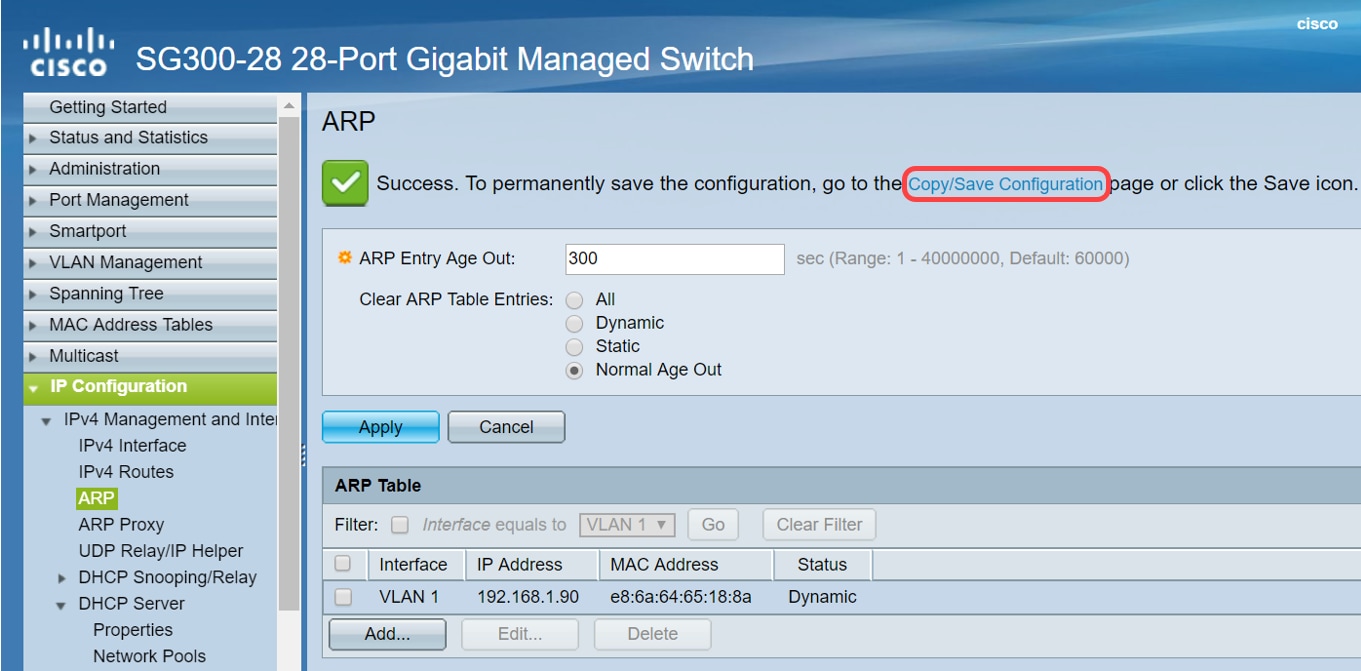
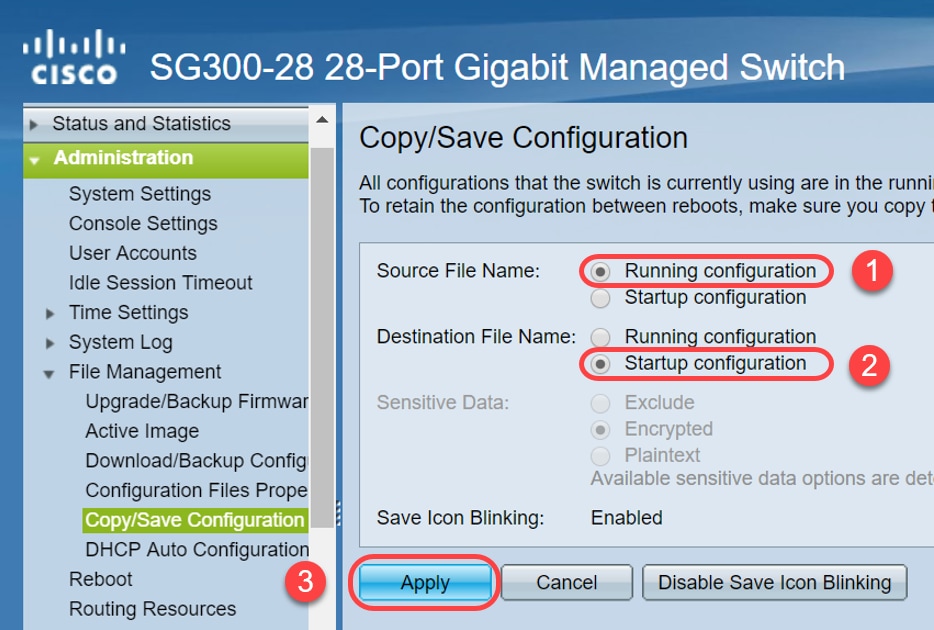
Step 3. Select Copy/Save Configuration to save the running configuration to the startup configuration. This ensures that the configuration will remain after a restart or reboot of the switch.
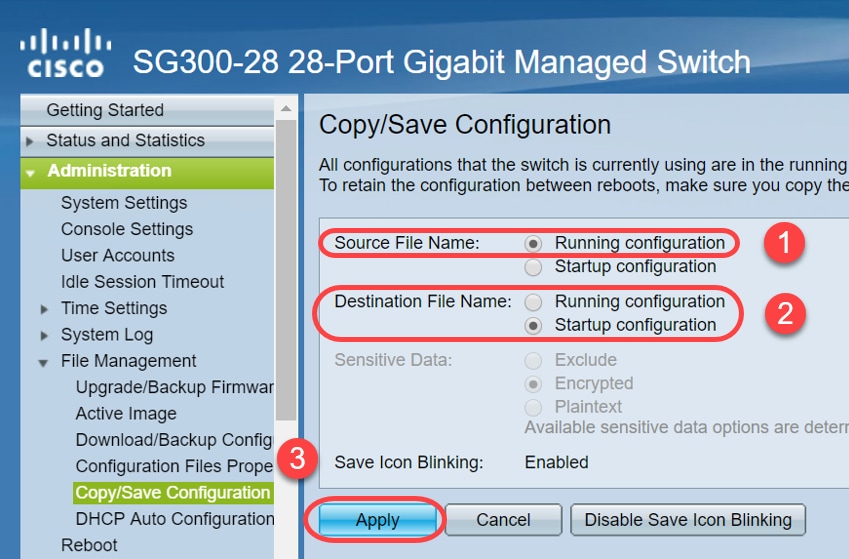
Step 4. Under Source File Name, verify Running configuration is selected. Under Destination File Name, verify Startup configuration is selected. Click Apply.
Step 5. This pop-up window will appear. Click OK to apply the new settings on the switch.

Option 2: Manually Clear the ARP List
A second option is to manually clear the list to make room for other clients to get an IP address. This action will not set up future ARP clearing as it is a manual operation. This process can be repeated whenever necessary.
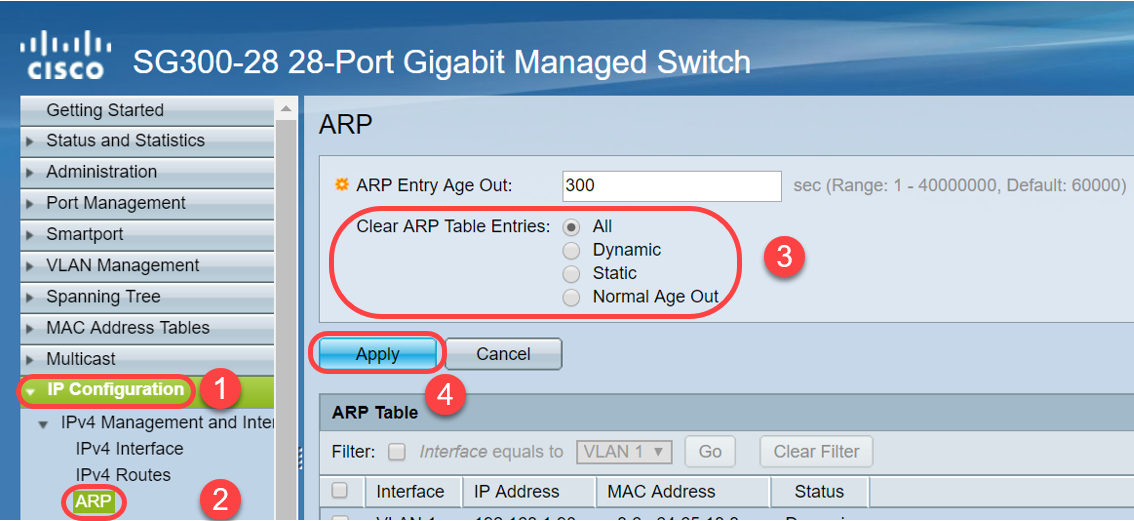
Step 1. Navigate to IP Configuration > ARP. Under Clear ARP Table Entries, select the type of ARP entries to be cleared from the system.
-
All — Deletes all of the static and dynamic addresses immediately.
-
Dynamic — Deletes all of the dynamic addresses immediately.
-
Static — Deletes all of the static addresses immediately.
-
Normal Age Out — Deletes dynamic addresses based on the configured ARP Entry Age Out time.
Note: In this example, All is selected.
Click Apply. The ARP global settings are temporarily written to the running configuration file.
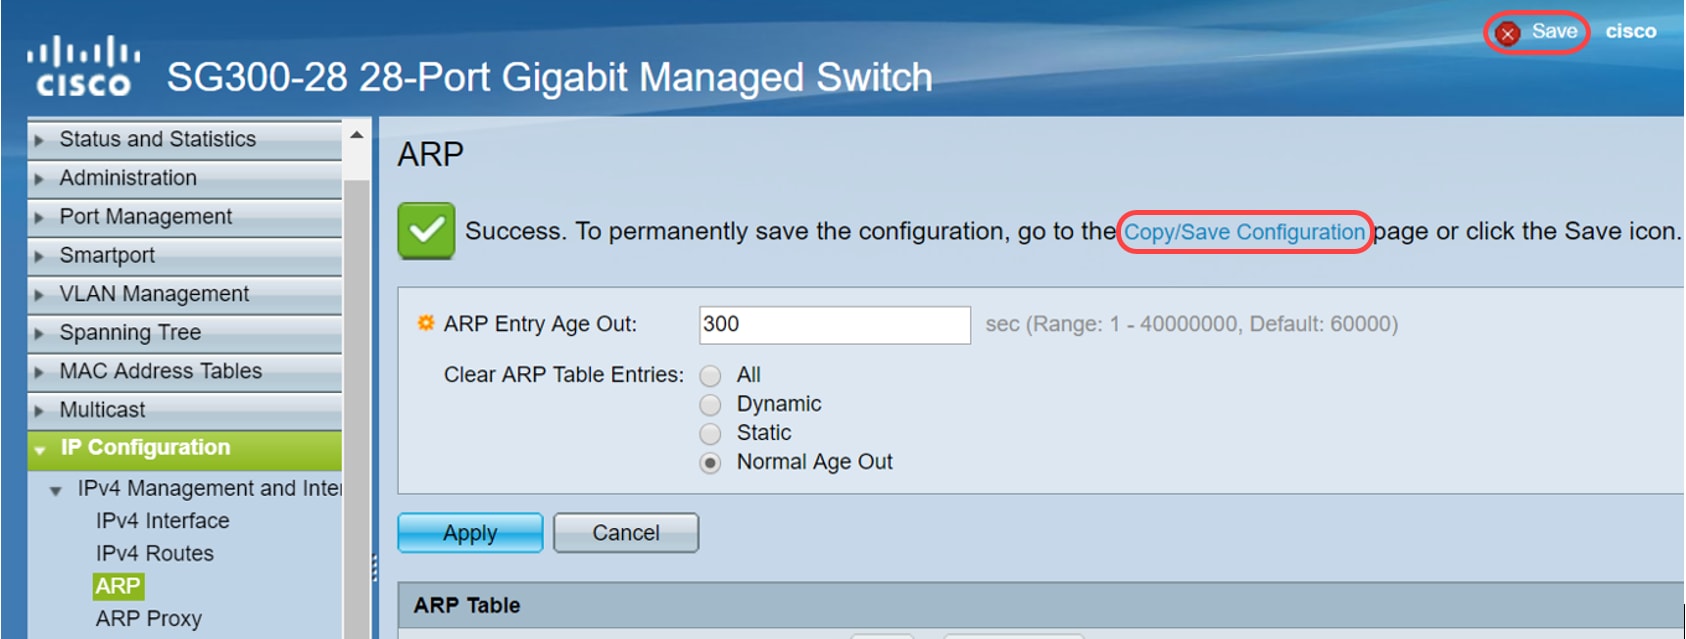
Step 2. To permanently save the configuration, click on the Copy/Save Configuration or the blinking Save icon.
Step 3. You will be redirected to Copy/Save Configuration page. Verify the Source File Name is selected as Running configuration and Destination File Name is selected as Startup configuration, click Apply.
Step 4. This pop-up window will appear. Click OK to apply the new settings on the switch.

Conclusion
You have now completed either setting the ARP table to clear more frequently or manually clearing the ARP list.
Contact Cisco
- Open a Support Case

- (Requires a Cisco Service Contract)
 Feedback