How to Import Certificate on Sx350 and Sx550X Series Switches
Available Languages
Objective
This objective of this document is to provide the steps to successfully import a certificate on Sx350 and Sx550X series switches using the Graphical User Interface (GUI) and the Command Line Interface (CLI).
Table of Contents
Introduction
One of the issues encountered when importing a certificate on Sx350 and Sx550X switches is that the user faces key header is missing and/or failed to load public key errors. This document will explain how to get past these errors to successfully import a certificate. A certificate is an electronic document that identifies an individual, a server, a company, or other entity and associates that entity with a public key. Certificates are used in a network to provide secure access. Certificates can be self-signed or digitally signed by an external Certificate Authority (CA). A self-signed certificate, as the name indicates, is signed by its own creator. CAs manage certificate requests and issue certificates to participating entities such as hosts, network devices, or users. A CA-signed digital certificate is considered industry standard and more secure.
Applicable Devices and Software Version
SG350 version 2.5.0.83
SG350X version 2.5.0.83
SG350XG version 2.5.0.83
SF350 version 2.5.0.83
SG550X version 2.5.0.83
SF550X version 2.5.0.83
SG550XG version 2.5.0.83
SX550X version 2.5.0.83
Prerequisites
You must have a self-signed or Certificate Authority (CA) certificate. Steps for obtaining a self-signed certificate are included in this article. To learn more about CA certificates, click here.
Import using GUI
Step 1
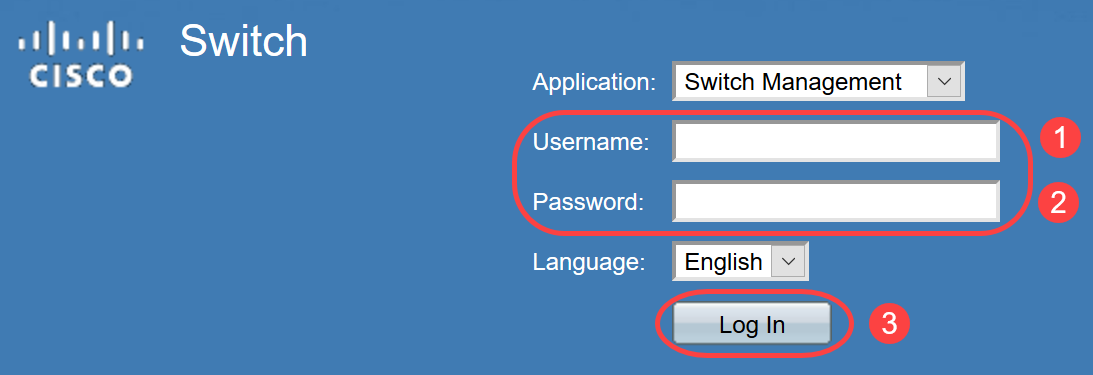
Log in to the GUI of the switch by entering your Username and Password. Click Log In.

Step 2
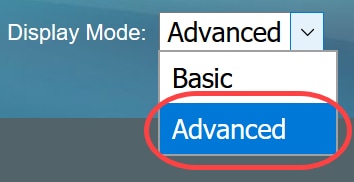
From the Display Mode on the top right side of the GUI, choose Advanced using the drop-down option.

Step 3
Navigate to Security > SSL Server > SSL Server Authentication.

Step 4
Select one of the certificates that is Auto Generated. Select the Certificate ID 1 or 2 and click on the Edit button.

Step 5
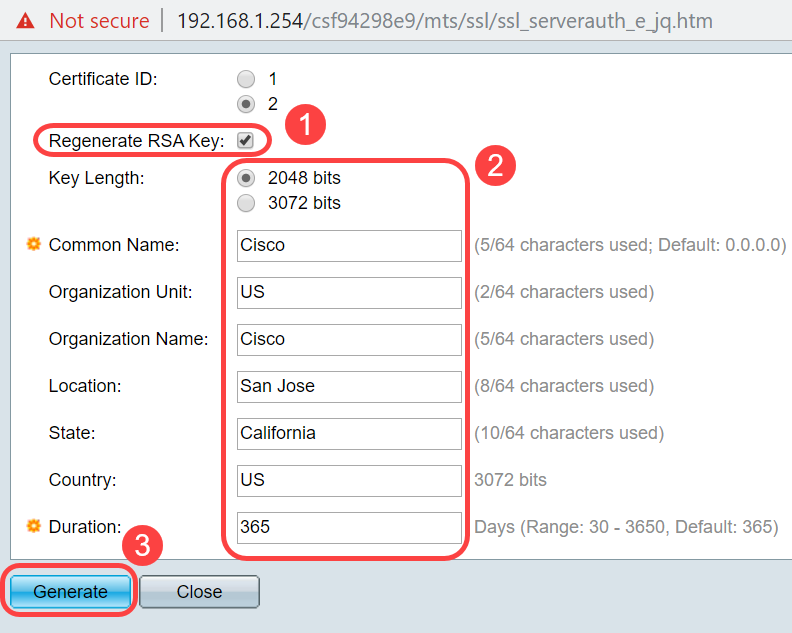
To generate a self-signed certificate, on the new pop-up window enable Regenerate RSA Key and enter the following parameters:
Key Length
Common Name
Organization Unit
Organization Name
Location
State
Country
Duration
Click Generate.

You may also create a certificate from a third-party CA.
Step 6
Now you will be able to see the User Defined certificate under the SSL Server Key Table. Select the newly created certificate and click on Details.

Step 7
On the pop-up window you will be able to see the Certificate, Public Key and Private Key (Encrypted) details. You may copy those on a separate notepad file. Click Display Sensitive Data as Plaintext.

Step 8
A pop-up window will open to confirm the display of Private Key as plaintext, click OK.

Step 9
Now you will be able to see the Private Key in plaintext form. Copy that plaintext output on a notepad file. Click Close.

Step 10
Select the newly created User Defined certificate and click Import Certificate.

Step 11
On the new pop-up window, enable Import RSA Key-Pair option and paste the private key (copied in step 9) in plaintext format. Click Apply.

In this example the key word, RSA, is included at the BEGIN and END of the Public Key.
Step 12
You will see the success notification on the screen. You may close this window and save the configuration on the switch.

Possible Errors
The errors discussed pertain to the public key. Normally there are two types of public key formats that are used:
1. RSA Public Key file (PKCS#1): This is specific for RSA keys.
It starts and ends with the tags:
-----BEGIN RSA PUBLIC KEY-----
BASE64 ENCODED DATA
-----END RSA PUBLIC KEY-----
2. Public Key file (PKCS#8): This is a more generic key format that identifies the type of public key and contains the relevant data.
It starts and ends with the tags:
-----BEGIN PUBLIC KEY-----
BASE64 ENCODED DATA
-----END PUBLIC KEY-----
Key header is missing error
Scenario 1: You generated the certificate from a third-party CA. You copied and pasted the Public Key and clicked Apply.

You received the message, Error: Key header is missing. Close the window. A few modifications can be made to make this problem disappear.

To fix this error:
Add the key word, RSA, to the beginning of the Public Key: BEGIN RSA PUBLIC KEY
Add the key word, RSA, to the end of the Public Key: END RSA PUBLIC KEY
Remove the first 32 characters from the key code. The highlighted portion shown below is an example of the first 32 characters.

When you apply the settings, you will not get the Key header is missing error in most cases.
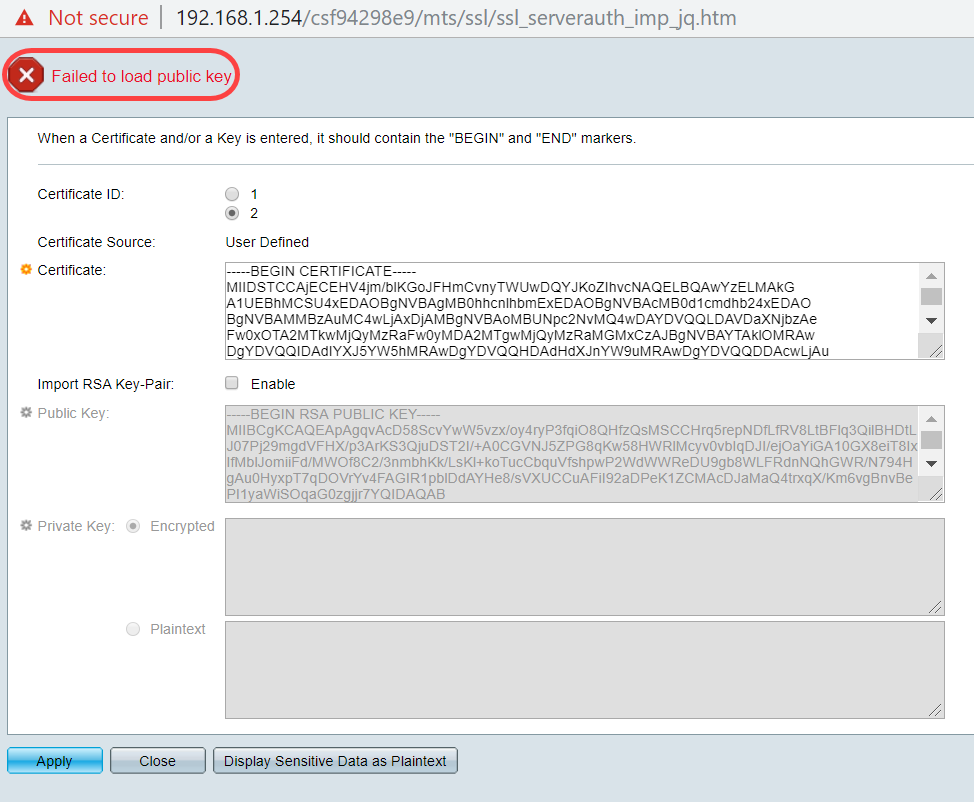
Failed to load public key error
Scenario 2: You generated a certificate on one switch and imported it onto another switch. You copied and pasted the Public Key after removing the first 32 characters and clicked Apply.

You got the Failed to load public key error on the screen.

To fix this error, DO NOT delete the first 32 characters of the public key in this case.

Import using CLI
Step 1
To import certificate using CLI, enter the following command.
switch(config)#crypto certificate [certificate number] importCertificate 2 is imported in this example.
switch(config)#crypto certificate 2 importStep 2
Paste the input; add a period (.) on a separate line after the input.
-----BEGIN RSA PRIVATE KEY-----MIIEvgIBADANBgkqhkiG9w0BAQEFAASCBKgwggSkAgEAAoIBAQC/rZQ6f0rj8neA
...truncated 24 lines....
h27Zh+aWX7dxakaoF5QokBTqWDHcMAvNluwGiZ/O3BQYgSiI+SYrZXAbUiSvfIR4
NC1WqkWzML6jW+52lD/GokmU
-----END RSA PRIVATE KEY-----
-----BEGIN RSA PUBLIC KEY-----
MIIBCgKCAQEAv62UOn9K4/J3gCAk7i9nYL5zYm4kQVQhCcAo7uGblEprxdWkfT0l
...truncated 3 lines....
64jc5fzIfNnE2QpgBX/9M40E41BX5Z0B/QIDAQAB
-----END RSA PUBLIC KEY-----
-----BEGIN CERTIFICATE-----
MIIFvTCCBKWgAwIBAgIRAOOBWg4bkStdWPvCNYjHpbYwDQYJKoZIhvcNAQELBQAw
---truncated 28 lines...
8S+39m9wPAOZipI0JA1/0IeG7ChLWOXKncMeZWVTIUZaEwVFf0cUzqXwOJcsTrMV
JDPtnbKXG56w0Trecu6UQ9HsUBoDQnlsN5ZBHt1VyjAP
-----END CERTIFICATE-----
.
Certificate imported successfully
Issued by : C=xx, ST=Gxxxxx, L=xx, O=xx CA Limited, CN=xx RSA Organization Validation Secure Server CA
Valid From: Jun 14 00:00:00 2017 GMT
Valid to: Sep 11 23:59:59 2020 GMT
Subject: C=DE/postalCode=xxx, ST=xx, L=xx/street=xxx 2, O=xxx , OU=IT, CN=*.kowi.eu
SHA Fingerprint: xxxxxx
Conclusion
You have now learned the steps to successfully import a certificate on the Sx350 and Sx550X series switches using the GUI and CLI.