RADIUS Configuration on the 200/300 Series Managed Switches
Available Languages
Objective
Remote Authorization Dial-In User Service (RADIUS) is a security service used for authentication of users in networks with centralized security architecture. The 200/300 Series Managed Switches can act as a RADIUS client in your network, and, in conjunction with a RADIUS server, you can establish a centralized system for authentication of users in your network. This article explains how to configure a RADIUS server and to apply authentication methods on the 200/300 Series Managed Switches.
Applicable Devices | Software Version
- SF/SG 200 Series - 1.2.9.x
- SF/SG 300 Series - 1.2.9.x
RADIUS Default Configuration
This section guides you through the default configuration of a RADIUS server. These default values can be used for any RADIUS server you want to add to a switch.
Step 1
Log in to the web configuration utility and choose Security > RADIUS. The RADIUS page opens:
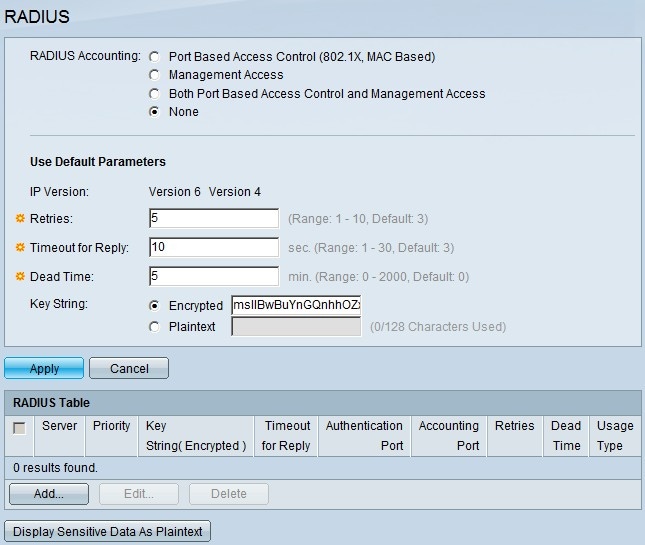
Images in this article are from a SG300 model switch.
Step 2
In the RADIUS Accounting field, click one of the following:
- Port Based Access Control (802.1x, MAC Based) - To use the RADIUS server for 802.1x port accounting.
- Management Access - To use the RADIUS server for login accounting.
- Both Port Based Access control and Management Access - To use the RADIUS server for both 802.1x and login accounting.
- None - To not use the RADIUS server for accounting purposes.
Radius Accounting is not available on the SG200 series switches.
Step 3
In the Use Default Parameters section, In the Retries field, enter the number of retries the switch made to authenticate the RADIUS server.
Step 4
In the Timeout for Reply field, enter the time in seconds for each authentication attempt made to the RADIUS Server.
Step 5
In the Dead Time field, enter the time in minutes before the switch declares a non-responsive RADIUS server as dead and moves to the next available server for attempt connection.
Step 6
In the Key String field, enter the key used for authentication and encryption between the switch and the RADIUS server. This key must match on both the RADIUS server and the switch. Click one of the following:
- Encrypted - If you have an encrypted key from another device, enter the key.
- Plaintext - If you do not have an encrypted key from another device, then enter the key as a plain text.
Step 7
Click Apply to save these default values and make them available for a RADIUS server.
Add/Edit a RADIUS Server
In this section, a step-by-step procedure is given that explains how to add or edit a RADIUS server to a 200/300 Series Managed Switches.
Step 1
Log in to the web configuration utility and choose Security > RADIUS. The RADIUS page opens:

Step 2
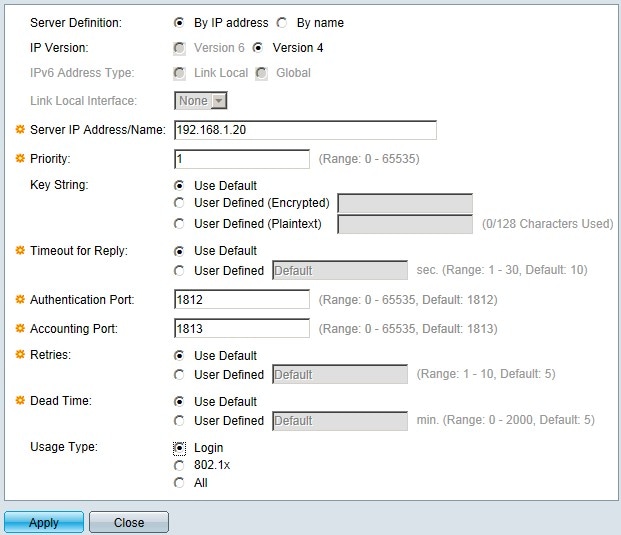
In the RADIUS Table section, click Add. The Add Radius Server window appears.
To edit a current Radius server, click Edit and edit the desired properties of the RADIUS server.
Step 3
In the Server Definition field, click one of the following:
- By Name - If the RADIUS server is defined with a name.
- By IP Address - If the RADIUS server is defined with an IP address.
Step 4
In the IP Version field, click Version 6 or Version 4 as the type of IP address of the RADIUS server.
Step 5
If Version 6 is chosen as the IP address in the IPv6 address type, click one of the following:
- Link Local - An IPv6 address that only identifies hosts on a single network link.
- Global - An IPv6 address that is reachable from other networks.
Step 6
If Link Local is chosen as the IPv6 address type, in the Link Local Interface drop-down list, choose the appropriate interface.
Step 7
In the Server IP Address/Name field, enter the IP address or name of the RADIUS server.
Step 8
In the Priority field, enter the priority of the RADIUS server the switch will use. The server with the highest priority is queried first in the switch. Zero (0) gives the highest priority.
Step 9
In the Key String field, click one of the following:
- Use Default - To use the default key for authentication.
- User Defined (Encrypted) - If available, enter the encrypted key.
- User Defined (Plaintext) - If not available, enter the key as a plain text.
Step 10
In the Timeout for Reply field, click one of the following:
- Use Default - To use the default value.
- User Defined - Enter the number in seconds the switch waits for each attempt to connect to the RADIUS server.
Step 11
In the Authentication Port field, enter the UDP port the RADIUS server uses for authentication.
Step 12
In the Accounting Port field, enter the UDP port the RADIUS server uses for accounting.
Step 13
In the Retries field, click one of the following:
- Use Default - To use the default value.
- User Defined - To use a different value. Enter the number of tries the switch makes before a failure connection to the RADIUS server is considered to have occurred.
Step 14
In the Dead Time field, click one of the following:
- Use Default - To use the default value.
- User Defined - To use a different value. Enter the time in minutes before the switch declares a non-responsive RADIUS server as dead and moves to the next available server for attempt connection.
Step 15
In the Usage Type field, click one of the following:
- Login - Authenticates the administrators of the switch.
- 802.1x - The RADIUS Server will check the security credentials of users who request network access based on the 802.1x Port-based Network Access Control (PNAC) scheme.
- All - Uses both types of authentications.
Step 16
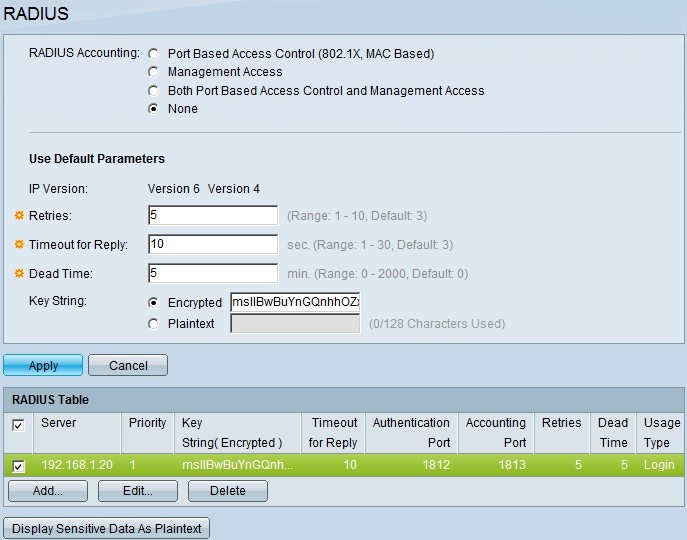
Click Apply.
Step 17
(Optional) To delete a RADIUS server, in the RADIUS Table section, check the check box of the RADIUS server you want to delete and click Delete.
RADIUS Authentication
Once the RADIUS server is configured appropriately, you need to authenticate it on the switch. This section explains how to authenticate a RADIUS server on the 200/300 Series Managed Switches.
Step 1
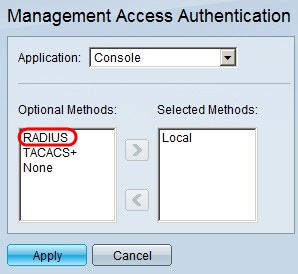
Log in to the web configuration utility and choose Security > Management Access Authentication. The Management Access Authentication page opens:
Step 2
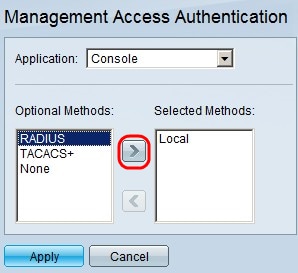
In the Optional Methods list, choose RADIUS.
Step 3
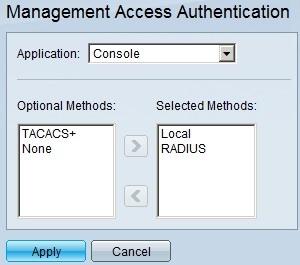
Click the > button.
Step 4
Click Apply.
Revision History
| Revision | Publish Date | Comments |
|---|---|---|
2.0 |
21-Apr-2022 |
Updated Content |
1.0 |
10-Dec-2018 |
Initial Release |
 Feedback