Configure Static MAC Addresses on the 200/300 Series Managed Switches
Available Languages
Objective
A Media Access Control address (MAC address) is a unique identifier assigned to network interfaces for communication on the physical network segment. The 200/300 Series Managed Switches allows you to configure a static MAC address. Static MAC addresses offer security to a specific interface. With static MAC addresses, you can ensure that on any particular interface, the switch will only listen to traffic from the specific static MAC address. All other traffic from other MAC addresses that comes through that interface will be dropped by the switch.
The objective of this article is to explain how to configure static MAC addresses on the 200/300 Series Managed Switches.
Applicable Devices
• SF/SG 200 and SF/SG 300 Series Managed Switches
Software Version
• 1.3.0.62
Static MAC Address
Step 1. Log in to the web configuration utility and choose MAC Address Tables>Static Addresses. The Static Addresses page opens:

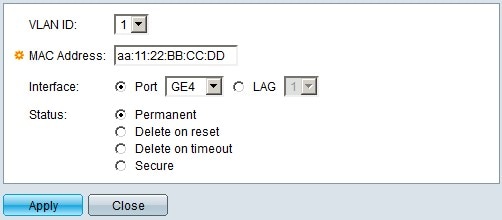
Step 2. Click Add. The Add Static Address window opens:

Step 3. In the VLAN drop-down list within the VLAN ID field, choose the VLAN you want to apply to the static MAC address.
Step 4. In the MAC Address field, enter the MAC address.
Step 5. In the Interface field, choose the desired radio button.
• Port — In the Port drop-down list, choose the desired port to apply the static MAC address.
• LAG —In the Link Aggregation Group (LAG) drop-down list, choose the desire LAG to apply the static MAC address.
Step 6. In the Status field, choose the desired radio button.
• Permanent — This sets the static MAC address permanently on the VLAN and interface chosen.
• Delete On Reset — The static MAC address will be deleted after a restart of the switch.
• Delete On Timeout — The static MAC address will be deleted automatically after the timeout value set on the switch.
• Secure — The static MAC address is secured if the interface is in classic lock mode. When an interface is in classic lock mode, all the mac address added to that specific interface are locked, and the interface won't learn any new MAC addresses.
Step 7. Click Apply.

Step 8. (Optional) To delete a static MAC address, check the check box of the desired MAC address and click Delete.
Revision History
| Revision | Publish Date | Comments |
|---|---|---|
1.0 |
13-Dec-2018 |
Initial Release |
 Feedback