Configure Secure Shell (SSH) Server Authentication Settings on a Switch
Available Languages
Objective
This article provides instructions on how to configure server authentication on a managed switch, not how to connect to the switch. For an article on connecting to a switch via SSH + Putty, please click here to view that article.
Secure Shell (SSH) is a protocol that provides a secure remote connection to specific network devices. This connection provides functionality that is similar to a Telnet connection, except that it is encrypted. SSH allows the administrator to configure the switch through the command line interface (CLI) with a third party program.The switch acts as an SSH client that provides SSH capabilities to the users within the network. The switch uses an SSH server to provide SSH services. When SSH server authentication is disabled, the switch takes any SSH server as trusted, which decreases security on your network. If SSH service is enabled on the switch, security is enhanced.
Applicable Devices
- Sx200 Series
- Sx300 Series
- Sx350 Series
- SG350X Series
- Sx500 Series
- Sx550X Series
Software Version
- 1.4.5.02 – Sx200 Series, Sx300 Series, Sx500 Series
- 2.2.0.66 – Sx350 Series, SG350X Series, Sx550X Series
Configure SSH Server Authentication Settings
Enable SSH Service
When SSH server authentication is enabled, the SSH client running on the device authenticates the SSH server using the following authentication process:
- The device calculates the fingerprint of the received public key of the SSH server.
- The device searches the SSH Trusted Servers table for the IP address and host name of the SSH server. One of the following three outcomes can occur:
- If a match is found for both the address and host name of the server and its fingerprint, the server is authenticated.
- If a matching IP address and host name is found, but there is no matching fingerprint, the search continues. If no matching fingerprint is found, the search is completed and authentication fails.
- If no matching IP address and host name is found, the search is completed and
authentication fails.
- If the entry for the SSH server is not found in the list of trusted servers, the process fails.
Note: In order to support auto configuration of an out-of-box switch with factory default configuration, SSH server authentication is disabled by default.
Step 1. Log in to the web-based utility and choose Security > TCP/UDP Services.
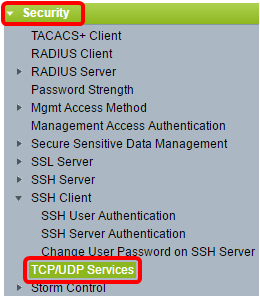
Step 2. Check the SSH Service check box to enable access of switches command prompt through SSH.
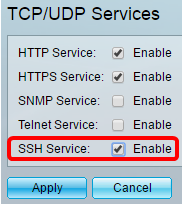
Step 3. Click Apply to enable the SSH service.
Configure SSH Server Authentication Settings
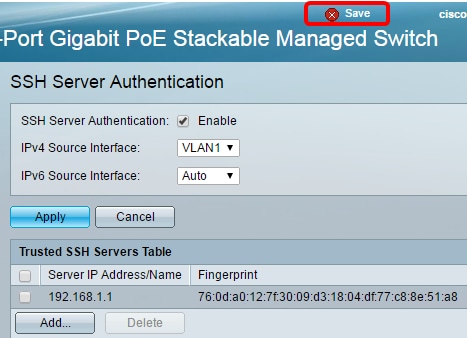
Step 1. Log in to the web-based utility and choose Security > SSH Client > SSH Server Authentication.
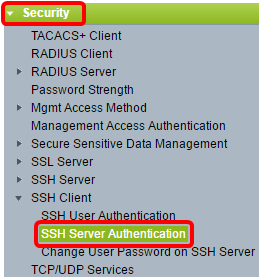
Note: If you have an Sx350, SG300X, or Sx500X, switch to Advanced mode by choosing Advanced from the Display Mode drop-down list.
Step 2. Check the Enable SSH Server Authentication check box to enable SSH server authentication.
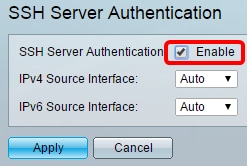
Step 3. (Optional) In the IPv4 Source Interface drop-down list, choose the source interface whose IPv4 address will be used as the source IPv4 address for messages used in communication with IPv4 SSH servers.

Note: If the Auto option is chosen, the system takes the source IP address from the IP address defined on the outgoing interface. In this example, VLAN1 is chosen.
Step 4. (Optional) In the IPv6 Source Interface drop-down list, choose the source interface whose IPv6 address will be used as the source IPv6 address for messages used in communication with IPv6 SSH servers.
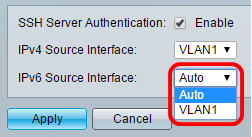
Note: In this example, the Auto option is chosen. The system will take the source IP address from the IP address defined on the outgoing interface.
Step 5. Click Apply.
Step 6. To add a trusted server, click Add under the Trusted SSH Servers Table.
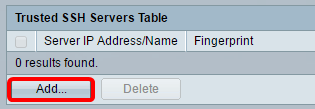
Step 7. In the Receiver Definition area, click one of the available methods to define the SSH server:
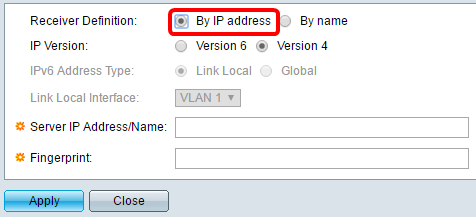
The options are:
- By IP Address — This option lets you define the SSH server with an IP address.
- By Name —This option lets you define the SSH server with a fully qualified domain name.
Note: In this example, By IP address is chosen. If By name is chosen, skip to Step 11.
Step 8. (Optional) If you chose By IP address in Step 6, click the IP version of the SSH server in the IP Version field.

The available options are:
- Version 6 — This option lets you enter an IPv6 address.
- Version 4 — This option lets you enter an IPv4 address.
Note: In this example, Version 4 is chosen. The IPv6 radio button is available only if an IPv6 address is configured in the switch.
Step 9. (Optional) If you chose Version 6 as the IP address version in Step 7, then click the type of the IPv6 address in IPv6 Address Type.

The available options are:
- Link Local — The IPv6 address uniquely identifies hosts on a single network link. A link local address has a prefix of FE80, is not routable, and can be used for communication only on the local network. Only one link local address is supported. If a link local address exists on the interface, this entry replaces the address in the configuration. This option is chosen by default.
- Global — The IPv6 address is a global unicast that is visible and reachable from other networks.
Step 10. (Optional) If you chose Link Local as the IPv6 address type in Step 9, choose the appropriate interface in the Link Local Interface drop-down list.
Step 11. In the Server IP Address/Name field, enter the IP address or the domain name of the SSH server.

Note: In this example, an IP address is entered.
Step 12. In the Fingerprint field, enter the fingerprint of the SSH server. A fingerprint is an encrypted key used for authentication. In this case, the fingerprint is used to authenticate the validity of the SSH server. If there is a match between the server IP address/Name and the fingerprint, then the SSH server is authenticated.
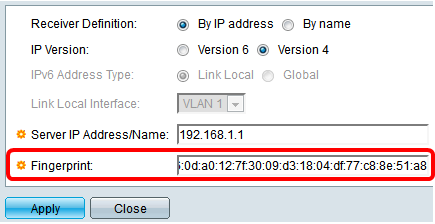
Step 13. Click Apply to save your configuration.
Step 14. (Optional) To delete an SSH server, check the check box of the server you wish to delete, and then click Delete.

Step 15. (Optional) Click the Save button at the top portion of the page to save the changes to the startup configuration file.
You should now have configured the SSH server authentication settings on your managed switch.
Revision History
| Revision | Publish Date | Comments |
|---|---|---|
1.0 |
13-Dec-2018 |
Initial Release |
 Feedback