Configure Option 125 on a Server to Allow Dynamic Host Configuration Protocol (DHCP) Auto Image Updates on a Switch
Available Languages
Objective
Scenario:
Managing multiple or stacked switches in the network could be very challenging to maintain, especially if you have to add a new switch to the network, apply new configuration settings, or update each switch to its latest image version. You would want to find a way to allow the switches to automatically update their own images.
If you have enabled and configured the Dynamic Host Configuration Protocol (DHCP) Auto Configuration and Auto Image Update features to automatically update the firmware and configurations on a switch that is connected to a server which serves as a DHCP server. However, after configuring DHCP-based auto update, the switch did not download and apply the latest image.
Solution:
Enabling the DHCP image upgrade features to download both a new image and a new configuration file to one or more switches in the network is very helpful in making sure that each new switch added to the network receives the same image and configuration. These features function properly only when the DHCP server is configured to assign the host IP address dynamically. By default, the switch is enabled as a DHCP client when the Auto Configuration feature is enabled. If Image Auto Update is enabled, the flash image is downloaded and updated. If the new configuration is downloaded to a switch that already has a configuration, the downloaded configuration is appended to the configuration file stored on the switch.
Auto image download is done using an indirect image file. The indirect Image file is a text file that contains the path to the actual image file which is uploaded on a TFTP or SCP server. To provide the indirect image file name, Option 125 needs to be configured with the following parameters on the DHCP server:
- enterprise-number (4 octets) — Hex (0000.0009)
- sub-option-code (1 octet) — Hex (05)
- File name that points to the indirect image (ASCII to Hex)
This article provides instructions on how to configure Option 125 on the server to relay DHCP addresses correctly and make auto image update work on the switch.
Note: Before you proceed, you can verify if you have correctly configured the DHCP Image Upgrade Settings on your switch. For step-by-step instructions, click here.
Applicable Devices
- Sx200 Series
- Sx250 Series
- Sx300 Series
- Sx350 Series
- SG350X Series
- Sx500 Series
- Sx550X Series
Configure Option 125
Add Option 125 in your Server
Important: Make sure that there is an active DHCP server running in your Linux or Windows server.
Note: In this scenario, Windows Server 2012 R2 is used.
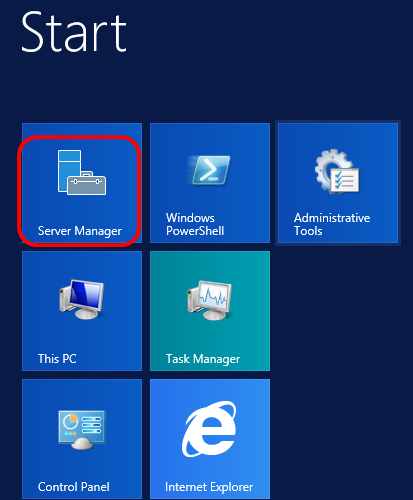
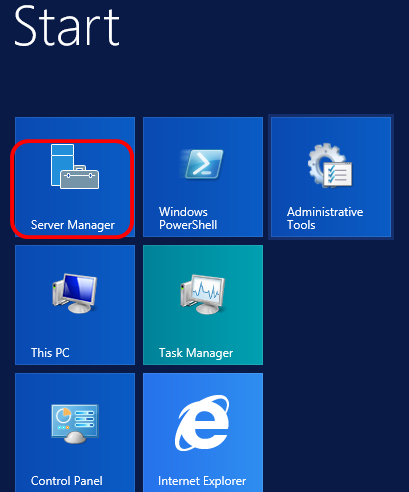
Step 1. Click Start > Server Manager.
Step 2. Right-click on the server name then click DHCP Manager.
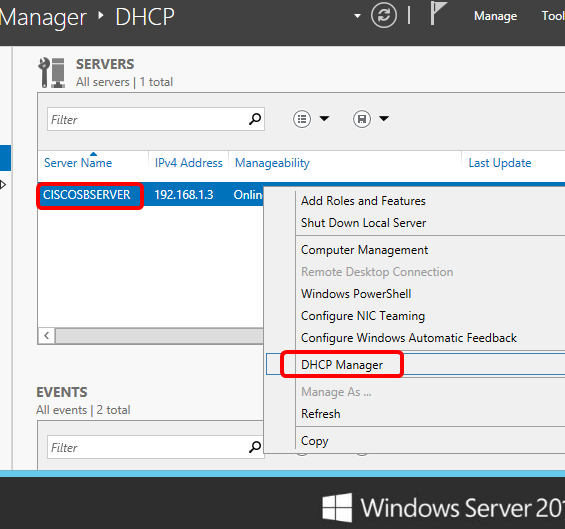
Note: In this example, CISCOSBSERVER is the server name.
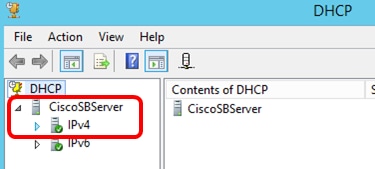
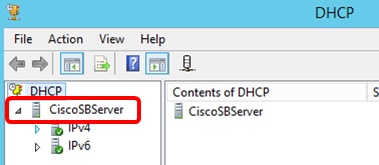
Step 3. Click the collapse button of the server name, and then click the collapse button of IPv4 to show available options.
Note: Option 125 works on IPv4 addressing only. If you want to configure DHCP Auto Image Upgrade settings on IPv6 address scope, configure Option 60 instead.
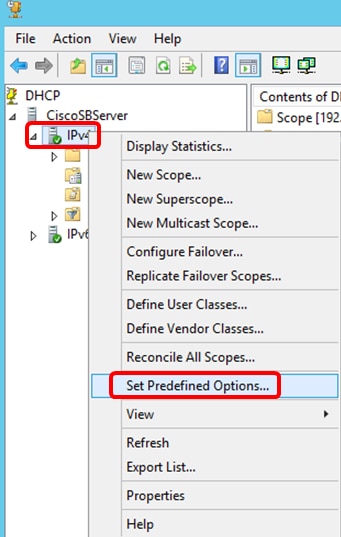
Step 4. Right-click on IPv4, and then click Set Predefined Options.
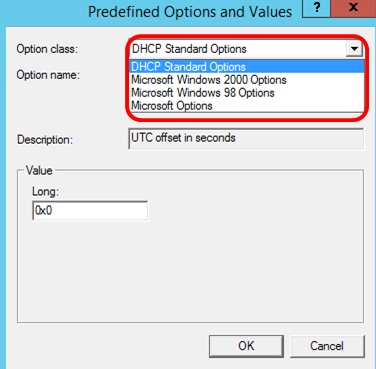
Step 5. Click DHCP Standard Options in the Option class drop-down list.
Step 6. Scroll down the Option name drop-down list to search for the option that starts with 125.
Note: By default, Option 125 is not available. If you have pre-configured Option 125, you can skip to Configure Option 125 Settings Through Netsh.
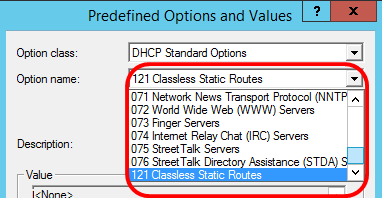
Step 7. If verified that Option 125 is not on the list, click Add.

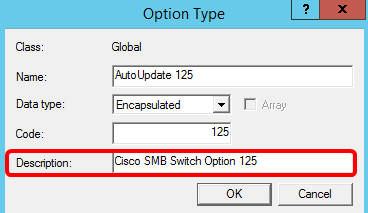
Step 8. Enter the option name in the Name field.
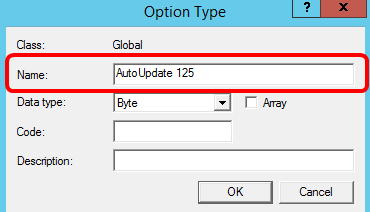
Note: In this example, AutoUpdate 125 is used.
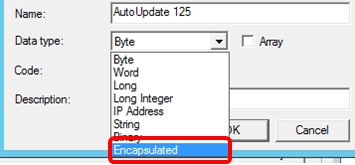
Step 9. Click Encapsulated from the Data type drop-down list.
Step 10. Enter 125 in the Code field. This code refers to the Option number indicator found at the beginning of the Option name as shown in Step 6.

Note: This code is used to create the Option 125.
Step 11. Enter the option description in the Description field and then, click OK.
Note: Cisco SMB Switch Option 125 is used as an example.
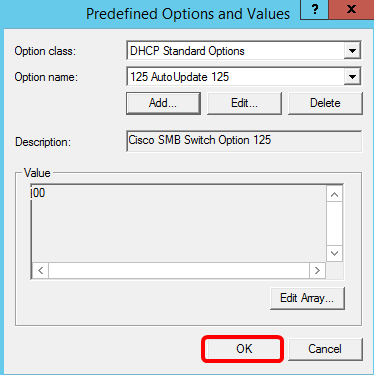
Step 12. Click OK in the Predefined Options and Values window.
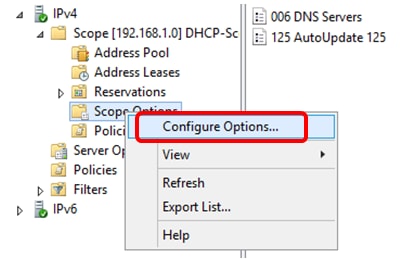
Step 13. (Optional) To verify the newly added option, choose Scope Options > Configure Options under the IP version that you have configured.
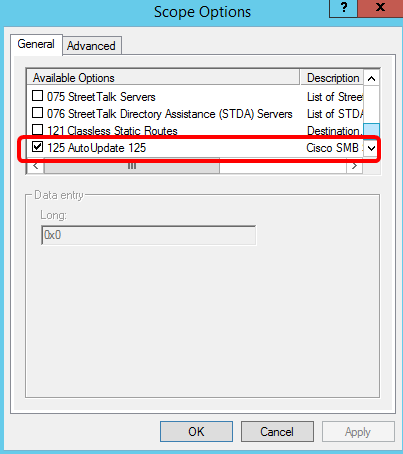
The Option 125 should now show in the list of Scope Options.
Configure Option 125 Settings Through Netsh
The proposed configuration method here uses netsh for configuring Option 125. This will allow you to run several netsh DHCP commands in the command prompt to modify the network configuration settings.
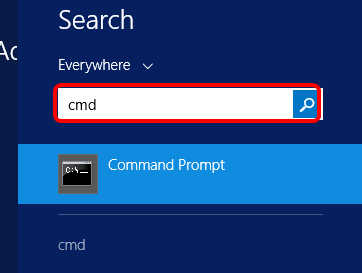
Step 1. Click Start then enter cmd in the Search box.
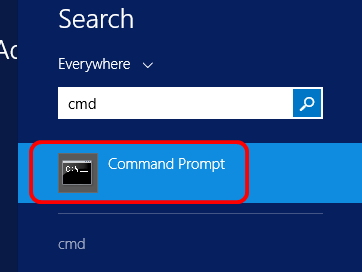
Step 2. Once the Command Prompt logo appears, click to launch.
Step 3. Change your current directory to Drive C:\ by entering the following:

Note: In this example, C:\Users\Administrator is the current directory. This may vary depending on the user name and directory on your computer.
Step 4. Access the netsh command-line utility by entering the following:

Step 5. Change to the DHCP context by entering the following:


Step 6. Shift from DHCP context to the server by entering the following:

Step 7. Enter the command scope and IP address to shift from the server context to the specified DHCP scope address and then press the Enter key. The prompt should display that current scope context has been changed.

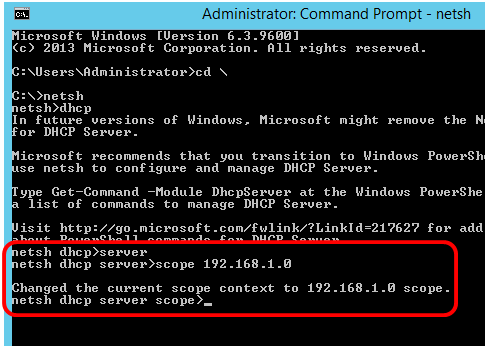
Note: In this example, the scope used is 192.168.1.0.
Step 8. Enter the command set optionvalue 125 ENCAPSULATED and the Option 125 code. After pressing Enter on your keyboard, the prompt below should display that the command has been successfully completed.

Note: In this example, 000000090805066161e2747874 is the code number used.
Option 125 Code Interpretation:
- 00-00-00-09 — Enterprise Number (Cisco Value)
- 08 — Option 125 Data Len
- 05 — Sub Option Code
- 06 — Sub Option Length
- 61-61-2E-74-78-74 — Sub Option Data ( aa.txt – ASCII to HEX conversion)
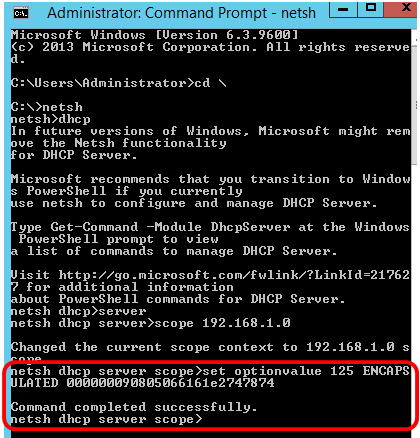
You should now have configured the Option 125 settings through netsh.
Verify Option 125 in DHCP Server
Step 1. Click Start > Server Manager.
Step 2. Right-click on the server name then click DHCP Manager.
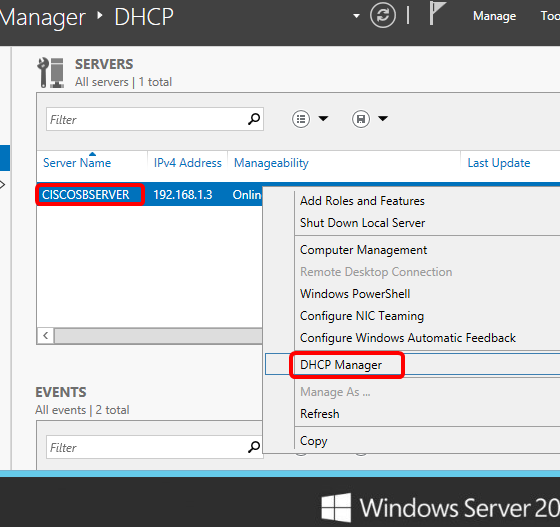
Note: In this example, CISCOSBSERVER is the server name.
Step 3. Click the collapse button of the server name to show available IP versions.
Step 4. Click the collapse button of the IP version, then click Scope Options.
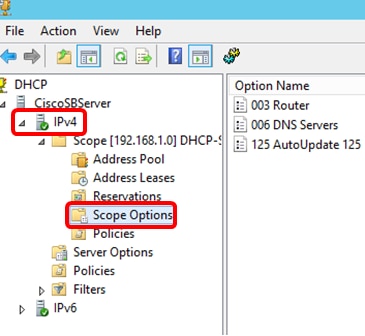
Note: In this example, IPv4 is chosen.
Step 5. Right-click on the configured Option 125, then click Properties.
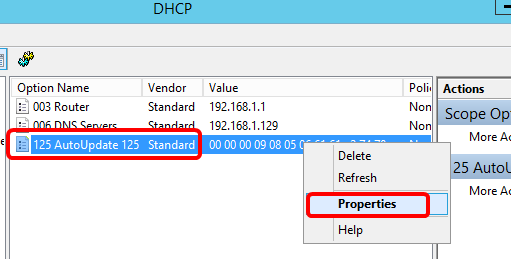
The configured Option 125 Scope Options page should display the Data, Binary, and ASCII codes in the Data entry area.
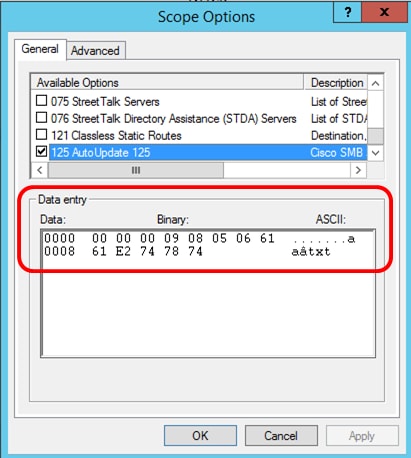
The Option 125 has now been successfully configured on your Windows Server.
Revision History
| Revision | Publish Date | Comments |
|---|---|---|
1.0 |
13-Dec-2018 |
Initial Release |
 Feedback