802.1X Host and Session Authentication Configuration on 200/220/300 Series Switches
Available Languages
Objective
802.1X is an IEEE standard for Port-based Network Access Control (PNAC) that provides an authentication method to devices that are connected to ports. The Host and Session Authentication page in the Administration GUI of your switch is used to define what authentication type is used on a per-port basis. Per-port authentication is a feature that allows a network administrator to divide the switch ports based on the desired type of authentication. The Authenticated Hosts page displays information about hosts that have been authenticated.
This article explains how to configure host and session authentication on a per-port basis and how to view the authenticated hosts in 802.1X security settings on the 200/220/300 Series Managed Switches.
Applicable Devices
- Sx200 Series
- Sx220 Series
- Sx300 Series
Software Version
- 1.4.5.02 — Sx200 Series, Sx300 Series
- 1.1.0.14 — Sx220 Series
Host and Session Authentication
Step 1. Log in to the web-based utility and choose Security > 802.1X > Host and Session Authentication.
Note: The images below are taken from the SG220-26P Smart switch.

Step 2. Click the radio button of the port that you want to edit.

Note: In this example, Port GE2 is chosen.
Step 3. Click Edit to edit host and session authentication for the specified port.

Step 4. The Edit Port Authentication window will then pop up. From the Interface drop-down list, make sure the specified port is the one you chose in Step 2. Otherwise, click the drop-down arrow and choose the right port.

Note: If you are using the 200 or 300 Series, the Edit Host and Session Authentication window appears.
Step 5. Click the radio button that corresponds to the desired authentication mode in the Host Authentication field. The options are:
- Single Host — The switch only grants a single authorized host access to the port.
- Multiple Host (802.1X) — Multiple hosts can gain access to the single port. This is the default mode. The switch requires only the first host to be authorized, thereafter all other clients that are connected to the port have access to the network. Should the authentication fail, the first host and all the attached clients are denied access to the network.
- Multiple Sessions — Multiple host can gain access to the single port, however each host must be authenticated.
Note: In this example, Single host is chosen.

Note: If you chose Multiple Host or Multiple Sessions, skip to Step 9.
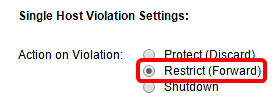
Step 6. In the single Host Violation Settings area, click the radio button that corresponds to the desired Action on Violation. A violation occurs if packets arrive from a host who has a MAC address that does not match the MAC address of the original supplicant. When this occurs, the action determines what happens to packets that arrive from hosts that are not considered the original supplicant. The options are:
- Protect (Discard) — Drops the packets. This is the default action.
- Restrict (Forward) — Gives access and forwards the packets.
- Shutdown — Blocks the packets and shuts down the port. The port remains down until reactivated or until the switch is rebooted.
Note: In this example, Restrict (Forward) is chosen.

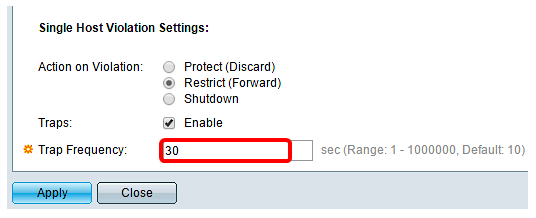
Step 7. (Optional) Check Enable in the Traps field to enable traps. Traps are generated Simple Network Management Protocol (SNMP) messages used to report system events. A trap is sent to the SNMP manager of the switch when a violation occurs.

Step 8. Enter the desired time allowed in seconds between sent traps in the Trap Frequency field. This defines how often traps are sent.
Note: In this example, 30 seconds is used.

Step 9. Click Apply.
You should now have configured Host and Session Authentication on your switch.
Viewing Authenticated Hosts
Step 1. Log in to the web-based utility and choose Security > 802.1X > Authenticated Host.

The Authenticated Hosts Table displays the following information for authenticated hosts.

- User Name — Specifies the supplicant name that was authenticated on the port.
- Port — Specifies the port number to which the supplicant is connected.
- Session Time — Specifies the entire time the supplicant was connected to the port. The format is DD:HH:MM:SS (Day:Hour:Minute:Second).
- Authentication Method — Specifies the method used to authenticate. The possible values are:
- None — Specifies that the supplicant was not authenticated.
- Radius — Specifies that the supplicant was authenticated by the RADIUS server.
- MAC Address — Specifies the MAC address of the supplicant.
- VLAN ID — Specifies which VLAN the host belongs to. The VLAN ID column is only available in the 220 Series Smart Plus Switches.
Revision History
| Revision | Publish Date | Comments |
|---|---|---|
1.0 |
10-Dec-2018 |
Initial Release |
 Feedback